Blueprints
A blueprint lets you configure an account once and reuse that setup everywhere. When a blueprint is applied, it rolls out AI employees, web chat settings, CRM fields, campaigns, automations, forms, and more to the target account in seconds, without any manual steps.
Reach for a blueprint when you are onboarding clients at scale, standardizing setup across an industry vertical, or offering SMB self-signup.
Blueprints were previously called account templates. The capability is the same, only the name has changed. Until the rename finishes rolling out you may still see the old name in some places, including the automation action and the activity it logs.
What a blueprint includes
A blueprint captures the configuration of a source account as a set of components:
- AI employees, AI capabilities, and AI tools
- Web chat widgets and settings
- Forms
- CRM custom fields, custom objects, and field layouts
- Pipelines
- Campaigns, email templates, and review request templates
- Promotions
- Automations
- Lists
Default capabilities that come with every AI employee are not listed as components.
Where to find blueprints
Go to Partner Center → Blueprints to see the blueprints your partner account owns. Filter the list by tag from the sidebar.
The list shows each blueprint's name, the version being deployed, its source account, what it contains, and the date it was created.
Create a blueprint
- Click
Create blueprint. - Pick the source account and give the blueprint a name, then click
Next. Partner Center scans the source account for everything that can be captured. - Select the components to include, then save. Creating a blueprint takes a moment while the source account is captured.
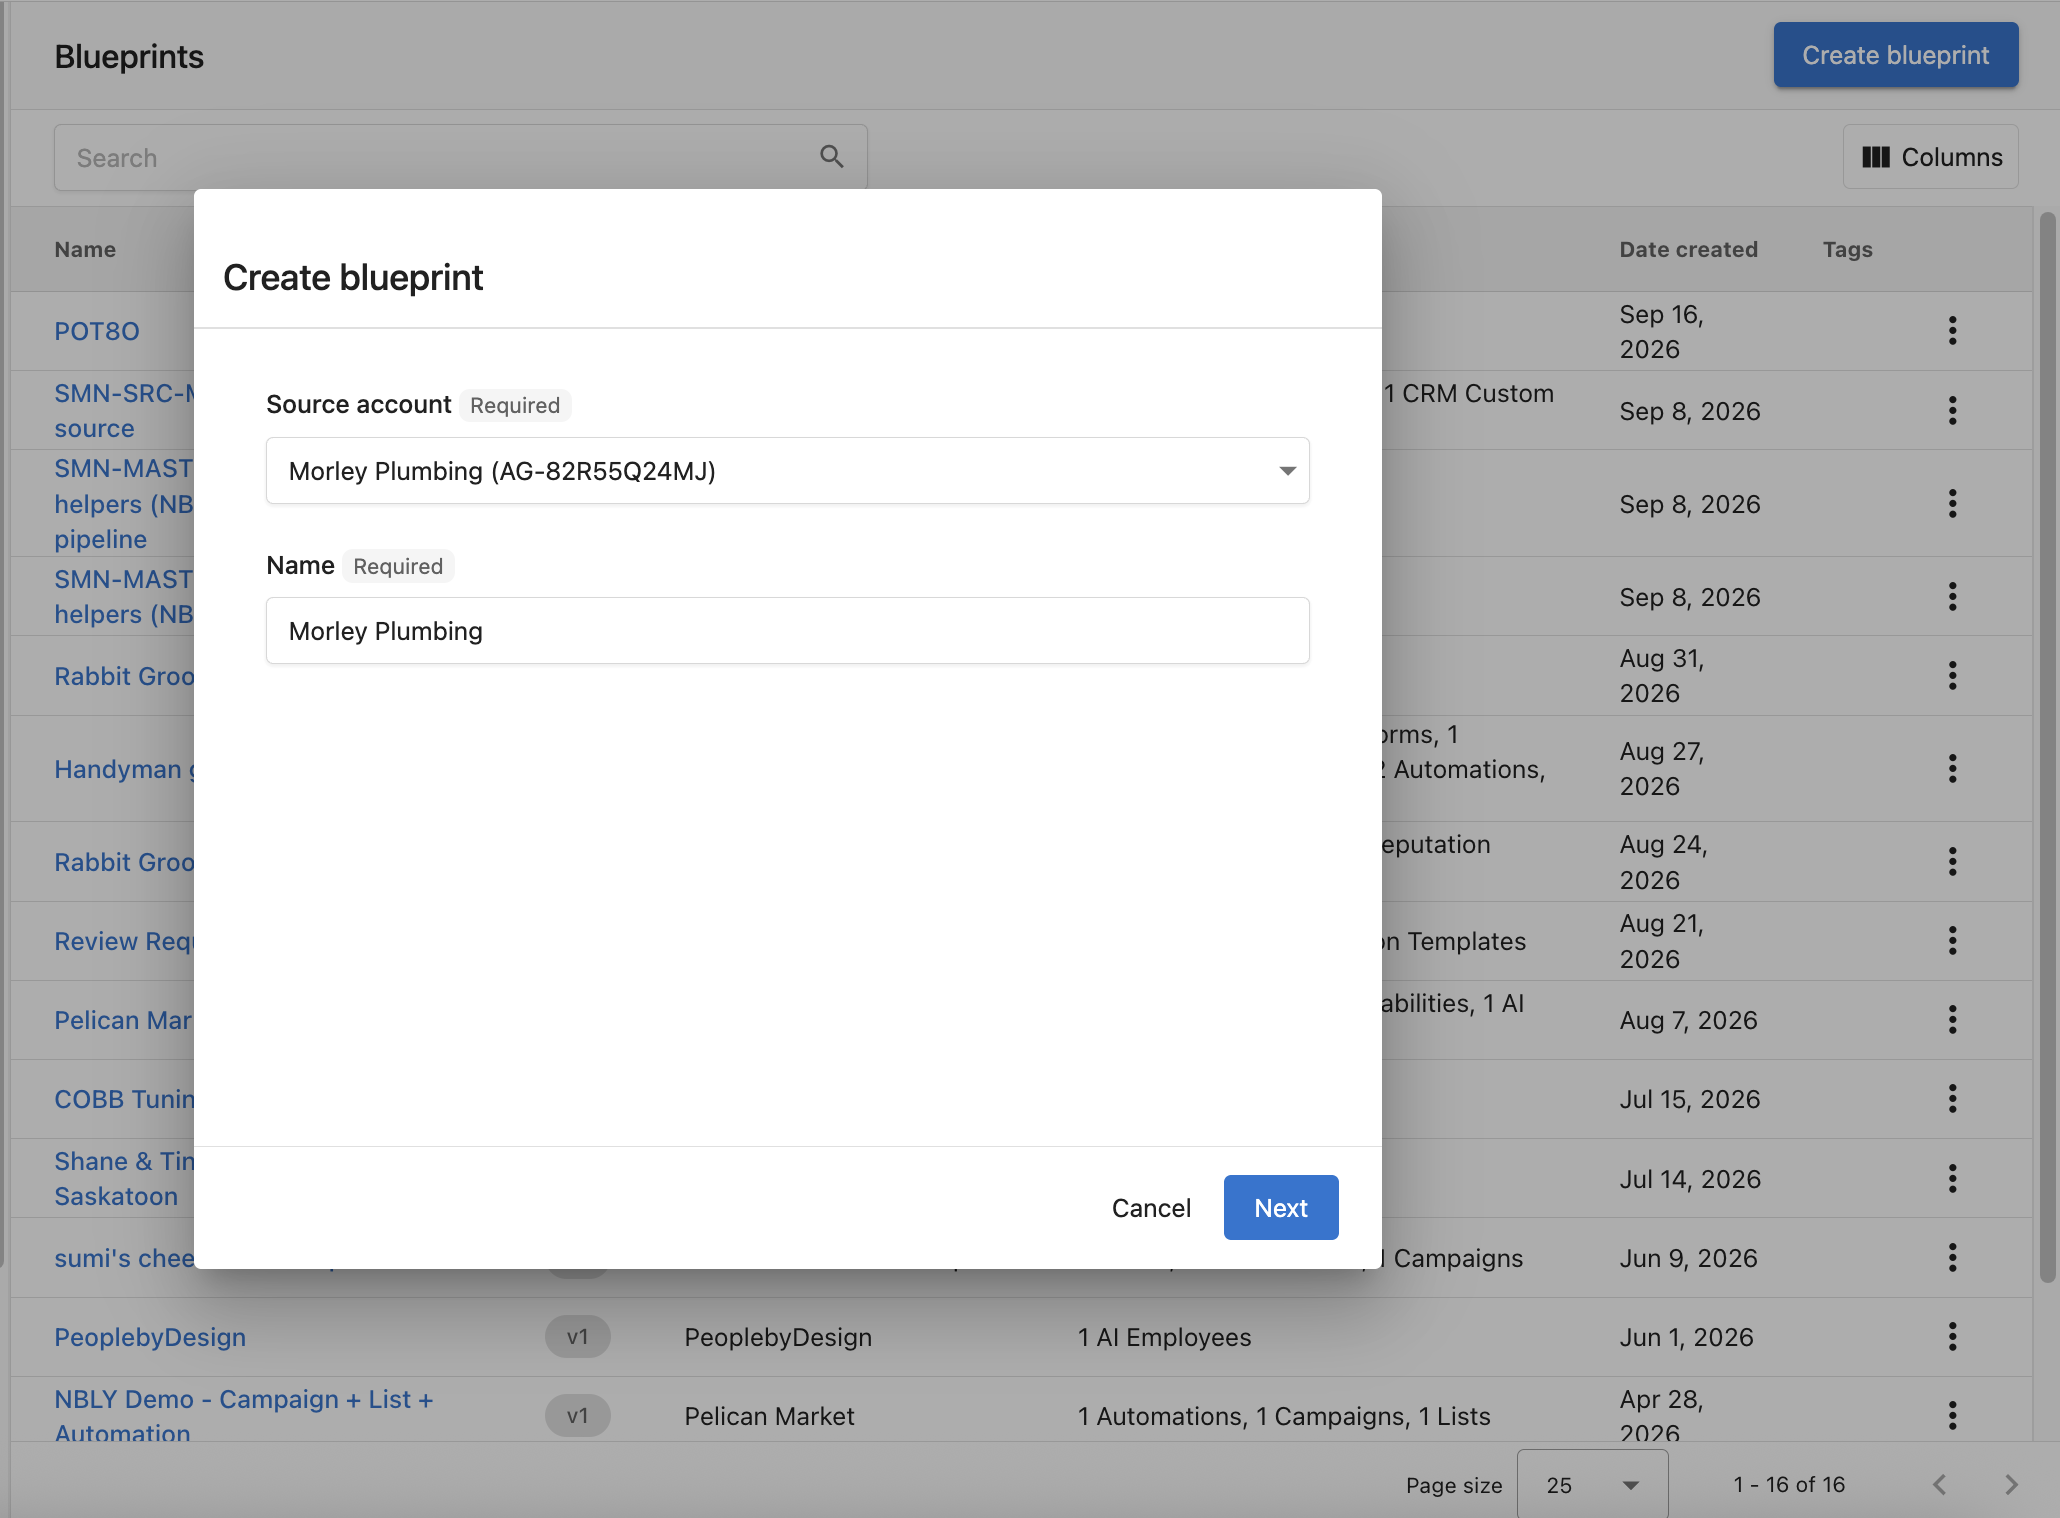
A blueprint also carries a description of what it sets up, up to 500 characters, and up to 10 tags of 50 characters each for filtering the list.
Apply a blueprint
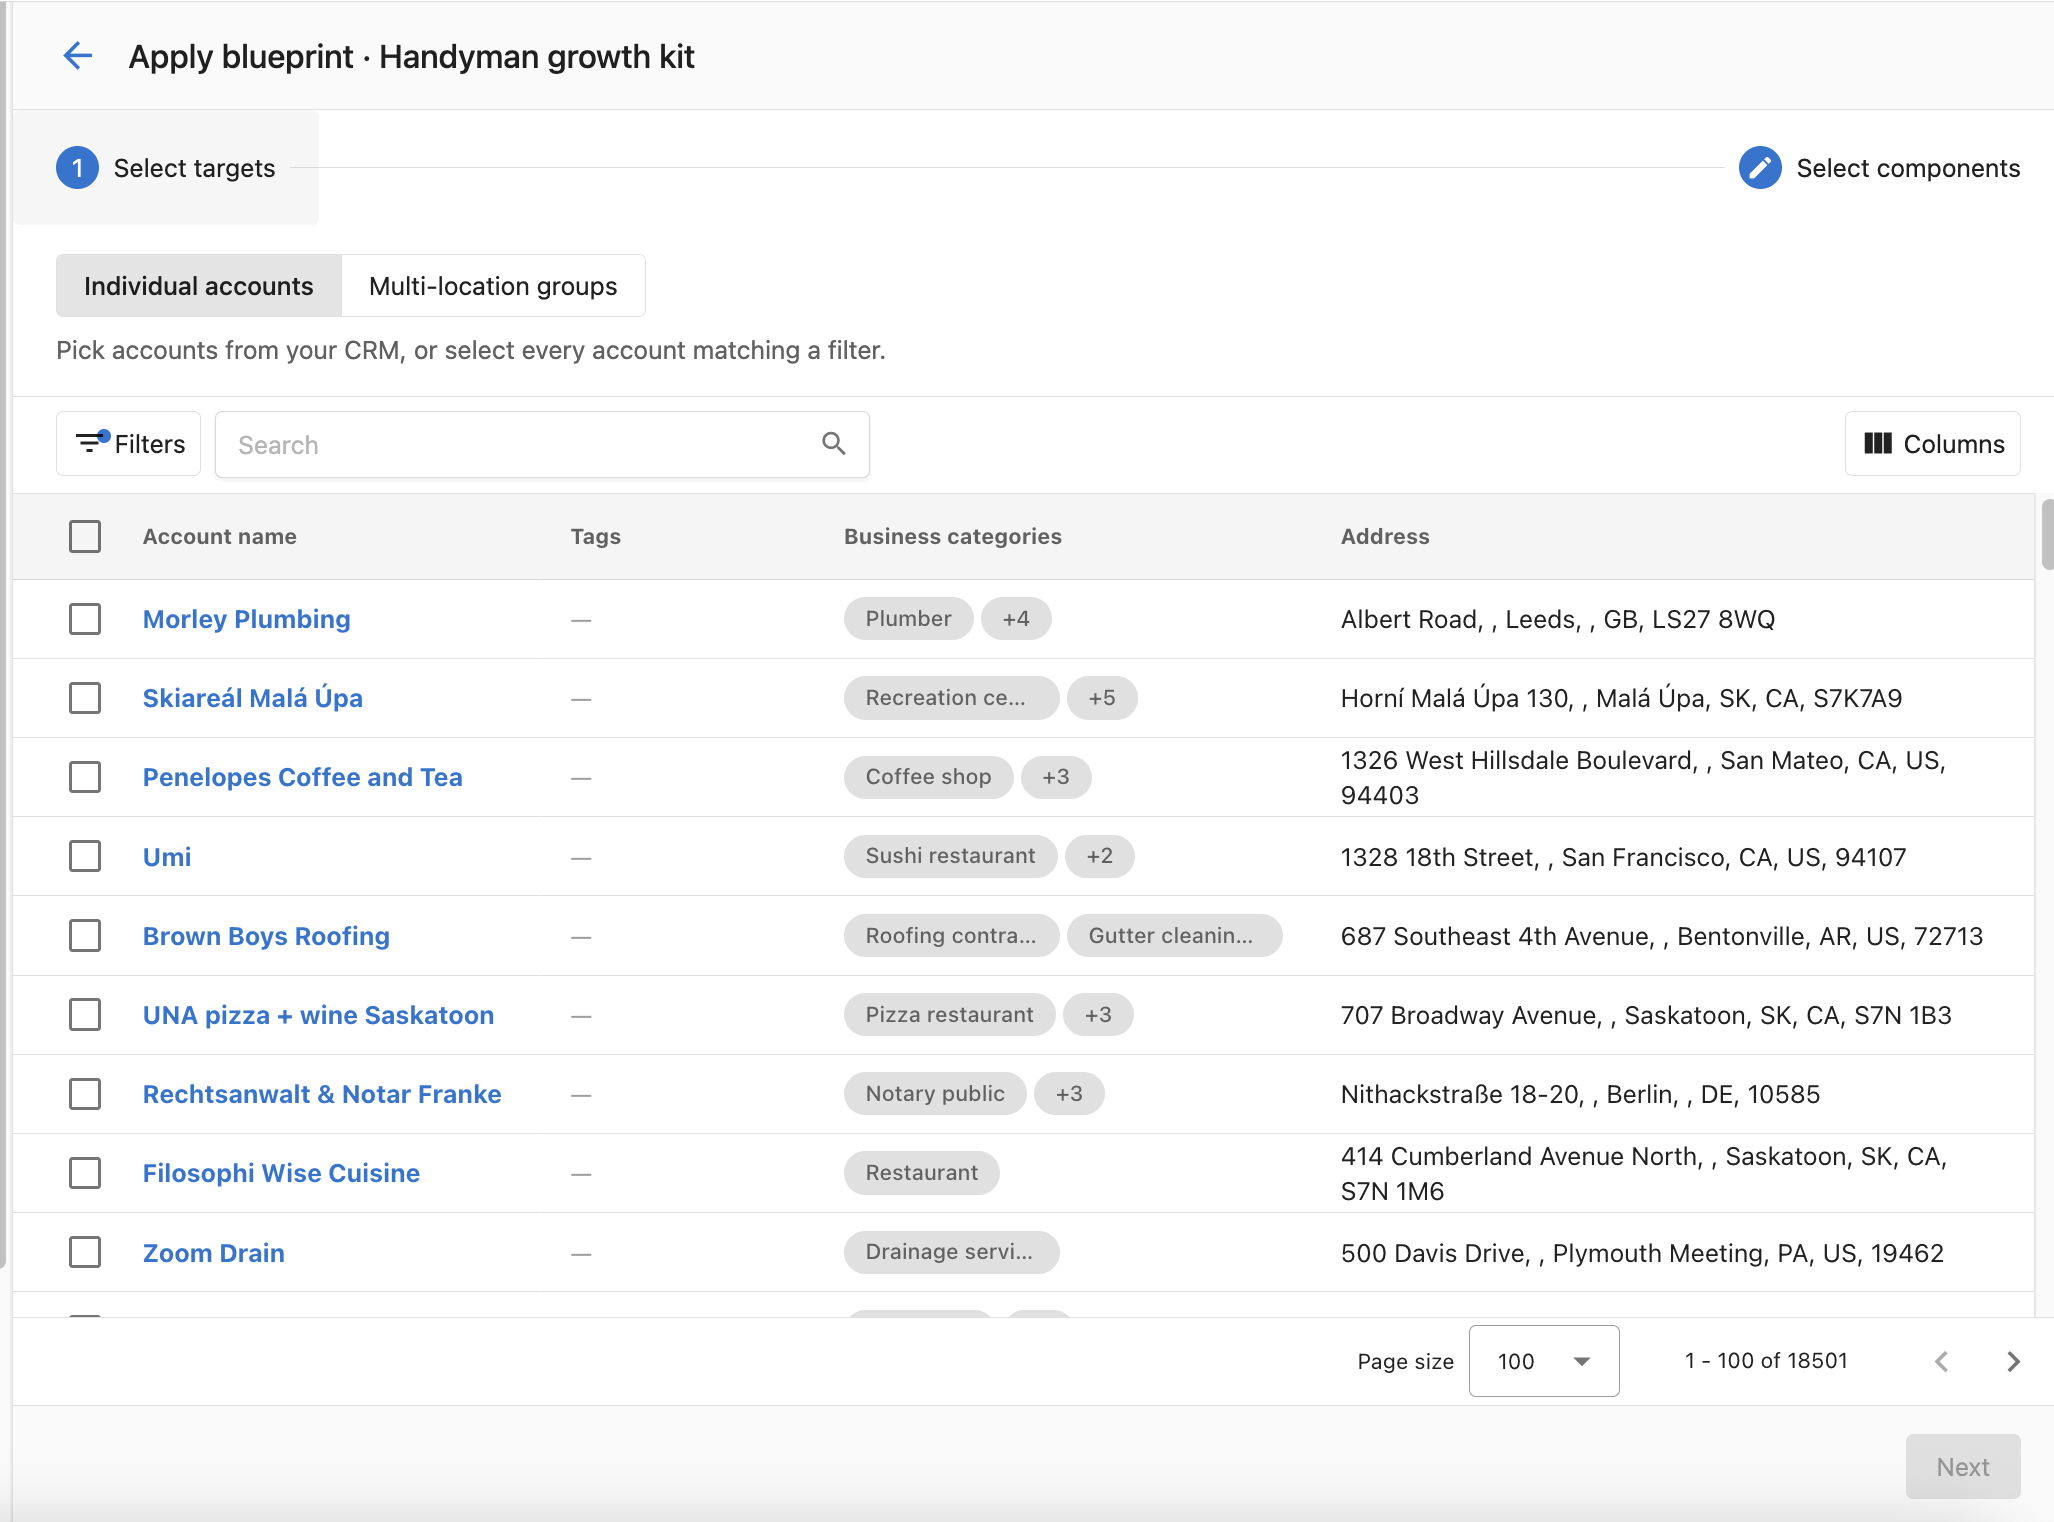
Open a blueprint and click Apply blueprint. Applying runs as a two-step wizard.
Select targets. Choose one of:
Individual accountsto pick accounts from your CRM. UseFiltersandSearchto narrow the table, then select rows, or select every account matching the filters you set.Multi-location groupsto apply to every account under the selected groups.
Rows with no linked account are skipped, and the wizard tells you how many.
Select components. Choose which of the blueprint's components to apply.
Applying a blueprint only adds or updates. Nothing already configured on the target account is removed.
Applying blueprints automatically
Link a blueprint to a business category
Link a blueprint to a business category and any new account created in that category, via API, manually, or through SMB self-signup, automatically gets the matching blueprint applied. No manual setup required.
Use the automation action
Blueprints can also be applied from inside an automation, giving you full control over when and how they are triggered.
- Go to Partner Center →
Automations. - Select or create an automation.
- Add the Apply blueprint action.
- Select the blueprint to apply.
This lets you apply or re-apply a blueprint based on any condition an automation can evaluate. The action deploys the blueprint's current version.
Versions
Every time you update a blueprint, a new version is created. Versions are numbered in order, v1, v2, v3, and each records the date, the author, and which components changed.
One version is always the current version. That is the version used by every new apply, including the automation action. Accounts applied earlier stay on the version they received until you move them.
To create a version, open the blueprint and click Update blueprint. Partner Center confirms that a new version will be created, then recaptures the current configuration from the source account.
Version history
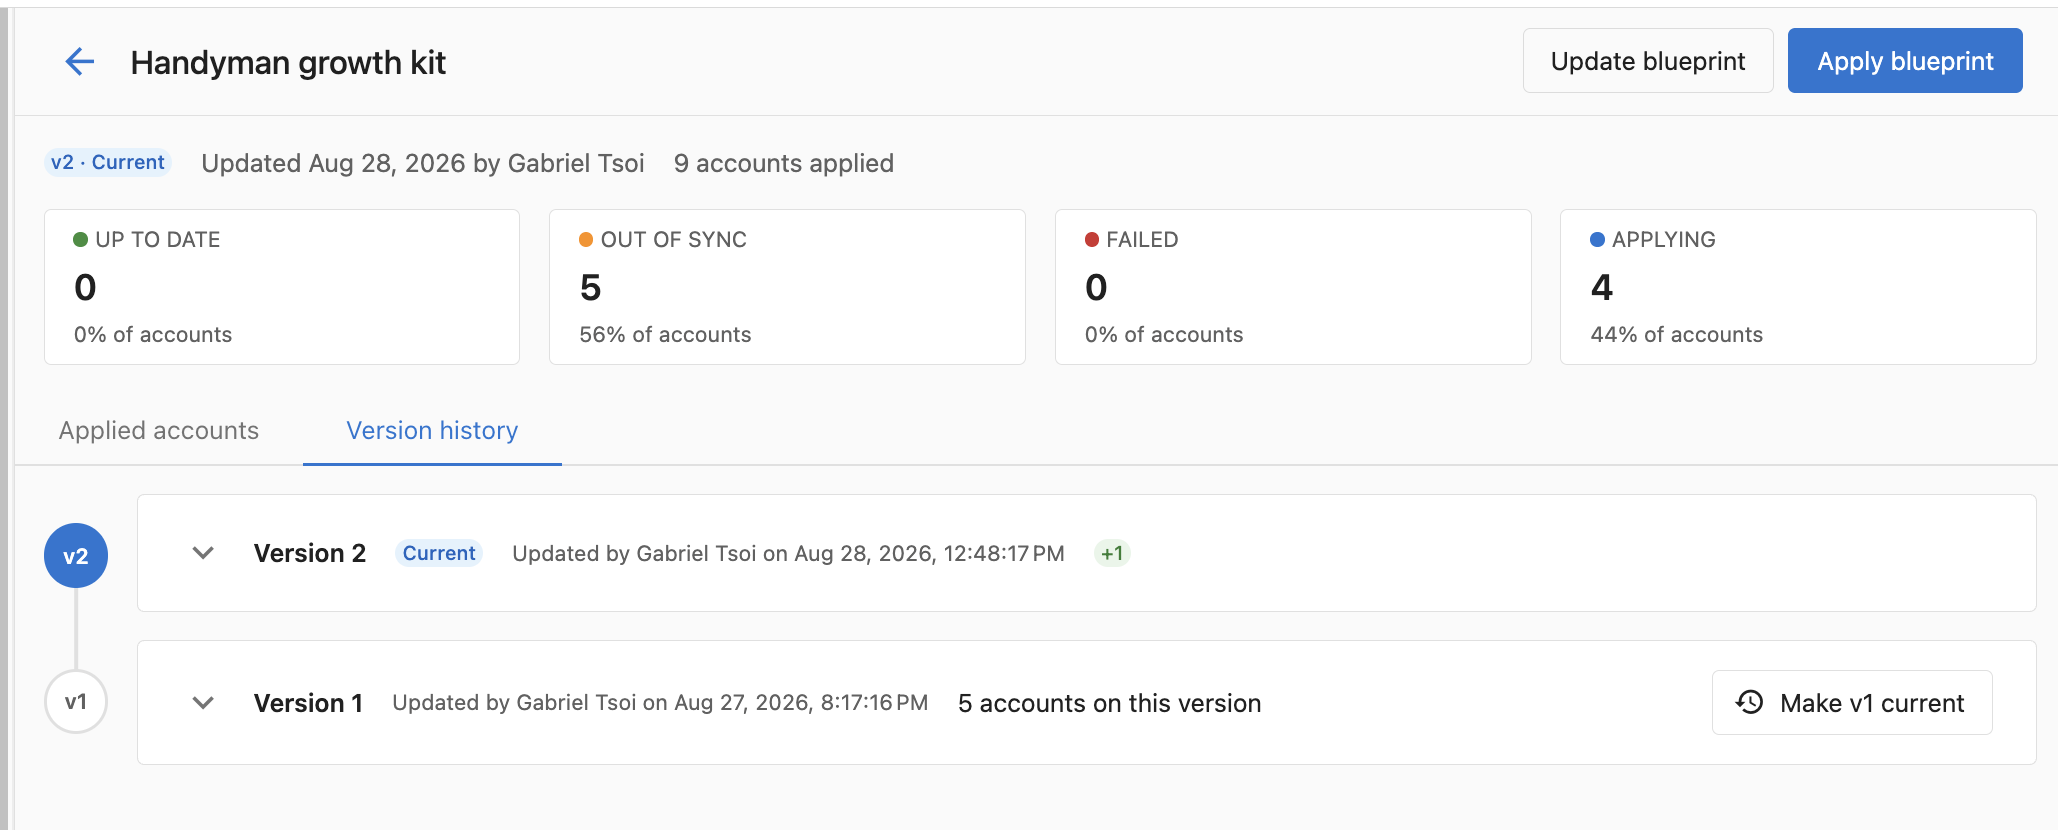
Select the Version history tab. Each entry shows:
Version {N}, andCurrenton the version new applies useUpdated by {author} on {date}- The components added and removed compared with the previous version, or
No changes from previous version {N} accounts on this version
Expand a version to see its full component list, including whether each automation is Active or Inactive.
Change which version new applies use
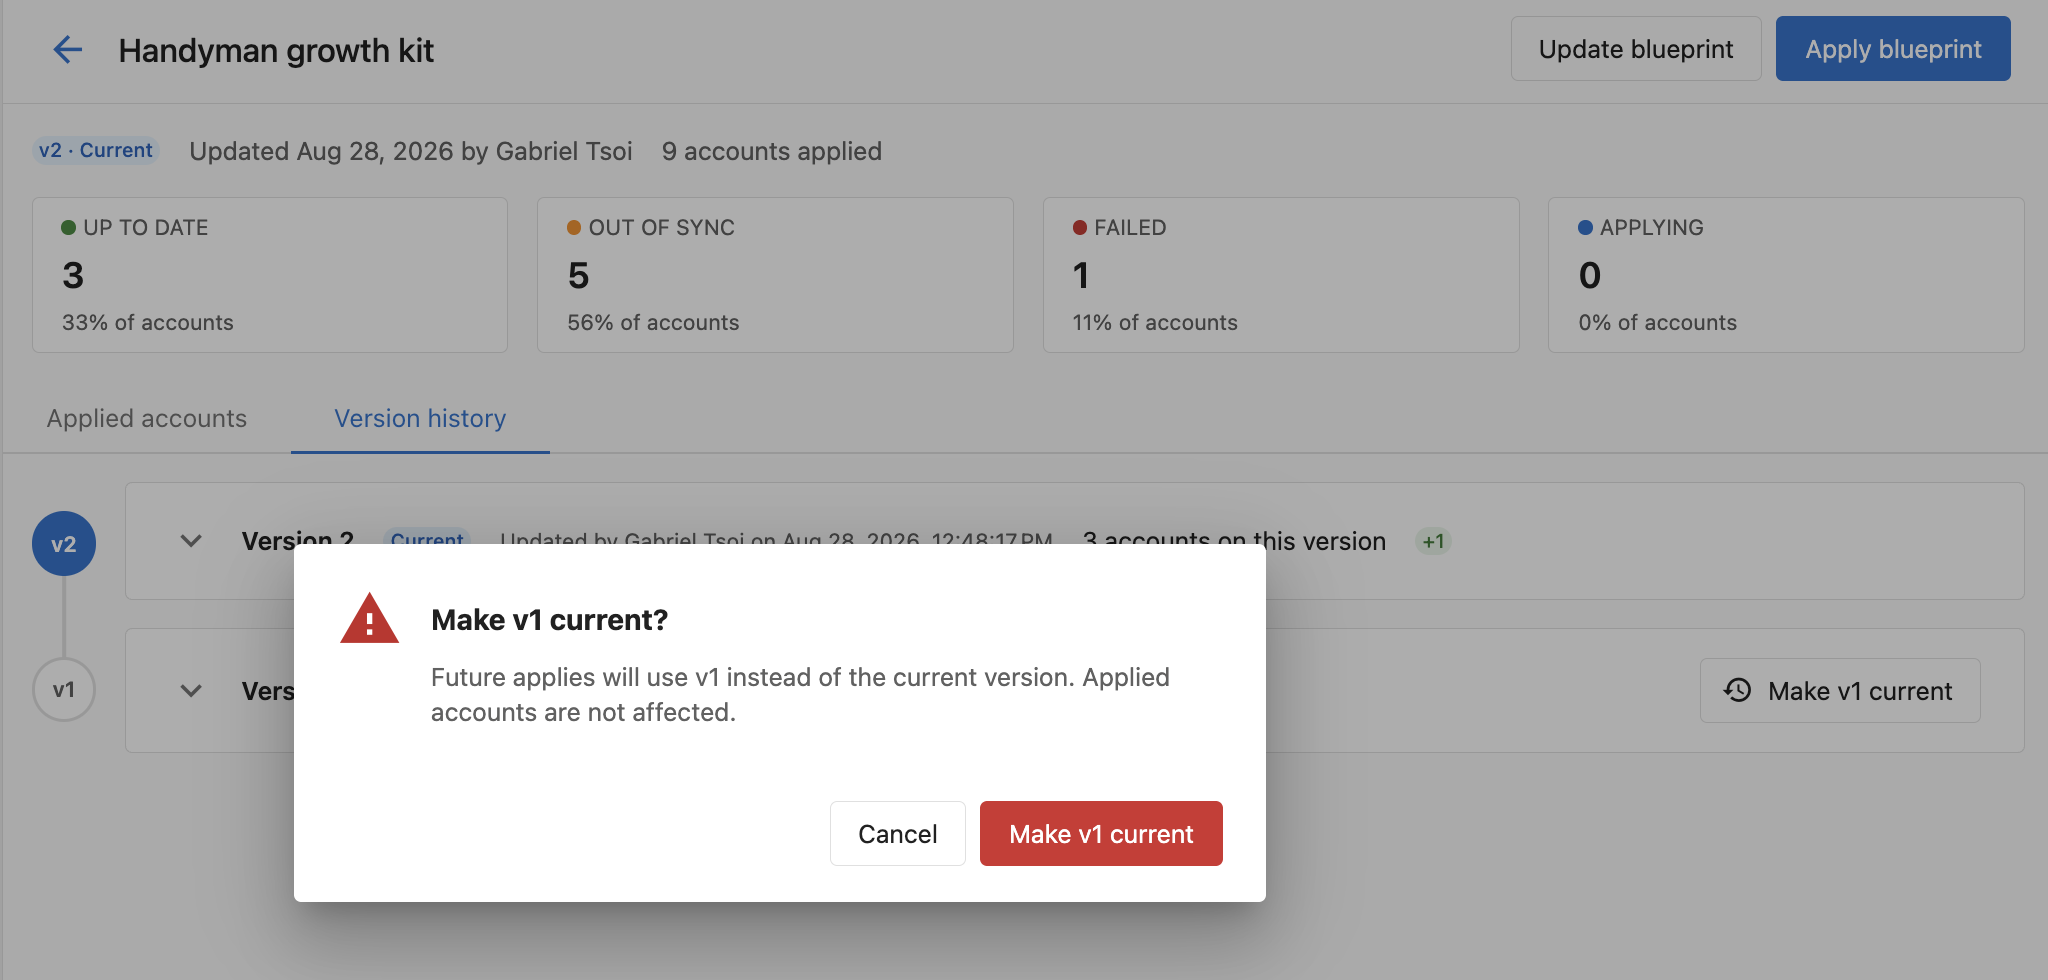
On any version that is not current, click Make v{N} current.
Future applies will use that version instead. Applied accounts are not affected, nothing is deployed, and no account changes. Use it to stage a rollout, or to stop a bad version from reaching more accounts while you remediate.
Track where a blueprint is deployed
The Applied accounts tab lists every account the blueprint has been applied to. Summary cards across the top break the rollout down by status, show the percentage of accounts in each, and act as filters. You can also search the list by account name.
| Status | Meaning |
|---|---|
Up to date | The account is running the blueprint's current version. |
Out of sync | The account is running an older version. The row shows v3 → v4 available. |
Failed | The last apply did not complete. |
Applying | An apply is in progress. |
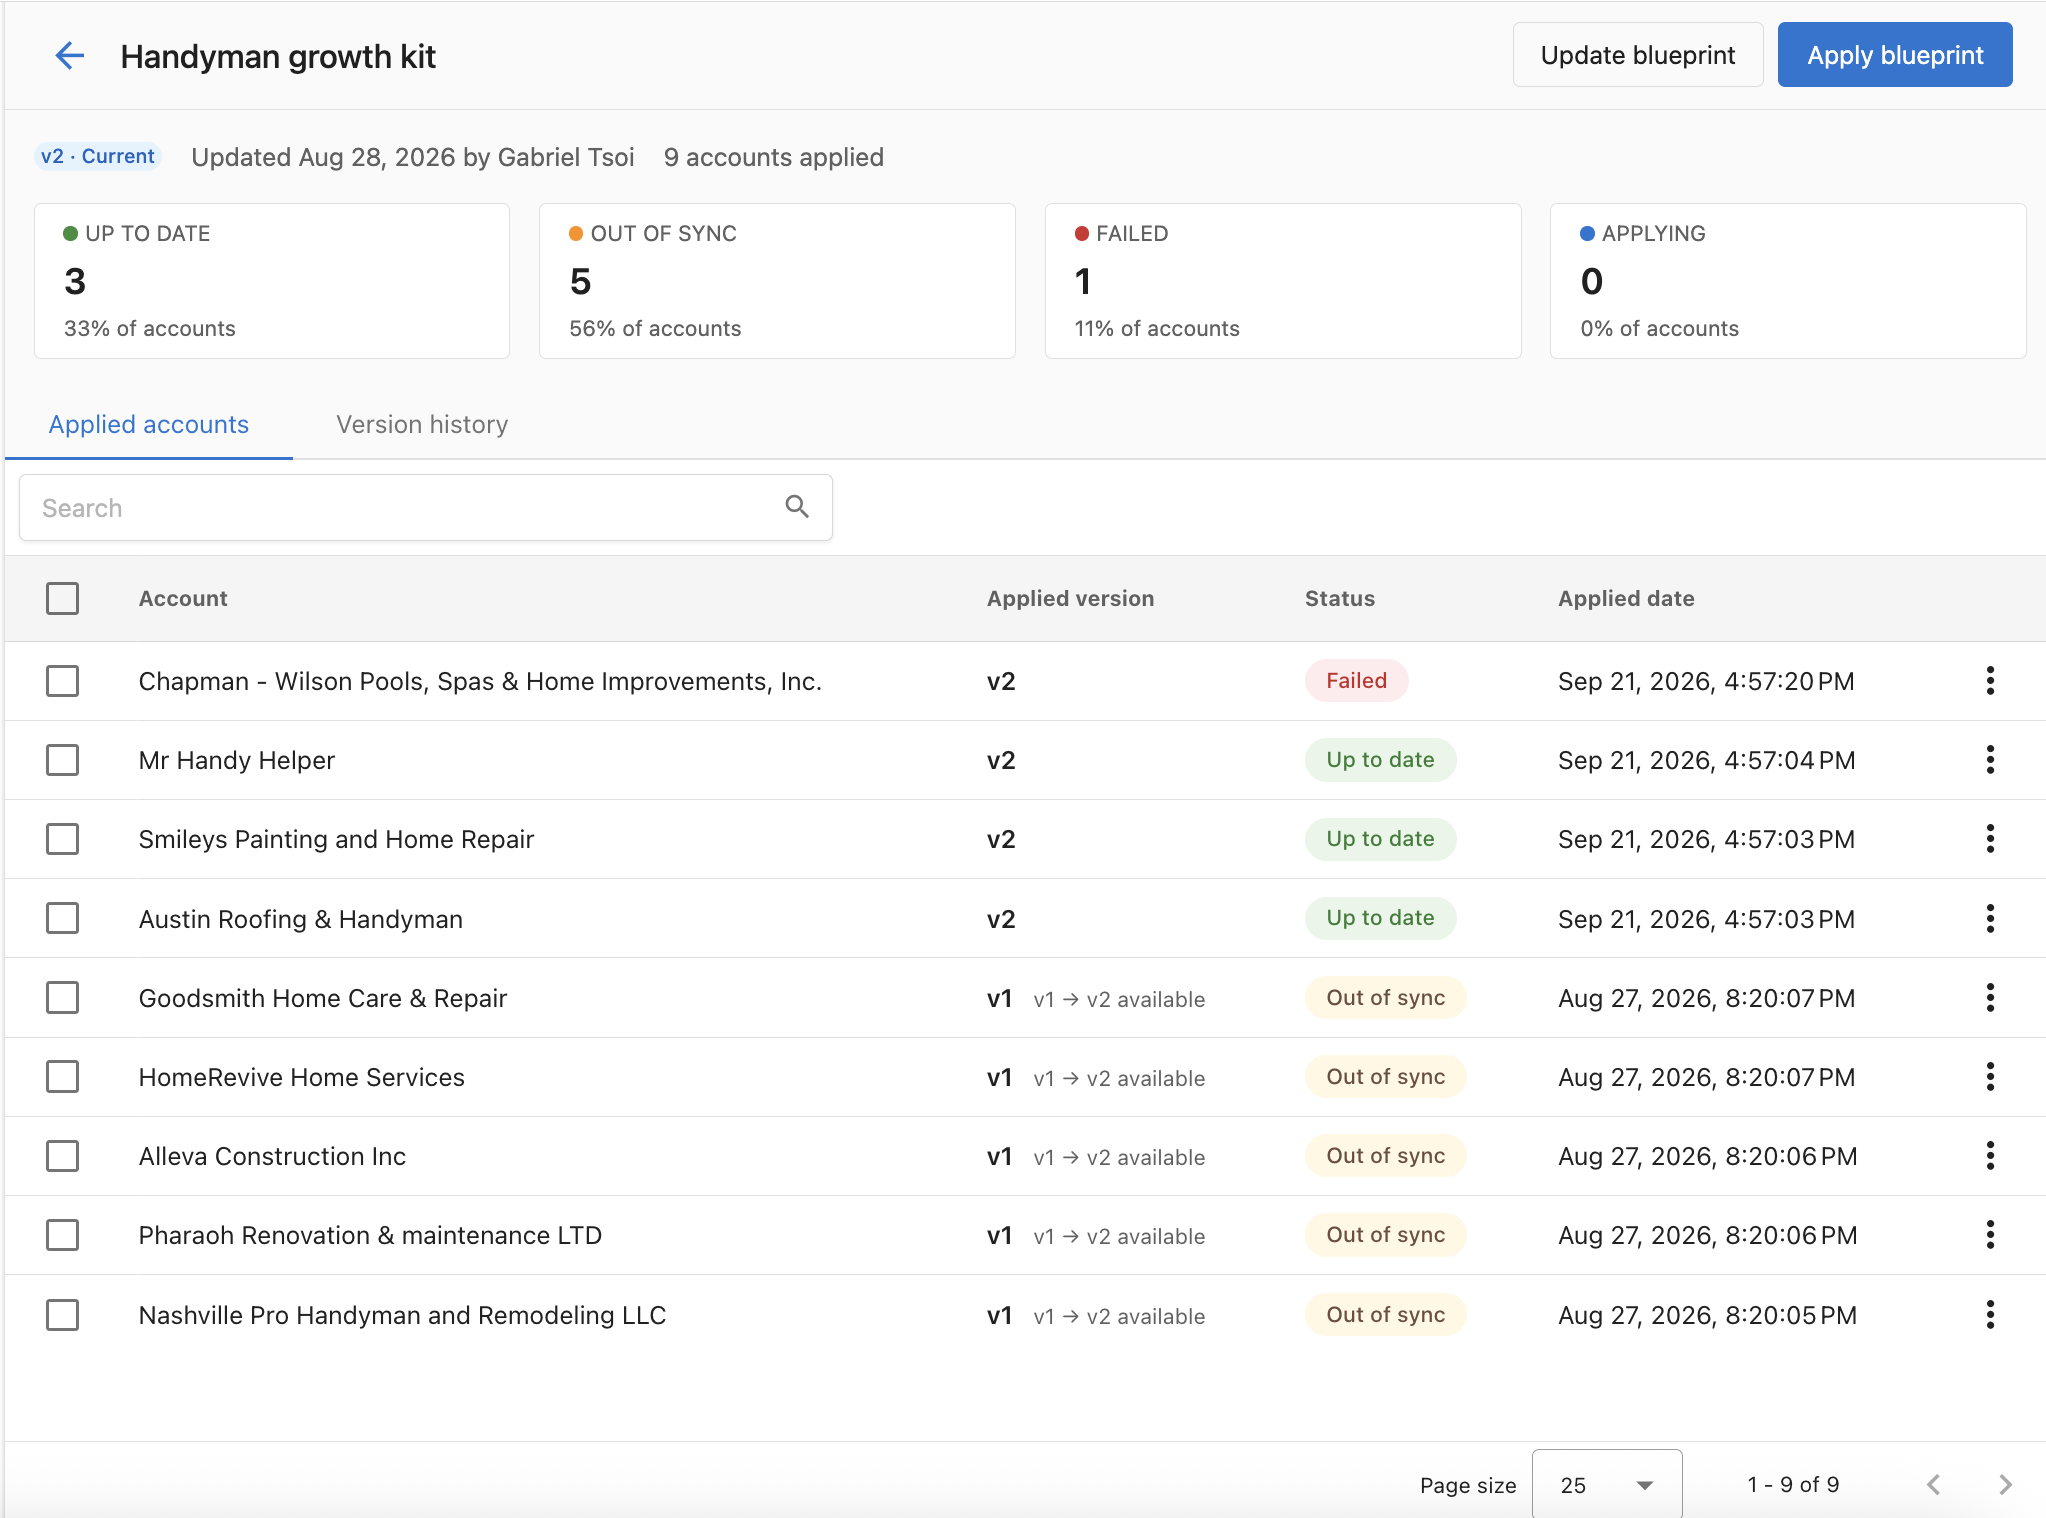
Accounts running a version newer than the current version are not flagged and are not prompted to change.
Upgrade and roll back accounts
A single account
Open the ⋮ menu on any row in Applied accounts:
Apply latest version (v{N})moves that account to the newest version.Roll back...opens a version picker so you can restore that account to an earlier version.
The row updates to show the new version and status once the apply completes.
Apply only adds and overwrites, it never removes. Rolling an account back to an earlier version restores that version's components, but components a later version introduced stay on the account and have to be removed by hand.
Many accounts at once
Select accounts with the checkboxes. A bar appears above the table showing how many are selected, with Select all and Clear, and an Actions menu holding:
Re-apply to latest versionRoll back..., then pick the version to restore the selection toExport errors, which downloads one CSV covering the failed accounts in the selection
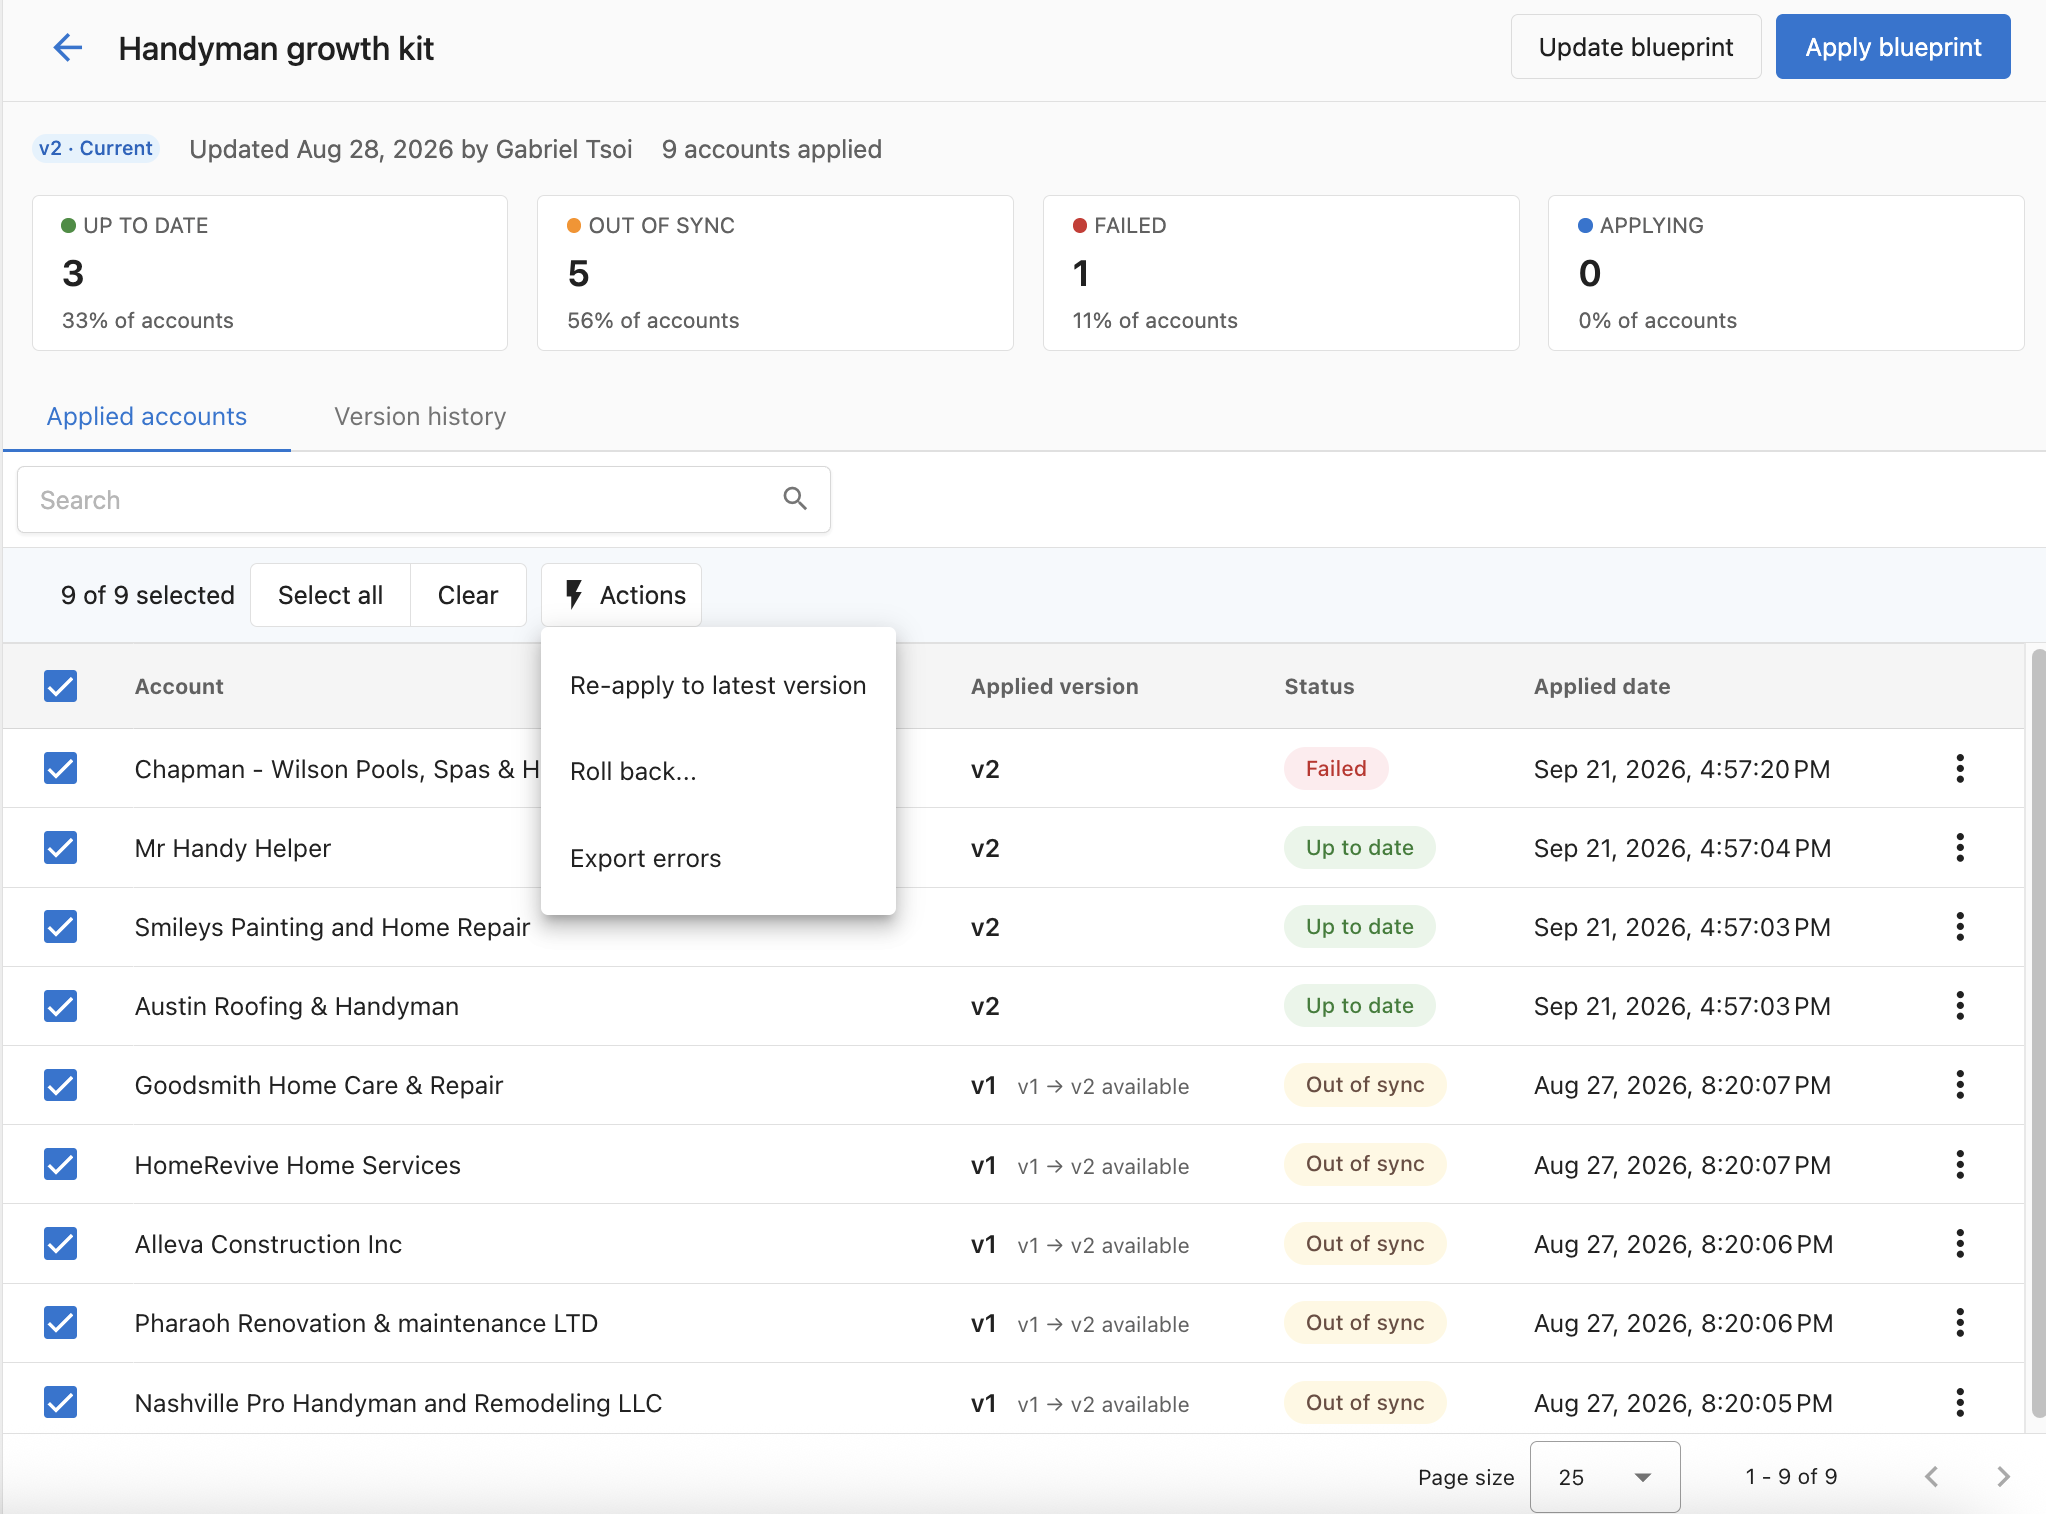
You can select up to 100 accounts at a time. Each row updates independently as its account finishes. A roll back across a large selection runs in the background and can take a while.
Diagnose a failed apply
A Failed row shows how many components failed. Click View error details on the row to open a panel with the detail.
The panel is headed with the account name and Apply v{N} failed, so you can see which version broke. Below that, every component that failed is listed with its name, a label for its type such as AI_ASSISTANT, and the error message returned when it was applied. Components that applied successfully are not listed, so a short panel on a failed account means most of the blueprint landed.
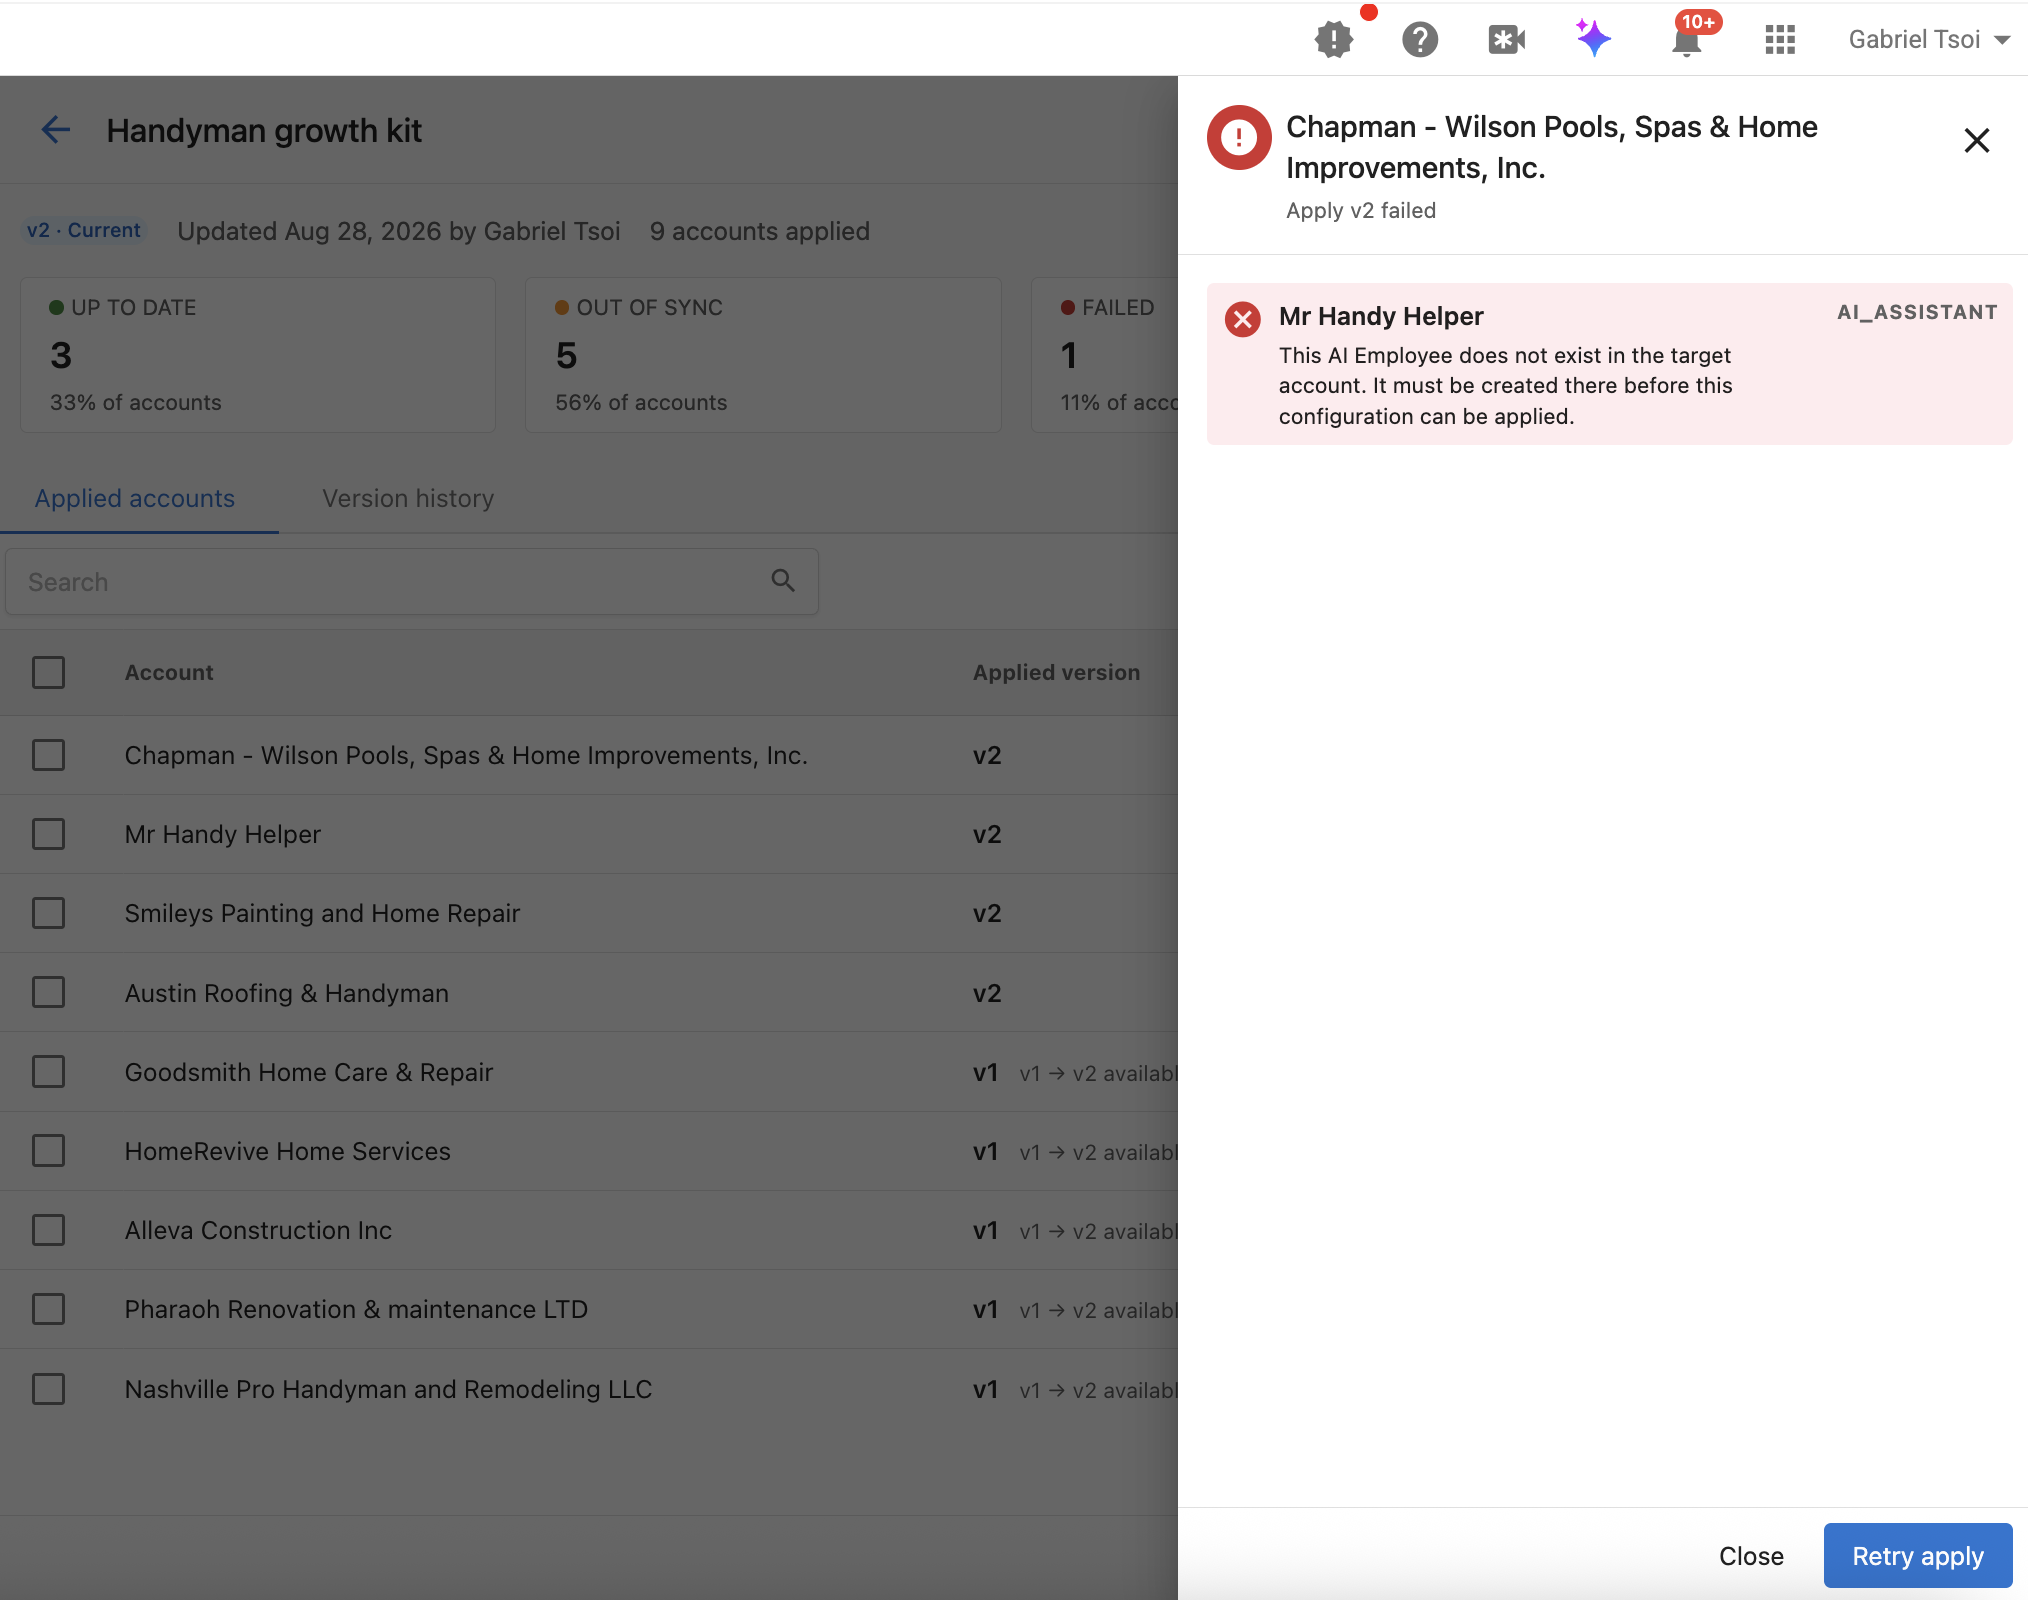
Retry apply at the bottom of the panel re-runs the apply for that account, which is the quickest path once you have fixed the underlying cause.
To work outside Partner Center, select the affected accounts and click Export errors. The CSV carries the account, object name, object type, object ID, error stage, and error message, and is generated fresh each time, so there is nothing to expire.
Error detail is recorded going forward from the release of this feature. Applies that failed earlier do not have per-component detail.
Common errors
| Message | What to do |
|---|---|
| This AI Employee does not exist in the target account. It must be created there before this configuration can be applied. | The target account is missing the product that creates that AI employee. Activate it on the account, then retry. |
| This account has reached the maximum of 3 custom object types. Remove one before deploying another. | Each account can have up to 3 CRM custom objects. Remove one on the target account, then retry. |
| Campaign updates are not yet supported. | Expected on any re-apply to an account that already has that campaign. See Campaigns are created once, never updated. |
| Automation was created but could not be activated. | The automation landed on the account but is Inactive. Turn it on from the account's automations list. |
| Failed to copy promotion images to target namespace. | A promotion image could not be copied. Retry the apply, and contact support if it persists. |
Campaigns are created once, never updated
Campaigns behave differently from every other component, and it matters most when you are versioning a blueprint.
The first time a blueprint is applied to an account, its campaigns are created there. On any later apply to that same account, whether an upgrade, a roll back, or a re-apply of the same version, the campaign already exists, so the apply tries to update it and stops with Campaign updates are not yet supported.
What that means in practice:
- The account is reported as
Failed, with the campaign listed as the failed component, even when every other component applied correctly. Check the other components in the error panel before assuming the whole apply was lost. - The failure is immediate and is not retried, so the account does not sit in
Applying. - Campaign edits made in the source account after a blueprint has been applied never reach accounts that already received it. New accounts that have not had the blueprint applied yet do get the edited campaign.
To push a campaign change to an account that already has it, either edit the campaign directly on that account, or delete it there and re-apply the blueprint.
If you version a blueprint often, keep campaigns in a blueprint of their own. That way a campaign in the shared blueprint cannot fail every upgrade of the components you do change regularly.
Including CRM field layouts
A field layout, the grouping and ordering of fields on contact, company, opportunity, and custom object records, can be rolled out with a blueprint so every account presents its records the same way.
- Only customized layouts are captured. Object types still on the standard layout are skipped.
- If a layout references custom fields or a custom object type the target account doesn't have, those are created there first and the layout is repointed at them.
- Applying a blueprint replaces the target account's layout for that object type. Any layout customization already made on the target account is overwritten.
Including forms and web chat widgets
Forms and web chat widgets configured on the source account can be included in the blueprint and rolled out to every account it is applied to. This is particularly useful when:
- An initial web chat message needs to be in another language.
- Privacy statements differ by region.
Managing tags
From the blueprints sidebar, click Manage tags to add, rename, or delete tags across all your blueprints. Renaming a tag to a name that already exists merges the two. Deleting a tag removes it from every blueprint that carries it.
Using blueprint application as an automation trigger
When a blueprint finishes applying, the target account receives an activity log entry. Automations can listen for that entry and chain downstream work off a completed application, such as rep assignment or coupon form setup.
When to use a blueprint
- You are onboarding accounts at scale, through an enterprise rollout, a reseller channel, or a migration
- You want the same setup across every account in an industry vertical
- You offer SMB self-signup and need new accounts configured without anyone touching them