CRM overview
The Vendasta CRM, at CRM in Partner Center, is where you manage contacts, companies, opportunities, tasks, and meetings, and track every interaction with your prospects and clients.
Why use the CRM?
The Vendasta CRM keeps your team's contacts, deals, and communication history in one place, so everyone works from the same data and routine follow-ups can be automated.
What's included
- Contacts: Manage people, import/export, and run campaigns
- Companies: Manage organizations, associate contacts and opportunities
- Lists: Segment contacts and companies with static or smart lists
- Forms: Capture leads from your website directly into the CRM
- File Upload: Upload files to contacts and companies with AI-generated summaries
- Tasks: Plan and complete sales activities
- Opportunities: Track and manage deals in table or board views
- Custom Objects: Create custom modules to track industry-specific data like equipment, properties, or vehicles
- Field Layouts: Group, reorder, and hide fields to control how records are laid out
- My Meetings: Schedule and manage appointments with prospects, with conversation intelligence and AI-generated summaries
- Activity Feed: Track all interactions and engagement history
- Field Change History: View a complete audit trail of every field update — what changed, the previous and new values, and who or what made the update (available on Starter subscription and above)
- Sales Teams: Organize and manage your sales team performance
- Leaderboard: Monitor sales performance and team rankings
CRM AI
CRM AI adds intelligent automation to your CRM with the AI Sales Assistant. With a CRM AI subscription, you can automatically update CRM records from sales conversations, chat with your CRM data using natural language, and access conversation intelligence with sales coaching on every call. See CRM AI editions for available plans.
How do I get started with the CRM?
-
Go to CRM in Partner Center
- Navigate to
Partner Centerand click onCRM - Choose between
ContactsandCompaniesviews
- Navigate to
-
Set up your Companies view
- Customize columns to show information that matters to you
- Enable, display, and reorder columns based on your preferences
- Configure filters to focus on your assigned accounts
-
Create your first contact
- Click
Create contactin the top right corner - Fill in name, email, and phone number (email recommended)
- The system will check for duplicates automatically
- Click
-
Import existing data
- Use bulk import to add your existing contacts and companies
- Map fields during import to ensure data accuracy
Setting up your view
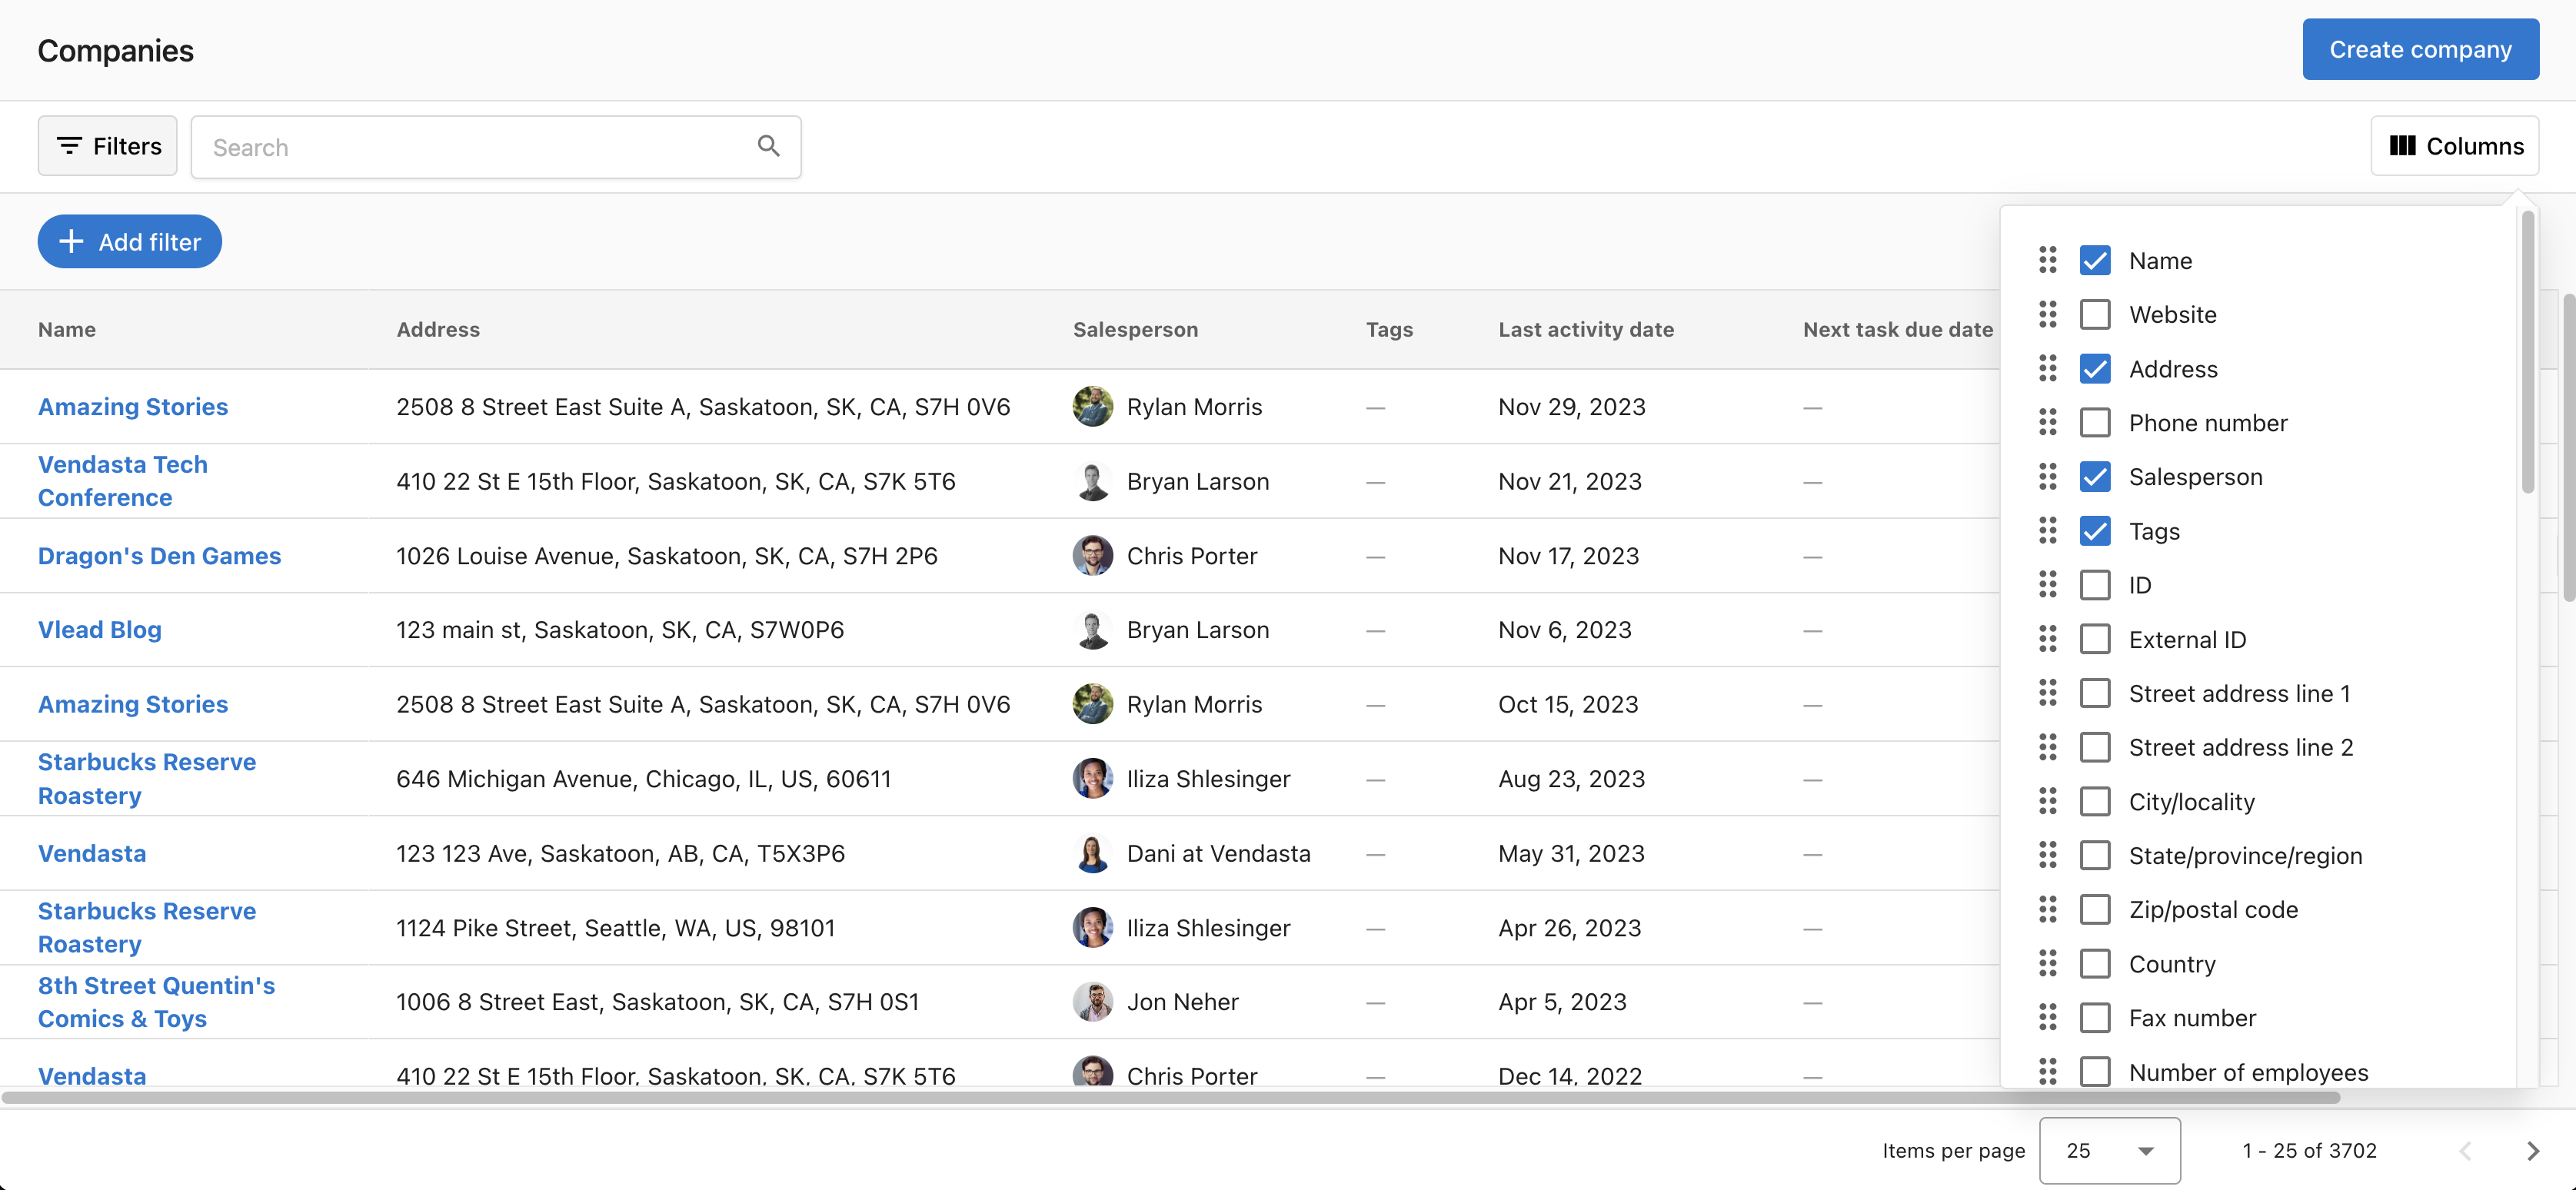
The screenshots in this document may show outdated interface elements. The functionality described remains accurate, but visual elements may differ from the current CRM interface.
Navigate to CRM → Companies. You are now on the company page. The very first thing you want to do is ask yourself what information matters to you. There is tons of information, and you will want to consider what data matters to you. You can set up your view by enabling, displaying, and reordering the columns. Say, the website is not important to you, while the address is. Check off the boxes according to your preferences. You may also want to see whether or not a company has claimed its Google Business Profile, which will be available if you have created a Snapshot Report.
Searching, filtering, and sorting
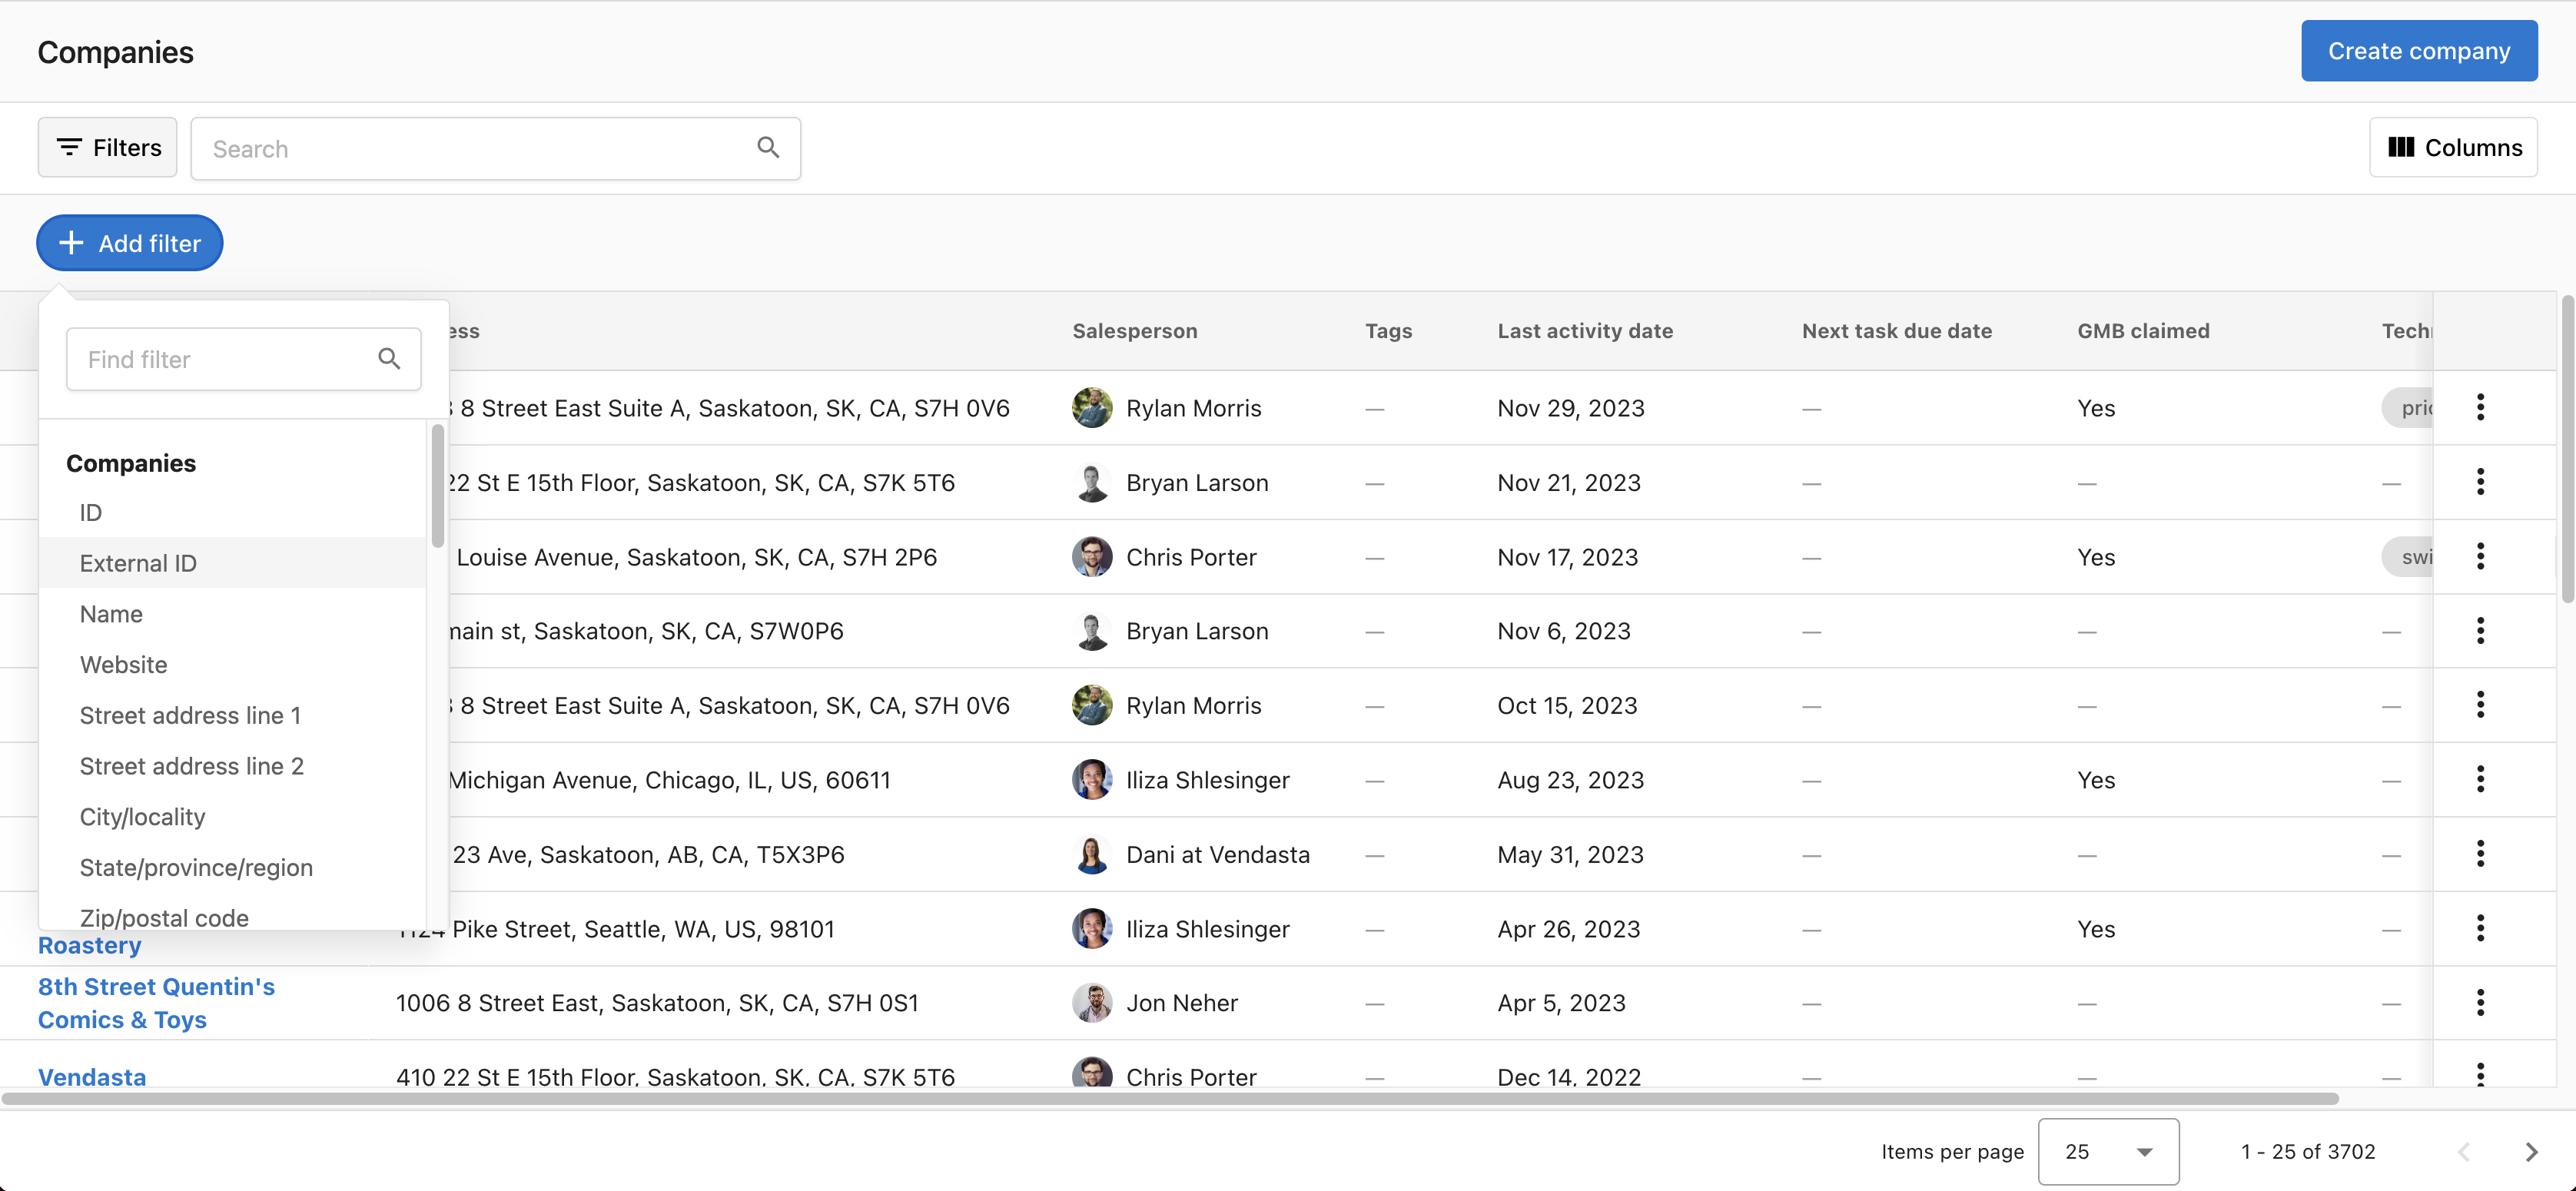
You can find the company that is assigned to you by clicking on the Add filter button, and then searching for Salesperson. You can then find yourself using your name or email.
If you know the name of the company, you can find it by searching in the search bar on the table where you can also search for a company by phone number, website, address, and other contact details.
You can also find when you last touched base with your current customers by looking at the last activity date. You can sort, and see if there are any customers you have missed catching up with so you can keep conversations fresh!
How do I log emails to the CRM automatically?
With Vendasta, you can automatically log emails sent from outside to the CRM through the BCC address and forwarding address.
The email setup instructions below reference specific identifiers like "Partner ID" and "Account Group ID". Please verify these are still accurate for your current setup, as some terminology and processes may have been updated.
Emails that are logged to the Vendasta CRM will include the email subject and contents with a max length of 4000 characters. The logged email will automatically be associated with the recipient's contact record and its associated primary company record.
Requirements for logging emails to the CRM using the BCC & forwarding address
Your email must meet the following criteria in order to be logged in the CRM:
- The email address from which you are sending the email must be a user in the platform
- The email address of the recipient is a contact record in the CRM
- It is important to note that there is no standard formatting for a forwarded email. If Vendasta is unable to process your email format, the email will not log to Vendasta CRM.
Log sent emails
When you send an email from your mail client, add the BCC address to the BCC line of the email. After sending, the email will be recorded in the Vendasta CRM automatically.
For your CRM in Partner Center:
- If you are setting this up for your own CRM in
Partner Center, you can use yourPartner IDas the prefix of the email address, following this format: [Partner ID]@sent-mail.yourdigitalagents.com- For example, if your
Partner IDis VEND, your BCC email address will be VEND@sent-mail.yourdigitalagents.com
- For example, if your
For Client's CRM in the Business App:
- If you are setting this up for your client's CRM in the
Business App, you should use theaccount group IDas the prefix of the email address, following this format: [Account Group ID]@sent-mail.yourdigitalagents.com - For example if your client's
account group IDis AG-1234567, your client's BCC email address will be AG-1234567@sent-mail.yourdigitalagents.com
Adding the BCC address automatically to the BCC line of the email through Yesware
There are a lot of software allowing you to add the BCC address automatically. In Vendasta, you can set this up through Yesware, if you have access to Yesware in your subscription. Here's how:
Marketplace→My Purchases, then click intoYesware- Install the Yesware chrome extension
- Allow
Yeswareto access yourGmail - When this is complete, refresh your
Gmailtab and you should see theYeswareoptions at the top of your inbox.

- Using the
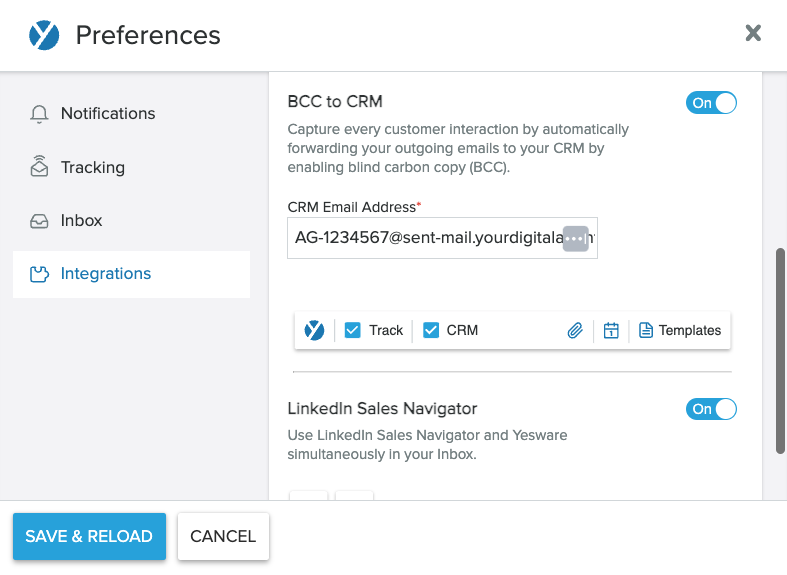
Yeswaredrop-down menu in the top left corner ofGmail, selectPreferences - Go to the
Integrationssection - Turn
BCC to CRMtoON - Input your unique BCC address
- Click
Save & Reload - Ensure that the
CRMbutton is checked when you send out an email - The
CRMbutton will remain checked moving forward and your emails will be logged seamlessly right into Vendasta CRM
Log received emails
You can use a forwarding address to log an email reply or any incoming emails from your clients. Before getting started, you will need to make sure your email client supports auto-forwarding. If your email client does not support auto-forwarding, you can forward the emails manually to have them captured in the Vendasta CRM.
Learn how to set up auto-forwarding on Outlook/Gmail/Apple Mail/Yahoo! Mail.
For your CRM in Partner Center:
- If you are setting this up for your own CRM in
Partner Center, you can use yourPartner IDas the prefix of the email address, like this: [Partner ID]@received-mail.yourdigitalagents.com- For example, if your
Partner IDis VEND, your forwarding email address will be VEND@received-mail.yourdigitalagents.com
- For example, if your
For Client's CRM in the Business App:
- If you are setting this up for your client's CRM in the
Business App, you should use theaccount group IDas the prefix of the email address, like this: [Account Group ID]@received-mail.yourdigitalagents.com- For example, if your client's
account group IDis AG-1234567, your client's forwarding email address will be AG-1234567@received-mail.yourdigitalagents.com
- For example, if your client's
The forwarded email will be logged to the contact's record, as well as the primary associated company in the Vendasta CRM.
Privacy and security note
As part of setting up an auto-forwarding rule, it's important to know that Vendasta will receive a copy of all emails you receive, however, we want to reassure you that our automated system is designed with your privacy in mind. The system discards any emails that do not include at least one contact's email address, ensuring only relevant communications are logged.
Furthermore, we can verify that the implementation does not retain a copy of those email bodies in our logs or audit tables. This measure is crucial to prevent any sensitive information, such as medical details sent through a work email, from being stored in our database. Our priority is to respect your privacy and security, ensuring that the Vendasta CRM remains a safe and reliable tool for managing your client interactions.
Record sources
You can view a record's source to understand how it was created or see its property history to track updates over time. The source values below indicate the tool or process that updated the record. For example, a record might be created by an import or have its property values changed via a workflow.
Records can be updated through the following sources:
CRM UI: Manually creating a company or contact in Vendasta CRM.Account Group: Created when an account group is made (only for Company records).Find-Businesses: Created using thefind businessesfeature (only for Company records).User: Created when an account group user is added (only for Contact records).Legacy Customer List: Created from the legacy customer list in theBusiness App(only for Contact records),Customer Voice,WordPress Hosting, orMarketplaceproduct integration.Bulk Import: Added through the bulk import process via CSV upload.Web Chat: Created via the AI lead capture widget.Form: Created when a user fills out a form built with the form builder. Form submissions automatically overwrite the corresponding CRM fields with the submitted values.Facebook Messenger: Created from conversations initiated throughFacebook Messenger.Google Business Messages: Created from conversations onGoogle Business Messages.Instagram Messaging: Created fromInstagramdirect messaging.WhatsApp: Created from conversations initiated throughWhatsApp, or when contacts are synced from a connectedWhatsAppcontact book.Inbox: Manually created in VendastaInbox.SMS: Records of conversations initiated through inbound SMS.Email: Created from inbound email conversations received inInbox.GingrApp: Created through theGingrintegration.Jobber: Created through theJobberintegration.HubSpot: Created or updated through theHubSpotintegration via two-way sync of Contact and Company records.
Field Change History
Every field update in your CRM is logged in Field Change History. Whether a field was updated by a form submission, the AI Sales Assistant, a teammate, or the system, you can see exactly what the previous value was, what it changed to, and who or what made the update.
To view Field Change History for any record:
- Go to
Business App→CRM - Open any contact, company, or opportunity record
- Click the History icon in the top right corner
- Review the log of changes, including the previous value, new value, and the source of each update
Field Change History is available to all users on a Starter subscription or above.
Frequently Asked Questions
Are there any limits to meeting recording?
CRM AI Pro includes 750 minutes of meeting recording. Enjoy unlimited recording as a bonus until mid-2026, after which overages will be billed at approximately $0.04 per minute.
Who can see these new tabs in Partner Center? Can I change this?
Yes, you can control who can see the new tabs in Partner Center for users with admin roles, here's how:
-
Navigate to the My Teams Page:
- Begin by navigating to the
My Teamspage in thePartner Center.
- Begin by navigating to the
-
Edit User Settings:
- Locate the user whose tab visibility you want to control.
- Click on the row action menu (often represented by three dots or a similar icon) next to their name.
- Select
Edit memberfrom the menu to modify their settings.
-
Adjust Admin Permissions:
- In the user's settings, find the section labeled
Admin. - Click on
Show more permissionsto expand the list of available permissions.
- In the user's settings, find the section labeled
-
Configure Specific Permissions:
- You will see various permission settings. Focus on the following three to control CRM tab visibility:
- Can manage contacts in the platform: Enabling this permission controls whether the user can see and manage the contact page, including the ability to create, edit, and delete contacts.
- Can manage activities in the platform: This permission allows the user to create, edit, and delete activities, including tasks.
- Can manage companies in the platform: By enabling this, the user gains or loses the ability to see the company page and to create, edit, or delete company information.
- You will see various permission settings. Focus on the following three to control CRM tab visibility:
Adjusting these permissions will effectively control the user's ability to view and interact with specific pages and features within the Partner Center, ensuring they have access to only the necessary tools for their role.
Does a contact have access like a user has access?
By default, a contact does not automatically gain access to the company's Business App, however, you can easily provide them with access by sending an invitation. Here's how to do it:
-
Navigate to the Business App Instance:
- Start by going to the company's profile page that corresponds to the specific
Business Appinstance you want the contact to access.
- Start by going to the company's profile page that corresponds to the specific
-
Access the Contacts Section:
- On the company's profile page, look for the
Contactsoption in the association panel, typically found on the right side of the page.
- On the company's profile page, look for the
-
Locate or Add the Contact:
- Search for the contact you wish to grant access to within the contacts list.
- If the contact is not listed, click
Add Contactto associate a new contact with the company.
-
Send the Invitation:
- Once you find or add the contact, check their information card for an
Invite to Business Appbutton. The invitation sends the contact an onboarding email — you can preview it and add a custom introductory message before sending. - If instead, you see a last login date, this indicates that the contact already has access to
Business App.
- Once you find or add the contact, check their information card for an
Following these steps will allow you to manage access to the company's Business App, ensuring that the right contacts have the necessary permissions.
Why does a CRM string field autocomplete with values from other contacts?
When you type into a CRM string field, you may see autocomplete suggestions pulled from values previously entered into that same field on other contacts. This is expected product-wide behavior — autocomplete draws from a global list of previously used values for each field, not from the specific contact you are editing. It is not a bug. You can ignore or dismiss the suggestion and type the correct value.
When should I use companies instead of accounts?
Accounts and companies serve different purposes:
-
Accounts: These are mainly used for handling your financial dealings within Vendasta. This covers billing details, product activations, and payment histories. To initiate these processes, you will need to create an account from the company if it has not already been created.
-
Companies: These are centered on building and maintaining customer relationships. They help you track potential leads and manage ongoing client interactions through the activity timeline.
So, if your role revolves around administrative functions, handling billing issues, and managing orders, opt for Accounts. They provide the necessary tools for effective financial management and operational administration.
If your job is focused on generating new sales, nurturing client relationships, and growing revenue, Companies are more apt. They offer the resources and framework for tracking leads, maintaining client relationships, and boosting sales.
The choice between accounts and companies depends on your job functions. Accounts are tailored for financial and administrative tasks, whereas companies are ideal for sales, CRM, and revenue growth activities.
What email address do I BCC to log emails in the Vendasta CRM?
For your own CRM in Partner Center, BCC [Partner ID]@sent-mail.yourdigitalagents.com. For a client's CRM in Business App, use their account group ID instead, like AG-1234567@sent-mail.yourdigitalagents.com. The sender must be a platform user and the recipient must be a CRM contact.
How do I log received emails in the CRM?
Forward them, manually or with auto-forwarding, to [Partner ID]@received-mail.yourdigitalagents.com, or to the client's account group ID at the same domain for a Business App CRM. The email is logged to the contact and its primary company.
What does Record Source mean on a CRM record?
Record Source shows the tool or process that created or updated the record, such as CRM UI, Bulk Import, Web Chat, Form, or an integration like HubSpot. See Record sources for the full list.
Is there AI for the Vendasta CRM?
Yes. CRM AI works through the AI Sales Assistant. It updates CRM records from sales conversations, lets you chat with your CRM data, and adds conversation intelligence with sales coaching on calls.