The Get started learning path sequences your first-week setup: the platform, branding, accounts, your team, and getting paid.
Vendasta Payments
Vendasta Payments is the built-in payment processing in Partner Center that lets your clients pay your invoices online by credit card under your brand, with funds deposited into your bank account automatically.
You set it up at Partner Center → Administration → Commerce Settings → Vendasta Payments. This guide walks you through the setup process from start to finish.
Vendasta Payments is only available on paid plans. It is not available on Free or Trial tiers. View plan details
Getting Started Checklist
- Check prerequisites: confirm your billing contact and regional eligibility before starting
- Create your Vendasta Payments account: set up payment processing under your brand
- Add a bank account for payouts: configure where client payments are deposited
- Connect an existing Stripe account (optional): link your current Stripe account instead of creating a new one
Step 1: What do I need before I start?
Before setting up Vendasta Payments, make sure the following are in place.
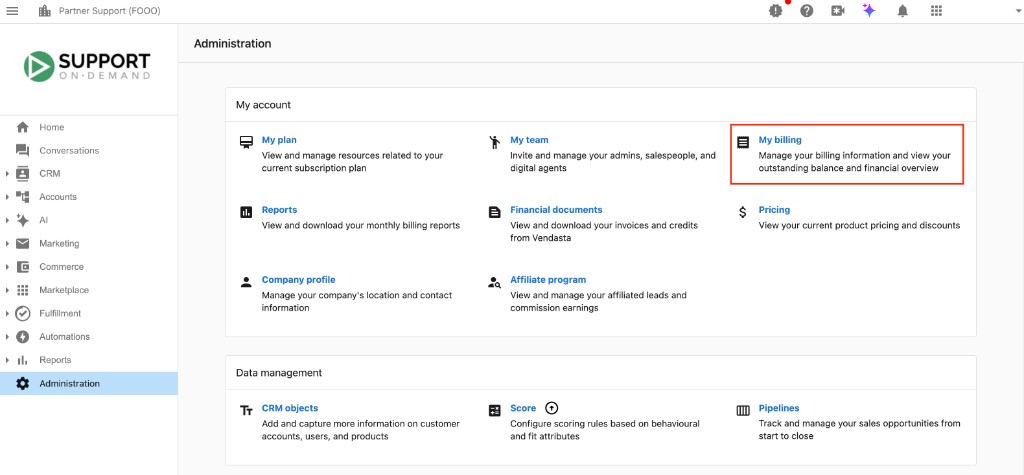
Complete your billing contact information
Navigate to Partner Center → Administration → My billing.
Confirm that your Billing Contact information is complete, including a full address with postal code. Incomplete billing information is the most common reason setup fails, even in supported regions.
Confirm your region is supported
Vendasta Payments is available in the following countries without additional assistance:
- United States, Canada, Australia, New Zealand, United Kingdom, Czech Republic
Partners in Germany, Belgium, Netherlands, Poland, and Switzerland can also access Vendasta Payments with sales assistance. Contact support@vendasta.com to get started.
If you see an "Unsupported in Your Area" error during setup, go back to My Billing and make sure your billing address is fully filled in, including the postal code. Missing address fields are the most common cause.
Step 2: How do I create my Vendasta Payments account?
Navigate to Partner Center → Administration → Commerce Settings → Vendasta Payments.
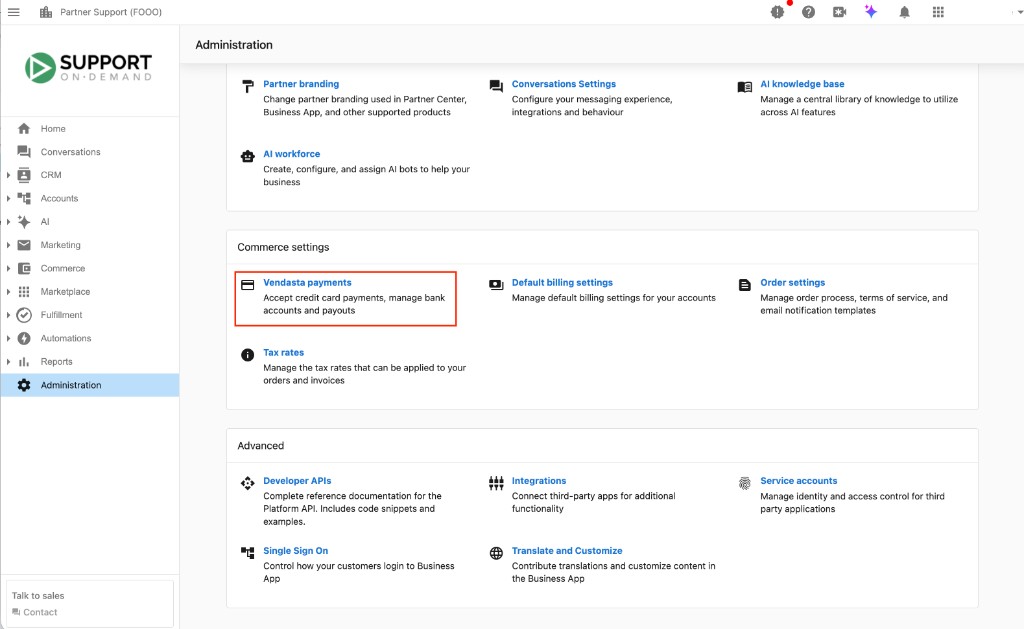
- Click Set up Stripe Account.
- Review and accept the Vendasta Payments Terms of Service.
- Fill in your business information:
- Legal business name: must match the name on your tax ID exactly
- Business number: your EIN (US) or CRA Business Number (Canada)
- Operating name: your "doing business as" name, if different from your legal name
- Registered business address
- Account representative details: legal name, home address, and ID verification
- Configure your bank account for payouts (covered in Step 3).
- Submit your application and wait for approval, typically 1 to 2 business days.
Set your customer statement descriptor
During setup, you'll be asked for a customer statement description. This is the text that appears on your clients' credit card statements when they pay you. Set this to your business name so clients recognize the charge and don't dispute it.
By default, "Vendasta" appears on client credit card statements. Replace this with your business name during setup. You have up to 22 characters.
Understand transaction fees
Standard Vendasta Payments processing fees are:
| Currency | Fee per transaction |
|---|---|
| USD, CAD, AUD, NZD | 2.9% + $0.30 |
| GBP | 2.9% + £0.20 |
| CZK | 2.9% + 8.00 Kč |
Fees are automatically deducted after each payment is collected. For full refunds, the transaction fee is deducted from your connected bank account.
Learn more about Vendasta Payments setup
Step 3: How do I add a bank account for payouts?
Once your Vendasta Payments account is approved, you need to add a bank account to receive client payments.
Navigate to Partner Center → Commerce → Payouts, or Partner Center → Administration → Commerce Settings → Vendasta Payments.
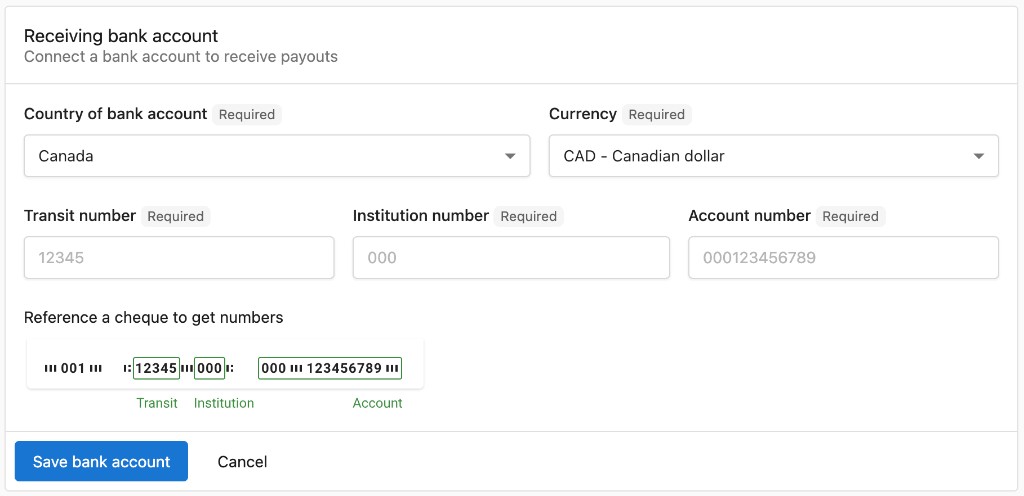
- Click Add Bank Account under the Receiving Payout section.
- Enter your bank account details:
- Country of bank account
- Currency
- Transit number
- Institution number
- Account number
- Set this account as your default for payouts.
- Click Save bank account.
If you need to replace an existing bank account, add the new one first, set it as default, then remove the old one. You cannot remove a bank account while it is set as the default.
How payouts work
After your first payment is received, Stripe holds the funds for up to one week. After that initial period, payouts are released on a 7-day rolling basis into your bank account. You can view all received payments under Partner Center → Commerce → Payments.
Multi-currency payouts
If you operate in multiple countries, you can add separate bank accounts for each currency you accept. Payments received in a configured currency are deposited without conversion. Payments in unconfigured currencies are automatically converted to your default currency.
Learn more about payment methods and fees
Step 4: (Optional) How do I connect an existing Stripe account?
If you already use Stripe to collect payments, you can connect your existing Stripe Standard account to Vendasta Payments instead of creating a new one.
Navigate to Partner Center → Administration → Commerce Settings → Vendasta Payments and select Connect an existing account.
Requirements
- You currently use Stripe to collect payments from customers
- You bill in a currency supported by Vendasta Payments
- You have not previously completed a transaction through a Vendasta platform-generated account
- Your connected Stripe account is registered in a country supported by Vendasta Payments
Fees with a connected Stripe account
When you connect your own Stripe account, your existing Stripe rates remain unchanged. Vendasta adds a 0.75% platform fee on each transaction.
This option is available for new users only. If you have already processed transactions through a Vendasta-generated Stripe account, you cannot switch to a personal Stripe connection.
If your Stripe connection does not complete, confirm that the connected Stripe account country is supported for Vendasta Payments.
Learn more about Vendasta Payments setup
Frequently asked questions
What are the Vendasta Payments processing fees?
Standard fees are 2.9% + $0.30 per transaction for USD, CAD, AUD, and NZD, 2.9% + £0.20 for GBP, and 2.9% + 8.00 Kč for CZK. Fees are deducted automatically after each payment is collected. If you connect your own Stripe account, your existing Stripe rates stay the same and Vendasta adds a 0.75% platform fee on each transaction.
Which countries is Vendasta Payments available in?
Vendasta Payments is available without additional assistance in the United States, Canada, Australia, New Zealand, the United Kingdom, and the Czech Republic. Partners in Germany, Belgium, the Netherlands, Poland, and Switzerland can access it with sales assistance by contacting support@vendasta.com.
Can I use Vendasta Payments on a Free or Trial plan?
No. Vendasta Payments is only available on paid plans. It is not available on Free or Trial tiers.
Why do I see an "Unsupported in Your Area" error during setup?
The most common cause is incomplete billing contact information. Go to Partner Center → Administration → My billing and make sure your billing address is fully filled in, including the postal code.
How long does Vendasta Payments account approval take?
After you submit your application, approval typically takes 1 to 2 business days. Once your account is approved, add a bank account to receive client payments.
When are client payments deposited into my bank account?
After your first payment is received, Stripe holds the funds for up to one week. After that, payouts are released on a 7-day rolling basis into your bank account. You can view received payments in Partner Center → Commerce → Payments.
Can I connect my own Stripe account instead of creating a new one?
Yes. You can connect an existing Stripe Standard account from Partner Center → Administration → Commerce Settings → Vendasta Payments by selecting Connect an existing account. This option is not available if you have already processed transactions through a Vendasta-generated Stripe account.
Can I receive payouts in more than one currency?
Yes. You can add a separate bank account for each currency you accept. Payments in a configured currency are deposited without conversion, and payments in other currencies are converted to your default currency.