The Get started learning path sequences your first-week setup: the platform, branding, accounts, your team, and getting paid.
How do I create client accounts and activate products?
To add a client, go to Accounts → Manage Accounts in Partner Center and click Create Account. To activate a product, open the account, find the Products card on the Overview, and click Create order.
In Vendasta, every client you serve is represented by an account. An account holds that client's business profile, their active products, and more. Before you can deliver any services, you need to create accounts for your clients and activate the right products for them. This guide walks you through that core workflow from start to finish.
Getting Started Checklist
- Create a client account: add your client's business to the platform
- Edit and complete the account profile: fill in business details to ensure accurate service delivery
- Activate products for a client: turn on the products and services your client is subscribed to
- Manage and update products: change editions, add-ons, or cancel products as your client's needs evolve
Step 1: Create a client account
Before you can activate any products or give a client access to Business App, you need to create an account for them. Accounts store your client's business profile and connect them to all services on the platform.
Navigate to Partner Center → Accounts → Manage Accounts.
Create a single account
The fastest way to add a known business:
- Click Create Account in the upper right corner.
- Type the business name and location in the search bar (e.g., "Joe's Bakery, Austin, TX").

- Select the correct business from the results. The platform automatically populates the address, phone number, and business categories from public directories.
- Review the pre-filled information and add anything missing.
- Click Create Account.
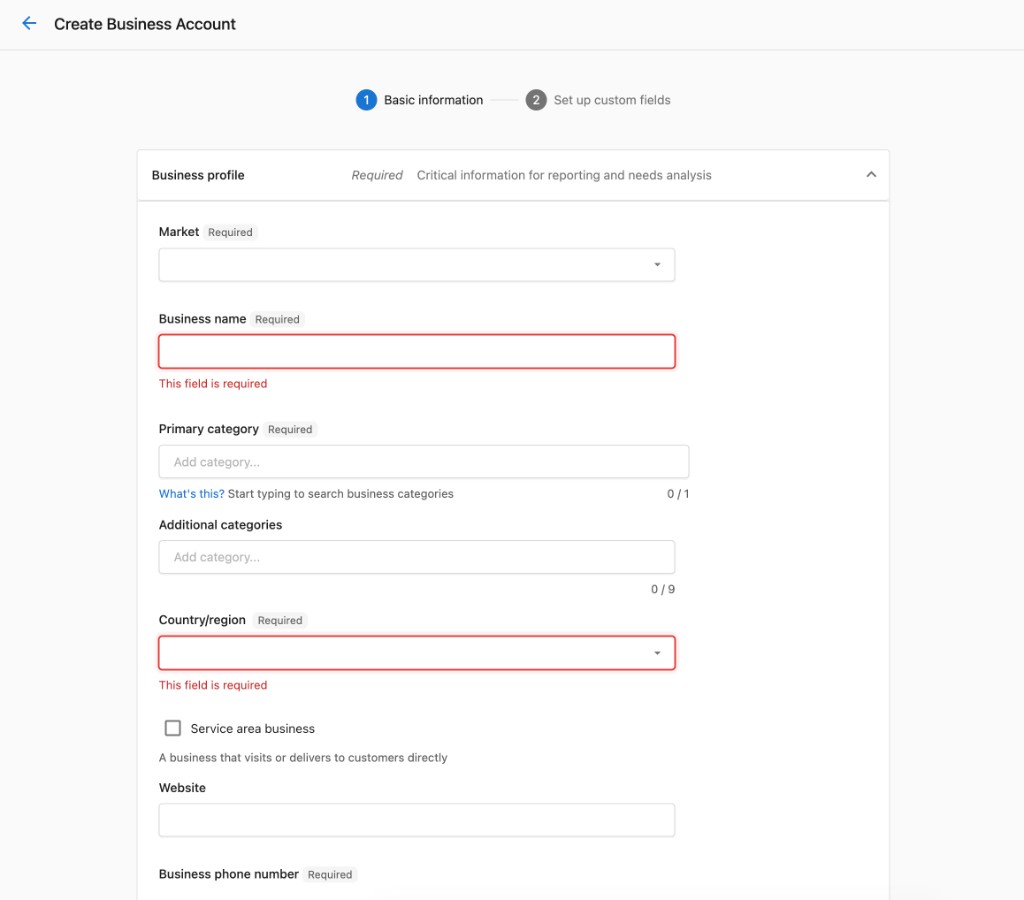
If the business doesn't appear in search results (for example, it's newly opened or a service-area business with no storefront), click Skip to account creation to enter all details manually.
Required fields for manual creation
When entering a business manually, you must provide:
- Business Name
- Street Address (or service area for businesses without a storefront)
- City, State/Province, ZIP
- Phone Number
- Business Categories (select up to 3)
Import multiple accounts at once
If you're onboarding several clients, use the bulk import:
- Click the three-dot menu beside the Create Account button in the upper right corner.
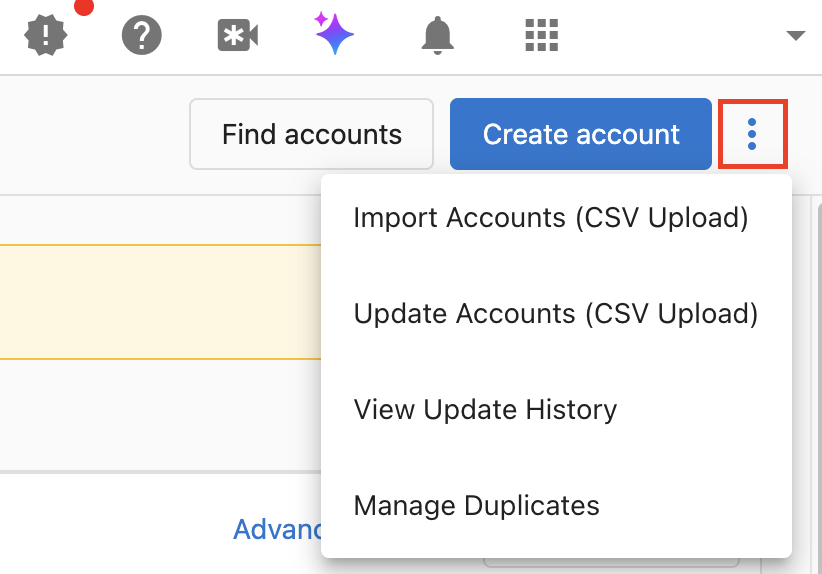
- Select Import Accounts (CSV Upload).
- Download the CSV template and fill it in with your clients' business information.
- Upload the completed CSV, review the import preview for errors, and configure notification settings.
- Click Import Accounts to process.
During import, you can control whether newly created users receive a welcome email and are granted access to Business App. You can adjust these permissions later from Manage Users.
Learn more about creating accounts
Step 2: Edit and complete the account profile
After creating an account, take a moment to make sure the business profile is complete and accurate. Products that rely on business data (such as listing management and reputation tools) work best when the account details are filled in correctly.
Navigate to Partner Center → Accounts → Manage Accounts, open the account, and click Edit.
Key profile fields to add
- Business Name: confirm it matches how the client publicly presents their brand
- Address: verify the full address, including suite or unit numbers
- Phone Number and Website: double-check these are current
- Business Categories: choose the most specific categories available, as some product features depend on them
- Business Hours: add operating hours to support listing and reporting tools
Assign to a market (if markets are part of your subscription)
If you serve clients across different regions or industries, assign each account to the appropriate market. Markets control which branding, products, and pricing apply to a client.
- In the Edit view, go to Administration.
- Select the correct market from the Market dropdown.
- Click Save.
Changing an account's address or market after creation can affect product integrations and reporting. Review these impacts before saving.
Learn more about editing accounts
Step 3: Activate products for a client
Once an account is set up, you can activate the products your client has purchased or needs. Product activation is how you turn on a service and begin delivering it.
Navigate to Partner Center → Accounts → Manage Accounts, open the account, and find the Products card on the account Overview.
Activate a product through the account
- Open the account and scroll down to the
Productscard on the Overview. - Click
Create order.
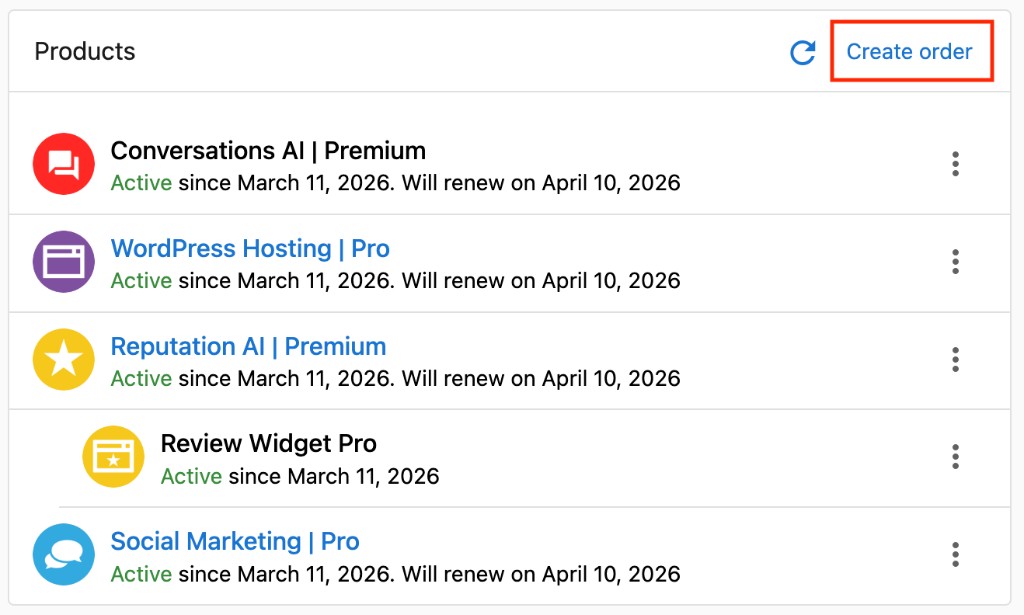
- Select the product and edition from your catalog. (If you don't see the product here, you will need to navigate to the marketplace and click "start selling".)
- Follow the on-screen steps to complete activation. A sales order will be automatically created to track the activation and billing.
- Verify the product appears as active and test that the client's Business App reflects the new service.
Product activation always generates a sales order as part of the process. This ensures proper billing and tracking across your commerce workflow.
Activating a product does not automatically charge your client. Billing depends on how you have subscriptions and invoicing configured. Learn more about subscriptions
Choose the right edition
Many products have multiple editions at different price points and feature levels. When choosing an edition:
- Match the edition to what the client actually needs now, not what they might need in the future.
- You can upgrade or downgrade editions later (see step 4).
Building your store
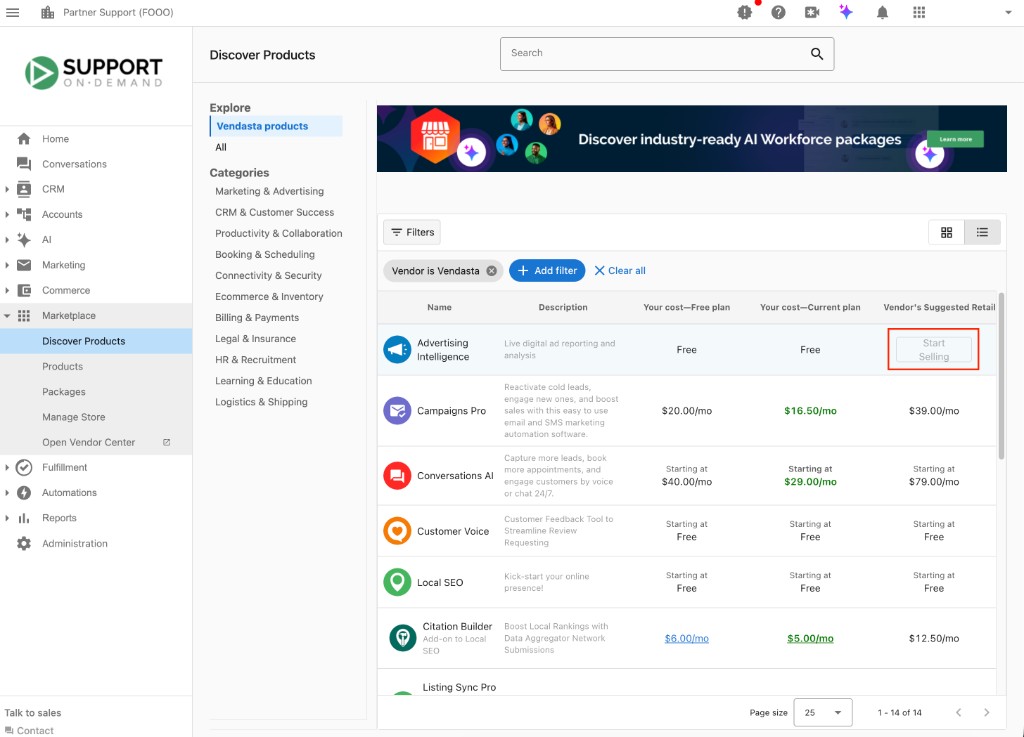
Before you can offer products to clients, you need to add them to your store from Marketplace:
- Navigate to
Partner Center→Marketplace. - Browse and select the products you want to offer.
- Click Start selling on a product to add it to your catalog.
Step 4: Manage and update products
As your clients' needs change, you'll need to update their products: upgrading editions, adding on services, or cancelling products they no longer use.
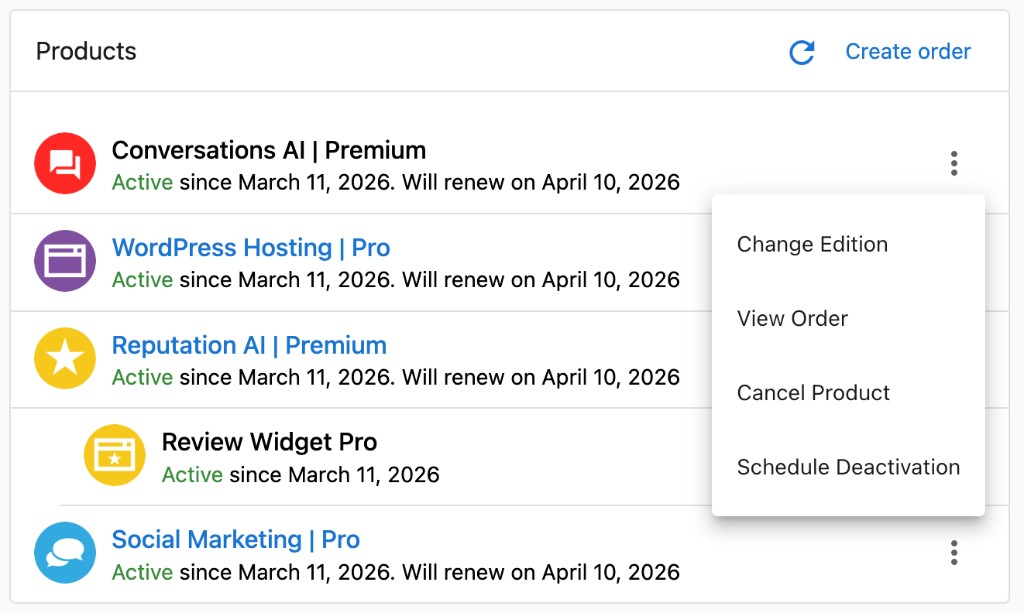
Navigate to Partner Center → Accounts → Manage Accounts, open the account, and find the Products card on the account Overview.
Change a product edition
To upgrade or downgrade a product for a client:
- In the
Productscard on the account Overview, click the menu icon beside the product that you wish to change the edition of. - Select
Change edition. - Choose the new edition and confirm.
Upgrading to a higher edition may incur additional charges. Some downgrades may not be supported for all products. Review the implications before confirming.
Cancel a product
If a client no longer needs a product:
- In the
Productscard on the Overview, click the menu icon beside the product and selectCancel product. - Choose how to cancel:
- Cancel at the end of the current period: the product stays active until the billing period ends
- Cancel immediately: access ends right away
- Cancel after a specified number of renewals: schedule cancellation in advance
After scheduling a cancellation, the product remains active until the cancellation date shown. You can undo the cancellation during this window if the client changes their mind.
Learn more about managing products
Frequently asked questions
How do I add a new client in Partner Center?
Go to Partner Center → Accounts → Manage Accounts and click Create Account. Search for the business by name and location, select it, review the pre-filled details, and click Create Account.
Why don't I see a product when I create an order for an account?
The product isn't in your store yet. Go to Partner Center → Marketplace, find the product, and click Start selling to add it to your catalog.
Can I downgrade a client's product?
Use Change edition in the product's menu on the account's Products card. Some downgrades aren't supported for all products, so review the options before confirming.
How do I remove a product from a client's account?
In the account's Products card, open the product's menu and select Cancel product. You can cancel at the end of the current period, immediately, or after a set number of renewals, and undo a scheduled cancellation before its date.
Does activating a product charge my client?
No. Activation creates a sales order for tracking, but billing depends on how your subscriptions and invoicing are configured.