Google Tag Manager & Facebook Meta Pixels Overview
This article guides you through the essentials of Google Tag Manager (GTM) tags and Facebook Meta Pixels. Understanding and implementing these tools is crucial for tracking and optimizing your client's digital marketing campaigns, ensuring they get the most out of their advertising efforts.
What is a GTM?
Google Tag Manager (GTM) is a free tool provided by Google that allows you to manage and deploy marketing tags (snippets of code or tracking pixels) on your client's website without having to modify the code directly. Tags are tiny bits of website code that can measure traffic and visitor behaviour, understand the impact of online advertising and social channels, use remarketing and audience targeting, and test and improve the site.
How GTM works
GTM uses a container tag to contain all the other tags for the site, like Google Analytics, Google Ads, or third-party tags. When someone visits the website, the container tag is triggered and fires all the tags contained within it based on specific rules you set up. This allows for greater control and flexibility in managing tags without needing to involve a developer for each update.
Why you need GTM on your client's website
- Ease of Use: Marketers can easily add and update website tags without needing technical knowledge or a developer's help.
- Speed: Updates and changes to tags can be done quickly and efficiently.
- Flexibility: Allows you to deploy a wide variety of tags from different vendors.
- Debugging and Preview Mode: You can test and debug your tags before deploying them live, reducing errors and ensuring correct data collection.
- Centralized Management: All tags are managed from one platform, simplifying the process and improving organization.
GTM is crucial for running effective digital ad campaigns. It ensures accurate data collection and enables better performance tracking, optimization, and reporting.
What is a Facebook Meta Pixel?
A Facebook Meta Pixel is a snippet of JavaScript code that you place on your client's website. It allows you to track visitor activity on the site, gather insights about the audience, and measure the effectiveness of your client's Facebook advertising campaigns.
How Facebook Meta Pixel works
When someone visits your client's website and takes an action (like completing a purchase), the Facebook Pixel is triggered and reports this action. This allows you to track visitors as they interact with the website, ensuring your client's ads are shown to the right people and measuring the outcomes of those ads.
Why you need Facebook Meta Pixel on your client's website
-
Audience Insights: Helps you understand the audience better by tracking their interactions on the website.
-
Ad Targeting: Allows you to create custom audiences based on specific actions people take on the site, leading to more targeted and effective ads.
-
Conversion Tracking: Measures the effectiveness of your client's Facebook ads by tracking actions taken by visitors on the website.
-
Optimization: Enables Facebook’s algorithms to optimize ad delivery to people who are more likely to take the desired action, improving ROI.
-
Retargeting: Allows you to retarget visitors who have visited the site but did not complete desired actions, increasing the chances of conversion.
Implementing the Facebook Meta Pixel is essential for running successful Facebook ad campaigns. It provides valuable data for optimizing ads and understanding visitor behaviour on your client's website.
Obtaining the GTM code or Facebook Meta Pixel code
To add a GTM or Facebook Meta Pixel to your client's website, add the code for the GTM container or the pixel to the website.
Finding the GTM code
- Open the Google Tag Manager website and sign in with the Google account you’ve used to create the tags and containers.
- Once your container is created, Google Tag Manager provides the GTM code snippets. There are two pieces of code: one to be placed in the
<head>section and one in the<body>section of the website's HTML.- The GTM itself is quite short (ex: GTM-ABCDEFG), but the entire code is several lines of text.
Finding the Facebook Meta Pixel code
-
Log into your Facebook account and go to Facebook Ads Manager.
-
Click on the menu icon (a grid of nine small squares) in the top left corner to open the Business Tools menu. Select
Events Manager. -
In the Events Manager, you’ll see a list of data sources. Look for the section labelled “Pixels.”
-
Find and click on the name of your pixel. If you have multiple pixels, select the one you want to work with.
-
Once you click on your pixel, you’ll be taken to the pixel details page.
-
Click on the
Set Upbutton in the top right corner.- Choose
Install Pixeland thenManually add pixel code to websiteto access the pixel code.
- Choose
Checking your website for existing code
In case the code has already been placed on the site, it’s a good idea to check for it first.
- Open the homepage (or any page) of your client's website on a desktop computer.
- Right-click on the page and click “Inspect” from the drop-down menu.
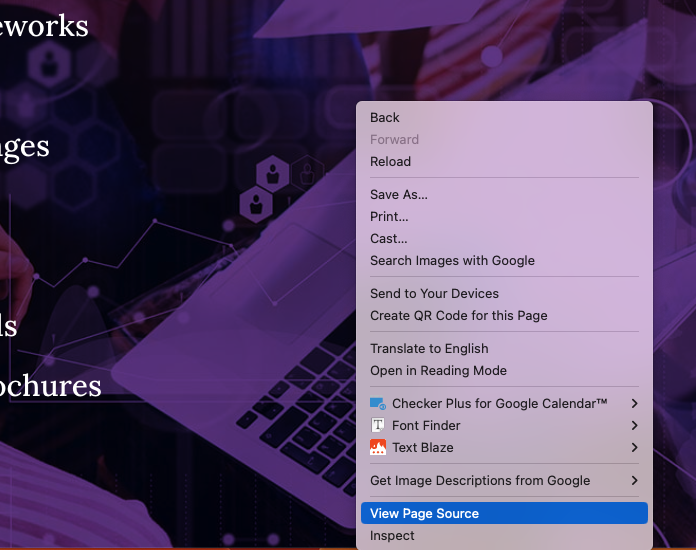
- After you’re redirected to the additional tab, click CTRL + F (Windows) or Command + F (Mac) and paste your code into the search bar.
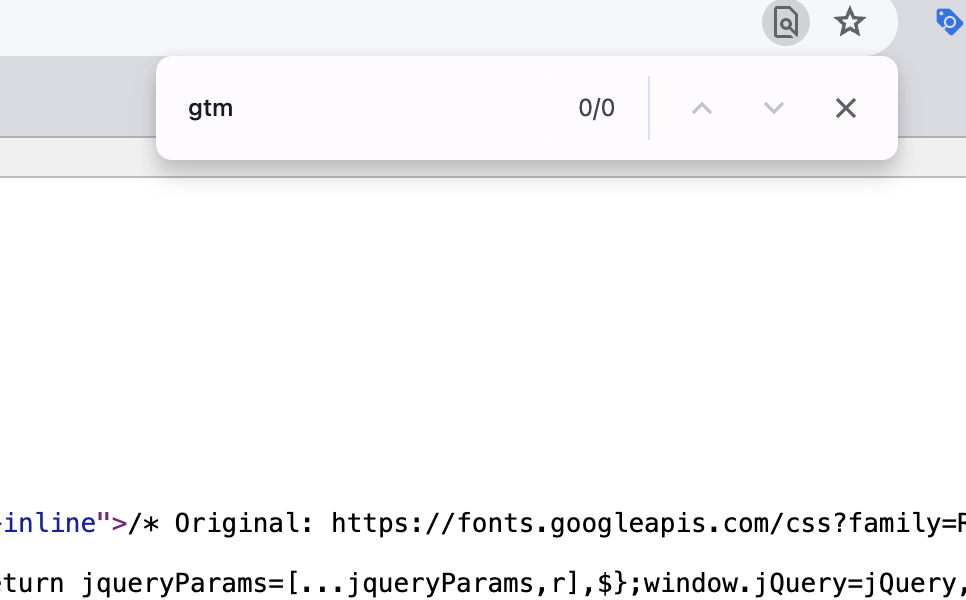
- Review the results to see if any match your GTM or Facebook Meta Pixel.
- If the code is not on the website, proceed with the below steps to add it.
Adding a GTM or Facebook Meta Pixel to your client's website
Access the backend of the website
-
Go to the backend of your client's website and navigate to the HTML sections. (The steps differ depending on the website platform and builder.)
Below are the steps for a WordPress website built with Divi:
-
Within the WordPress dashboard, click on
Divifrom the navigation bar on the left.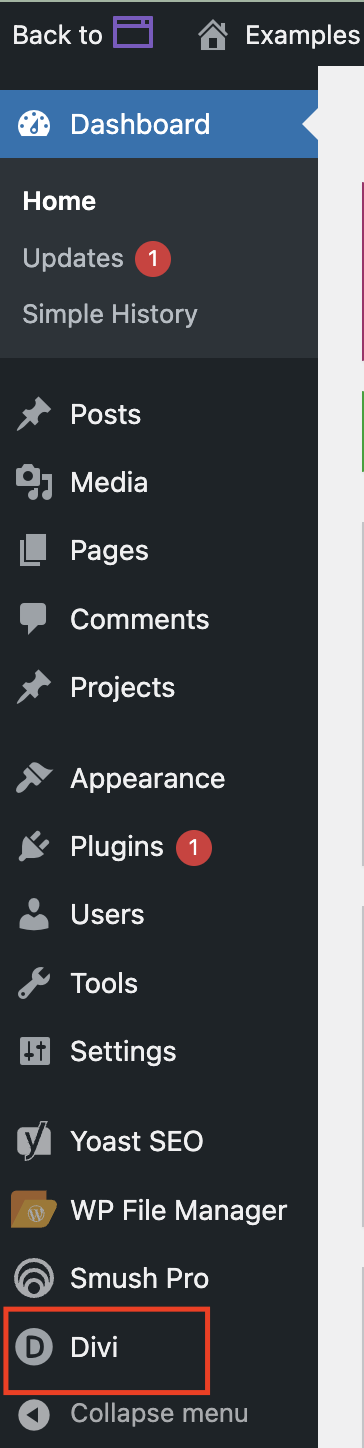
-
From the Divi Theme Options page, click on the
Integrationtab.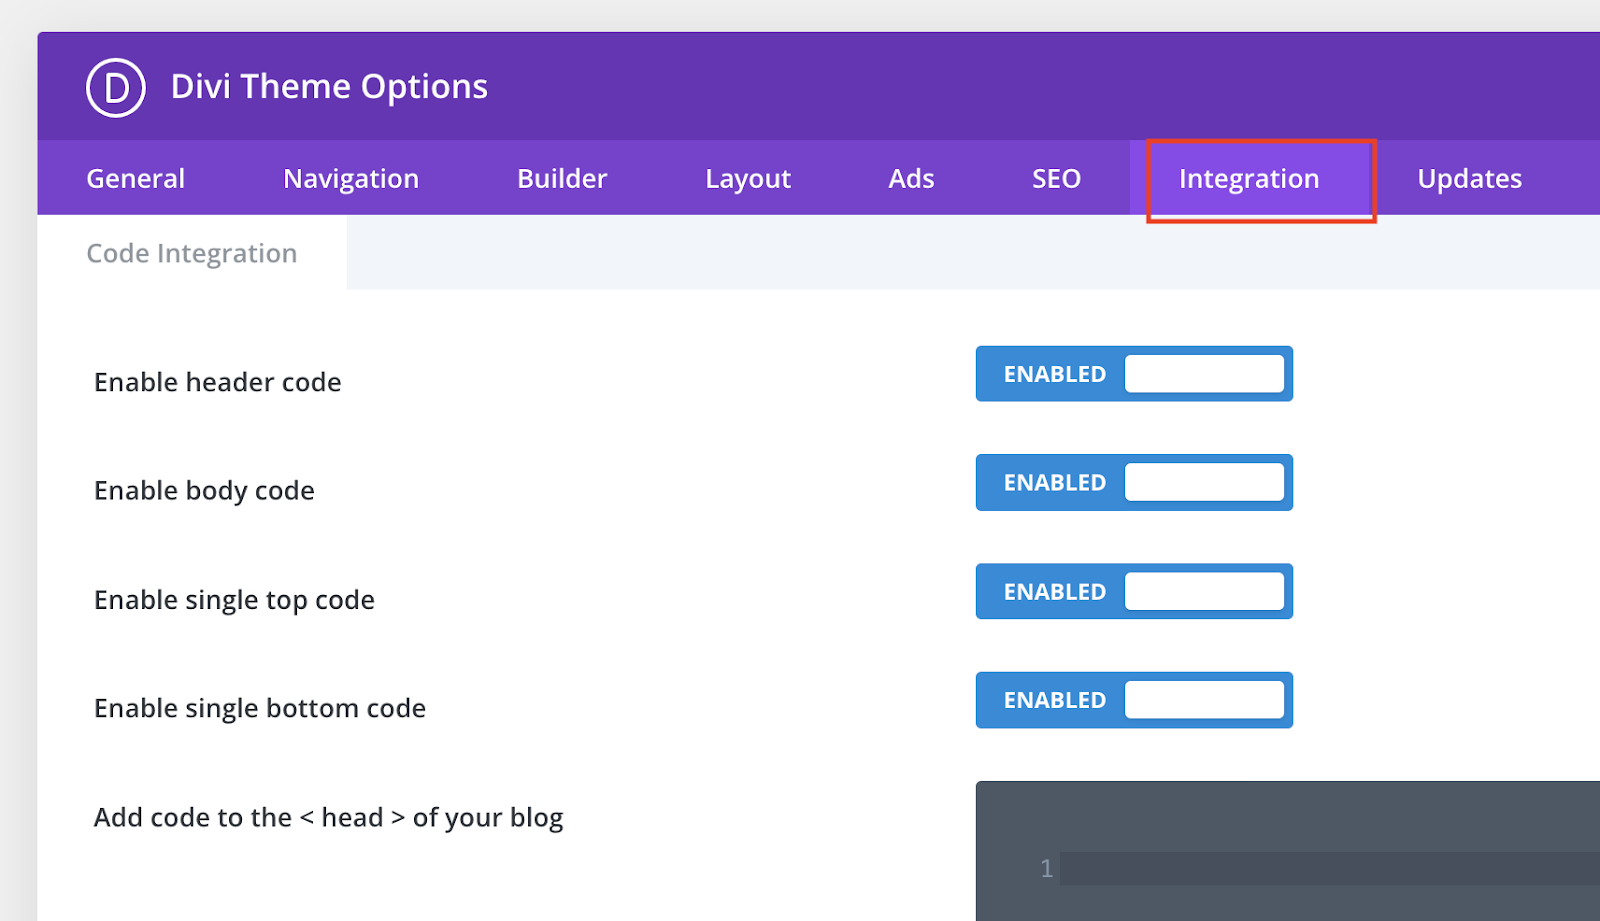
-
Look for two boxes in which code can be added, one for the
<head>and one for the<body>.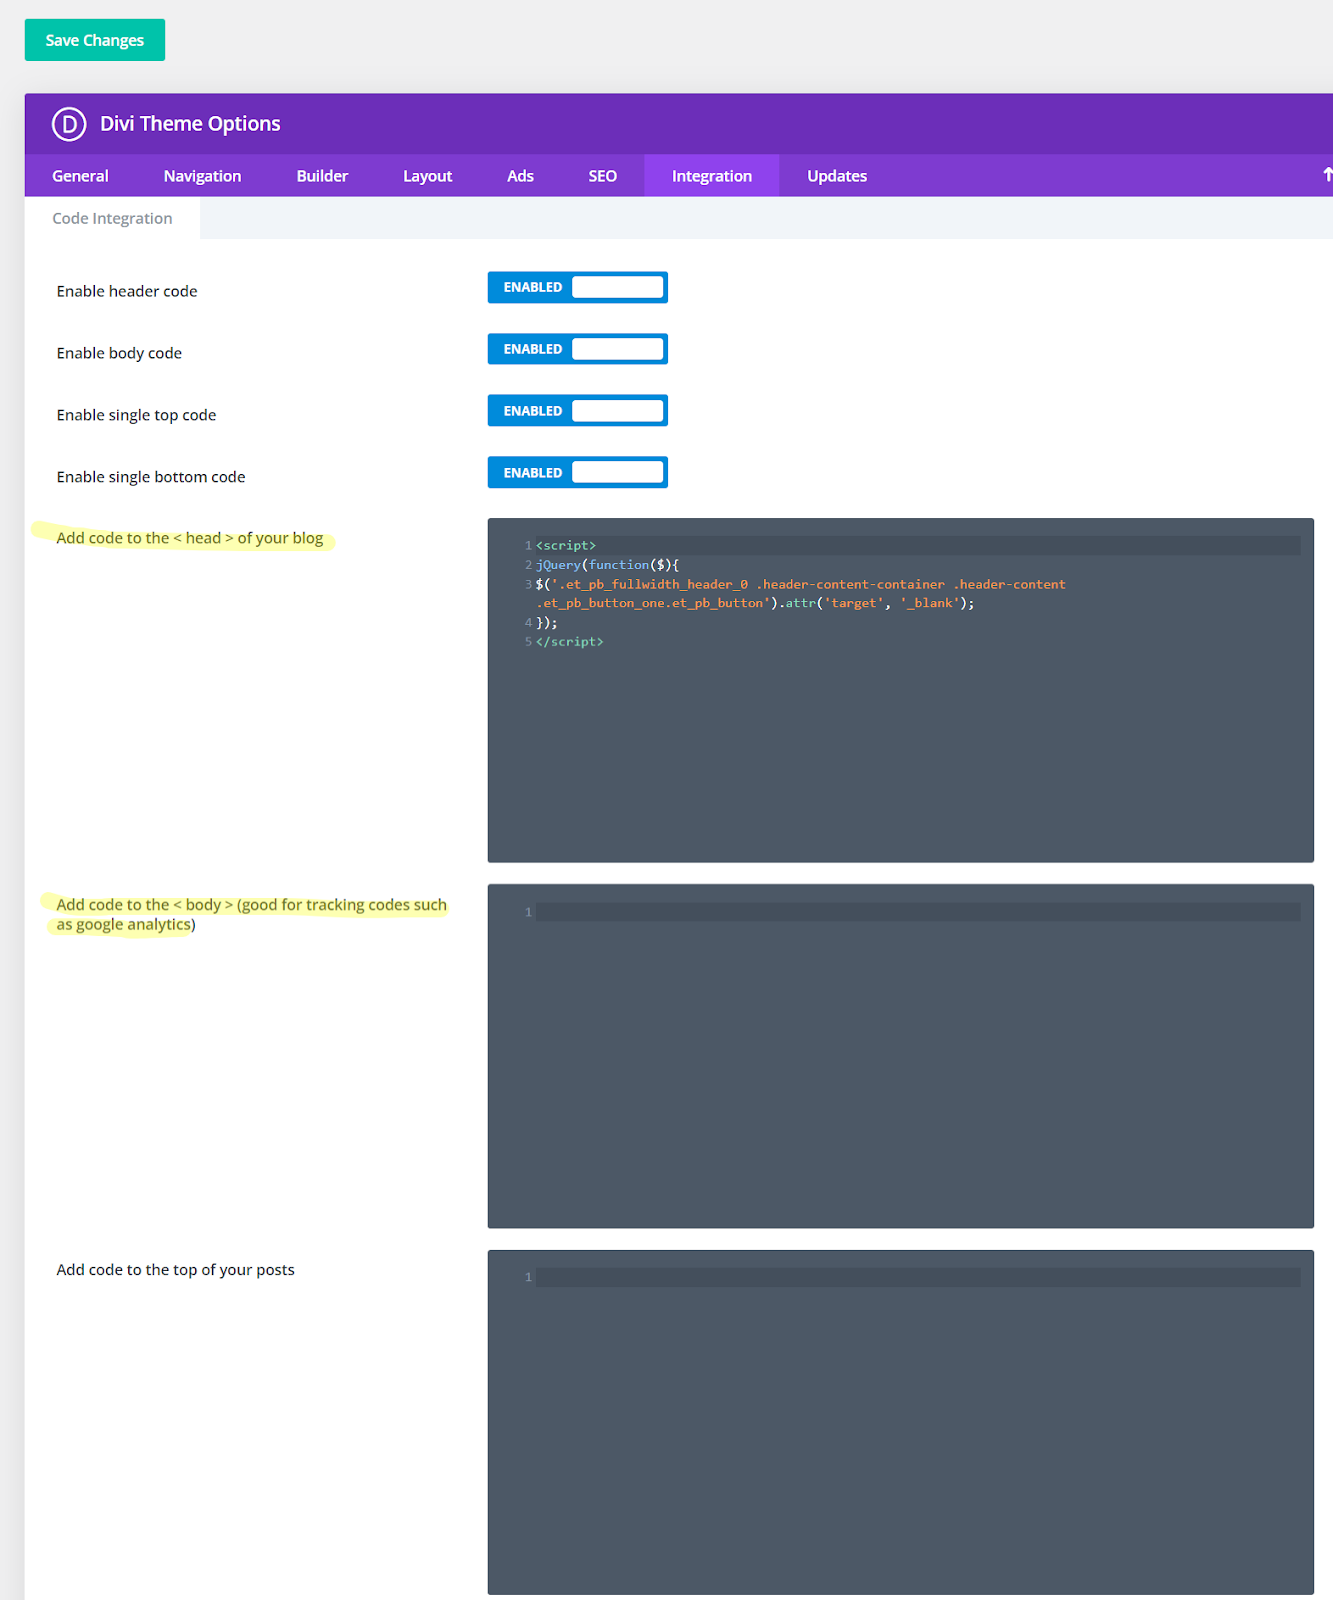
Adding the GTM code to the website
-
From Google Tag Manager, copy the GTM code snippets and paste them into the website’s HTML where instructed.
- Paste the code for the
<head>in the relevant section and the code for the<body>into the relevant section.-
The
<head>snippet should be placed as high in the<head>section as possible, and the<body>snippet immediately after the opening<body>tag.This approach ensures tags in GTM fire as soon as possible, whereas placing the code lower in the HTML causes them to fire later and can result in missing some data.
-
- Paste the code for the
-
Click the green
Save Changesbutton at the bottom of the page.
Adding the Facebook Meta Pixel code to the site
- Copy the entire pixel code provided by Facebook.
- Paste the pixel code into the website’s HTML within the header (i.e. the
<head>) section.- (This requires access to the backend of the website.)
- Paste the entire pixel code just before the closing
</head>tag.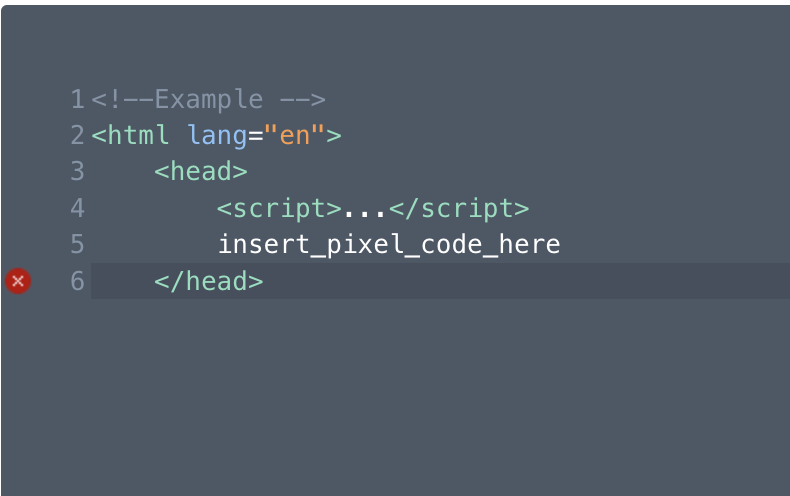
- Click the green
Save Changesbutton at the bottom of the page.
Now that the GTM code and/or the Facebook Meta Pixel codes have been added to the site, you should verify the installation and that they’re functioning correctly.
Verifying correct installation and functionality of GTM or Facebook Meta Pixel on website
Verify your GTM installation
To verify that the GTM is installed and functioning correctly, use a browser extension tool, like Google’s Tag Assistant Companion from the Chrome Web Store. Install and enable the extension, then visit your client's website to confirm which Google tags are detected and whether they're functioning properly.
Verify your Facebook Meta Pixel installation
You can use a browser extension tool, like Meta Pixel Helper from the Chrome Web Store, to verify that the pixel is installed and functioning correctly.
- Install and enable the Meta Pixel Helper browser extension from the Chrome Web Store.
- Visit the front end of your client's website and the page where the pixel is installed. The Pixel Helper indicates if the pixel is correctly installed and firing.
- If it’s not, an error message appears.
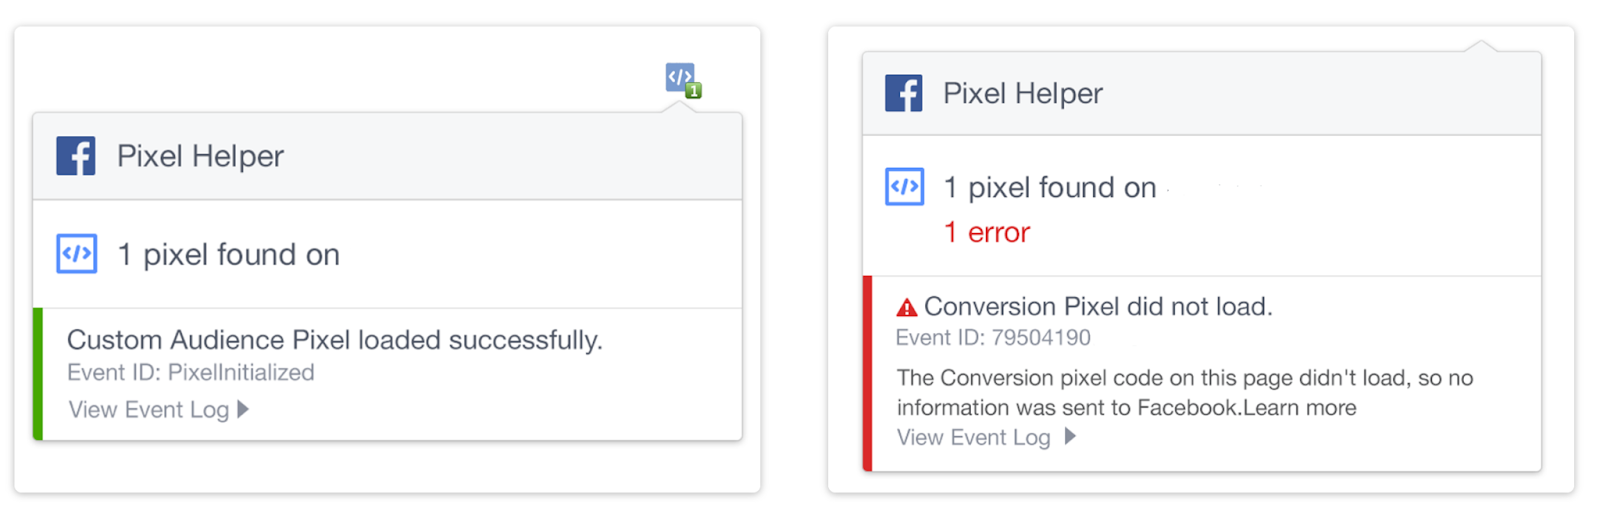
- If it’s not, an error message appears.
By following these steps, you can successfully add the Google Tag Manager (GTM) and/or Facebook Meta Pixel to your client's website. This allows you to track user interactions, optimize your client's ad campaigns, and create targeted audiences.