Multi-location web chat widget
The multi-location web chat widget lets you add a single web chat to a brand or franchise website where visitors can choose which location they want to talk to. When a visitor selects a location, they chat with that location's own AI Chat Receptionist, so every conversation, contact, and lead stays with the right business.
This is ideal for brands, franchises, and multi-location businesses that have one main website but want each location to handle its own customer conversations.
How it works
The multi-location web chat widget has two views:
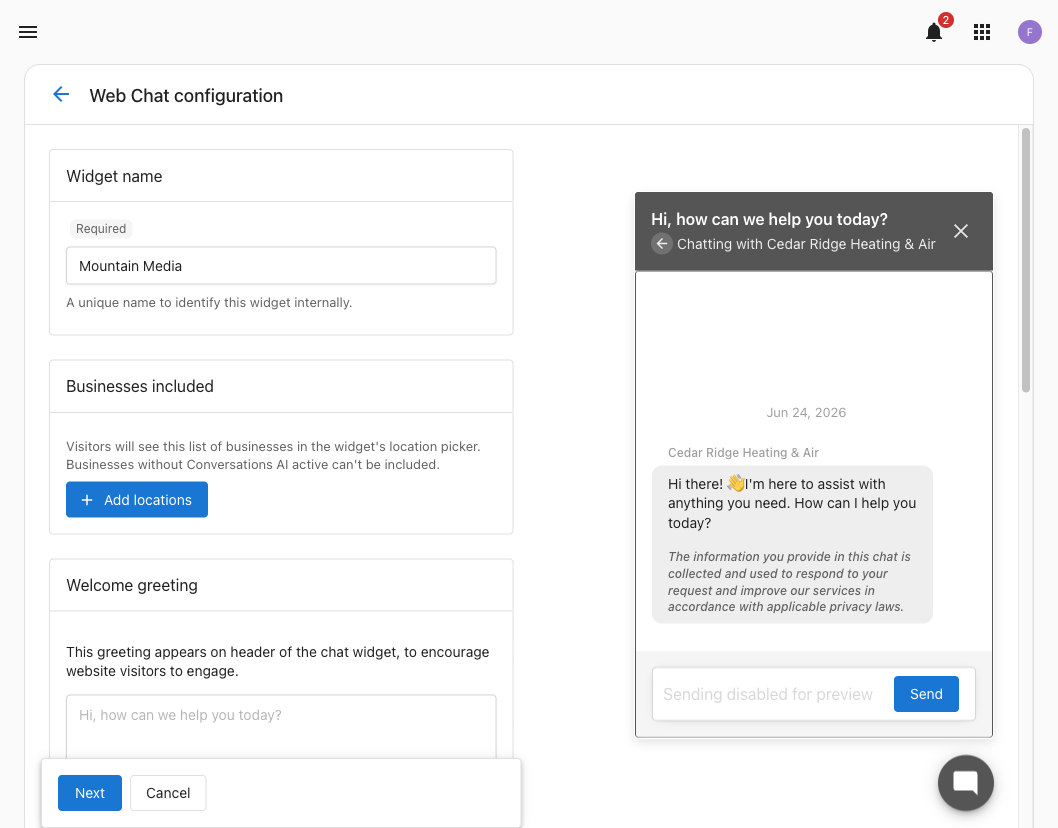
Location picker: When a visitor opens the widget, they see a searchable list of your locations. Each location shows its business name and address. Visitors can search by business name or address to quickly find the location they want, and page through the list ten locations at a time.Chat: When a visitor selects a location, the widget opens a conversation with that location's AI Chat Receptionist. A back arrow lets the visitor return to the location list.
Each location responds with its own AI Chat Receptionist and its own knowledge, and the conversation is delivered to that location's inbox.
Going back to the location list ends the current conversation. If a visitor picks a different location, they start a fresh chat rather than carrying the previous messages across.
How it's different from a standard web chat widget
| Standard web chat widget | Multi-location web chat widget | |
|---|---|---|
| Where it's set up | A single business account | A multi-location group (brand or franchise) |
| What the visitor sees | A chat with one business | A location picker, then a chat with the location they choose |
| Who answers | That business's AI Chat Receptionist | The selected location's own AI Chat Receptionist |
| Where it's best used | A single business website | A brand, franchise, or corporate website that covers many locations |
You can still install a separate standard web chat widget on each individual location's own website. Use the multi-location widget when you have one website (such as a brand or corporate site) that needs to route visitors to many locations.
Before you begin
Before you create a multi-location web chat widget, make sure:
- Multi-location Conversations is turned on for the group. If you haven't started yet, open
Conversationsfor the group and selectStart using multi-location Conversations. - Each location you want to include has web chat active in its own Conversations settings. Only these locations can be added to the widget, locations without it appear as
Conversations AI not activeand can't be selected.
Create a multi-location web chat widget
Step 1: Open the Web Chat configuration page
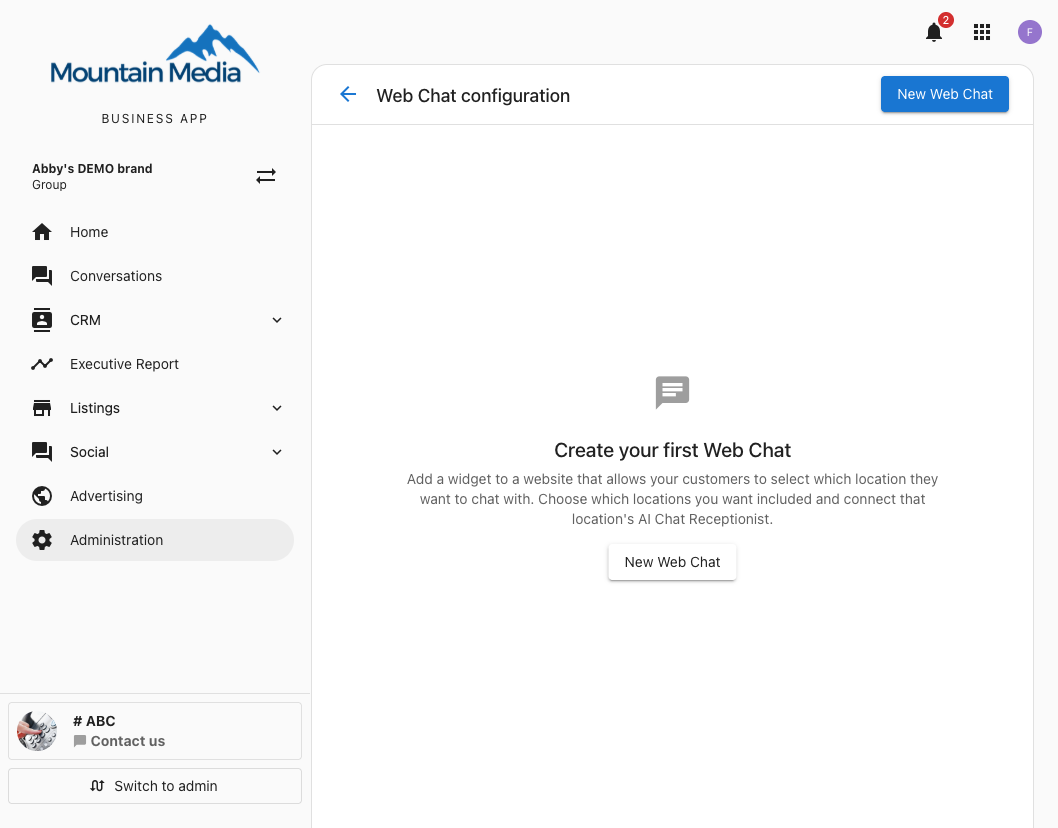
From the multi-location group, open the Web Chat configuration page (under Administration) and select New Web Chat.
Step 2: Check the widget name
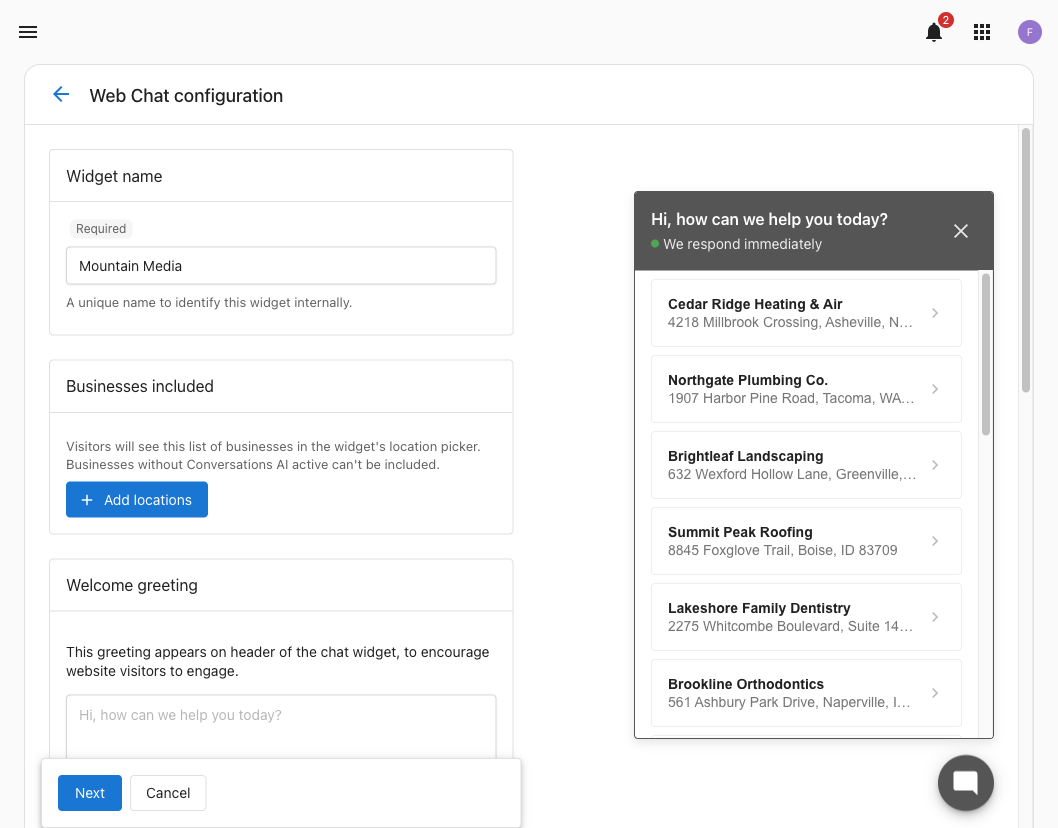
Widget name fills in automatically with your brand or group name. This is a unique name used to identify the widget internally, your visitors don't see it, so change it to something more specific if you plan to run more than one widget.
Step 3: Add the businesses to include
Under Businesses included, select Add locations to open the Choose businesses window, then pick the locations visitors can chat with.
- Use
Searchto find a business by name or address. - Each row shows the
Businessname and address and itsAI Employee. - Eligible locations show a green badge with the employee's name (for example,
Chat Receptionist). Locations without web chat active show a yellowConversations AI not activebadge and can't be selected. - Select your first business, and a banner appears with a count of everything else you could add, for example
Select all 12 eligible. When a search is active, this becomesSelect all 12 matchinginstead.
Select Done when you're finished. Once you've added locations, the button on this card becomes Edit locations.
Only businesses with web chat active can be added. If a location is missing or shows Conversations AI not active, set up and activate its AI Chat Receptionist, then reopen the window.
As you build the widget, a live preview on the right shows the visitor's location picker.
The preview uses sample locations, not the ones you selected. It's there to show layout and colors, not your final list.
Step 4: Add a welcome greeting (optional)
The Welcome greeting appears in the header of the chat widget to encourage visitors to engage, for example, "Hi, how can we help you today?" It's limited to 70 characters.
Step 5: Set the initial AI message (optional)
Initial AI message is the first message your AI Chat Receptionist sends once a visitor opens a chat. It's turned on by default with a standard message and privacy notice, and you can replace it with up to 600 characters of your own.
This message is the same for every location in the widget.
Step 6: Customize the appearance (optional)
Under Appearance, match the widget to your brand:
Primary colorandPrimary text color(DarkorLight) for the header and branding.Accent colorandAccent text colorfor the send button and chat bubbles.Web Chat bottom corner positionto show the widget in theLeftorRightcorner.Mobile Call-to-Action Popupto show a message popup to new visitors on mobile screens, rather than only the circular chat button.
These settings apply to the whole widget, including every location's chat.
Step 7: Create the widget
Select Next to create the widget. Its installation code appears right away (see the next section). After you close it, the widget appears in your web chat list, where its Status shows whether it's active.
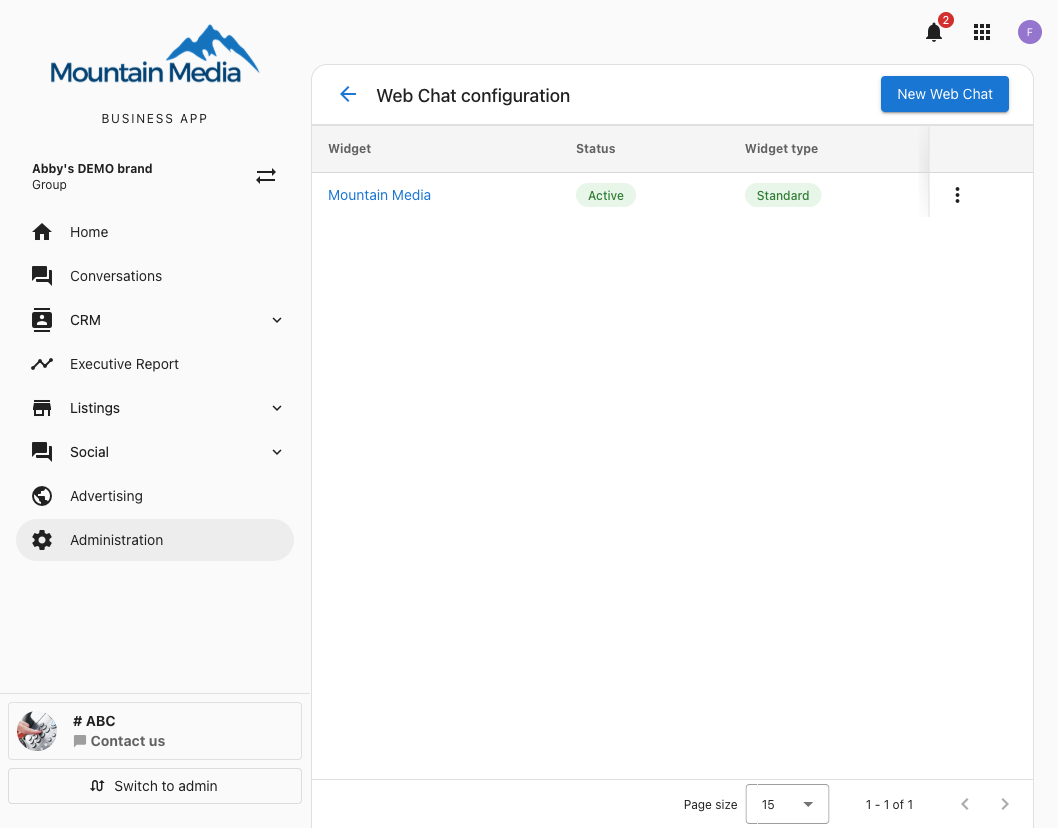
In the web chat list, the Widget type column shows Standard for a multi-location widget. That column separates widgets you create from System widgets (such as Snapshot and listings), it doesn't label multi-location widgets specifically.
Install the widget on your website
When you create the widget, its installation code appears under Floating chat widget. Add the code to the brand or corporate website where you want the location picker to appear.
A multi-location widget's install code includes a data-widget-type="group" attribute, this is what tells the widget to show the location picker.
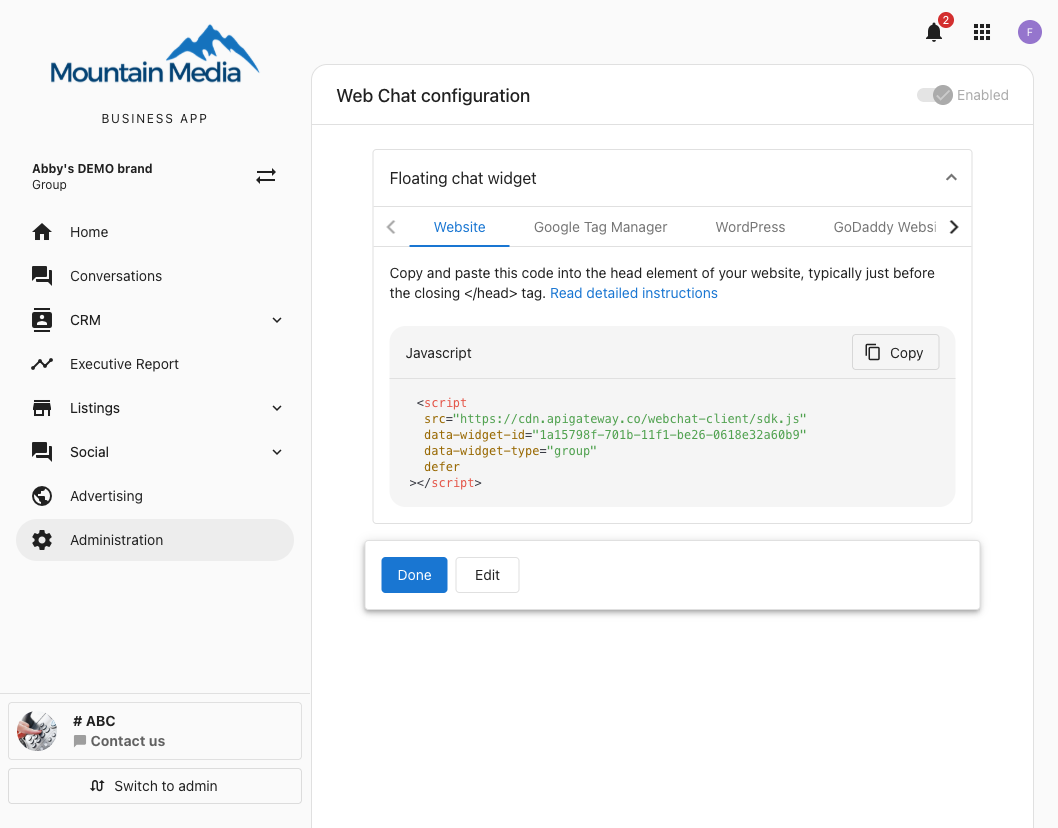
The panel has four tabs:
Website: a script tag to paste into your site.Google Tag Manager: the same widget delivered through a Tag Manager custom HTML tag.WordPress: aDownload WordPress pluginbutton. This tab installs a plugin rather than giving you a snippet to paste.GoDaddy Website Builder: a script sized for GoDaddy's custom code section.
For the Website tab, paste the code into the <head> of your website (or just before the closing </body> tag), on every page where you want the widget to appear:
<script
  src="https://cdn.apigateway.co/webchat-client..prod/sdk.js"
  data-widget-id="YOUR_WIDGET_ID"
  data-widget-type="group"
  defer
></script>
The exact code is generated for your specific widget. Always copy it from the widget's installation panel rather than typing it by hand, so the widget ID and script URL are correct.
The separate embedded widget install option and Widget Actions (prefill or auto-send links) that standard web chat widgets offer aren't available for multi-location widgets.
What your visitors see
When a visitor opens the widget, they see the location picker:
- The header shows your welcome greeting and
We respond immediately. - A search box,
Search by business name or address..., lets them filter your locations. - Each location appears as a card with its business name and address.
- Locations are shown ten at a time, with page controls underneath when there are more.
When they select a location, the chat opens with that location's AI Chat Receptionist. The header shows Chatting with that location, and a back arrow returns them to the location list.
How leads and conversations are routed
Each location keeps its own conversations:
- A conversation started from the widget is delivered to the selected location's inbox.
- Contacts and notifications are managed at the single-location level, each location follows up with its own leads.
- You can still see and manage all of these conversations together in the group's multi-location Conversations view.
Chats from the widget arrive as anonymous web chat conversations until the visitor shares their contact details, and the default inbox filter hides them. In the location's inbox, set the filters to include Web Chat and Anonymous to see them.
Frequently asked questions
Do I still need a separate web chat widget on each location's website?
No. If each location has its own website, you can continue to install a standard web chat widget on each one. The multi-location widget is for a single brand or corporate website that needs to route visitors to many locations. You can use either approach, or both.
Why is one of my locations missing from the "Choose businesses" list?
A location can only be added if it has web chat active in its own Conversations settings. If a location is missing or shows a yellow Conversations AI not active badge, set up and activate its AI Chat Receptionist, then reopen the widget and add it.
Can each location have a different AI Chat Receptionist?
Yes. Each location uses its own AI Chat Receptionist, with its own knowledge and settings. The visitor chats with the receptionist that belongs to the location they selected.
Does the chat show the receptionist's name and picture?
No. The multi-location widget doesn't display the individual receptionist's name or avatar in the chat window. The receptionist's name is shown to you in the Choose businesses window when you build the widget, so you can confirm which employee handles each location.
What happens to the appearance settings: are they per location?
No. The colors, name, welcome message, initial AI message, and position you set on the widget apply to the whole widget, including every location's chat.
Can I add or remove locations later?
Yes. Edit the widget and reopen Choose businesses to update which locations are included. You don't need to change the installed code on your website.