How do I manage packages and share them from the store?
What is Package Management & Store Integration?
In Partner Center, you manage packages under Marketplace → Packages, where you can edit, copy, archive, restore, and delete them. You can share packages with customers through Buy it Now links, direct package links, or buttons in Marketing campaigns.
Why is Package Management & Store Integration important?
Effective package management drives better results:
- Respond quickly to market changes and customer feedback
- Optimize package performance and visibility
- Organize packages strategically in your store
- Share packages effectively with customers
- Control package lifecycle and availability
What's included with Package Management & Store Integration?
Package lifecycle management
- Edit published and draft packages
- Archive and restore packages
- Delete packages permanently
- Publishing control
Store organization
- Package positioning
- Package ordering configuration
- Category management
- Visual hierarchy control
Package sharing
- Buy it Now links for specific customers
- Direct package links for general use
- Linking to packages from
Marketing→Campaigns - Performance tracking
How do I manage the package lifecycle?
How do I add multiple instances of a product to a package?
You cannot add the same product more than once to a package directly. To sell multiple units of a product, use add-ons instead:
- In Vendor Center, create an add-on for the product
- Enable
Allow multiple purchases per accounton the add-on if needed - Add the base product plus the add-on to the package
Alternatively, if the product has Allow multiple purchases per account enabled (under Advanced settings in Editions), customers can purchase it multiple times, but note this disables add-on support for that product.
Why doesn't my package appear on an invoice or in Shopping Cart?
Packages must use the line-item pricing model to work with invoices and Shopping Cart checkout. Legacy packages (created before the pricing model update) are automatically migrated when first opened and saved in the package editor. If a package is not appearing as an option when creating an invoice, open it in Marketplace → Packages, save it, and try again.
Why isn't my package price showing in the store?
For package pricing to display to customers in the store, the package's Purchase behaviour must be set to Add to Shopping Cart. If another option (Contact Sales, External URL) is selected, the price is intentionally hidden from the preview and store listing.
How do I copy a package to another market?
To make a package available in a different market:
- Go to
Marketplace→Packages - Switch to the market containing the package you want to copy
- Click the
options menu(⋮) on the package - Select
Copy - Choose the target market from the dropdown
- Click
Save & Publish
The copied package appears in the target market. Adjust pricing or contents as needed for that market.
How do I edit a package?
- Navigate to
Partner Center→Marketplace→Packages - Select target market (if using Markets)
- Click on package to modify
- Edit any element:
- Package name and description
- Product contents and quantities
- Individual line-item pricing and billing frequency
- Total package price with smart price allocation
- Preset visibility settings
- Purchase behavior settings
- Marketing content
- Choose save option:
Save & Publish: Immediate live updatesSave as Draft: Preserve changes without publishing
Existing packages that use the legacy pricing model will automatically convert to the line-item pricing model the first time they are opened and saved in the package constructor. Pricing and contents are preserved, review them before saving to confirm everything looks correct.
How do I archive a package?
- Go to
Partner Center→Marketplace→Packages - Select appropriate market (if applicable)
- Find target package
- Click the
options menu(⋮) →Archive - Confirm archiving decision
Benefits:
- Immediate removal from customer store
- Preserves all configuration and settings
- Maintains historical performance data
- Enables quick restoration
- Visible in Partner Center with the
Archivedfilter
How do I restore an archived package?
Restoration returns archived packages to active status, making them available for customer purchase.
Restoration process
- Navigate to
Partner Center→Marketplace→Packages - Access
Filtersmenu - Select
Archivedfilter to view archived packages - Locate package for restoration
- Click the
options menu(⋮) →Restore - Package immediately returns to active status
How do I permanently delete a package?
Deletion permanently removes packages from the system. This action cannot be undone and should be used only for packages that will never be needed again.
Requirements
- Packages must be archived before deletion
- Deletion is permanent and irreversible
- Consider long-term business needs before deletion
Deletion process
- Navigate to
Partner Center→Marketplace→Packages - Apply
Archivedfilter in Filters menu - Locate package for deletion
- Click the
options menu(⋮) →Delete - Confirm permanent deletion
Video: archive, restore, and delete packages
This walkthrough shows archiving a package, restoring it from the Archived filter, and permanently deleting an archived package.
How do I share packages with customers?
Package link sharing methods
Partner Center provides three distinct methods for sharing package links with customers and prospects, each designed for specific use cases and customer interactions.
Method 1: Buy it Now links
Purpose: Create account-specific, user-specific links that allow immediate package purchase without Business App sign-in.
Use cases
- Direct sales conversations with specific prospects
- Personalized email outreach to target customers
- Sales team follow-up with qualified leads
- Streamlined purchase for known customers
Create link
- Navigate to
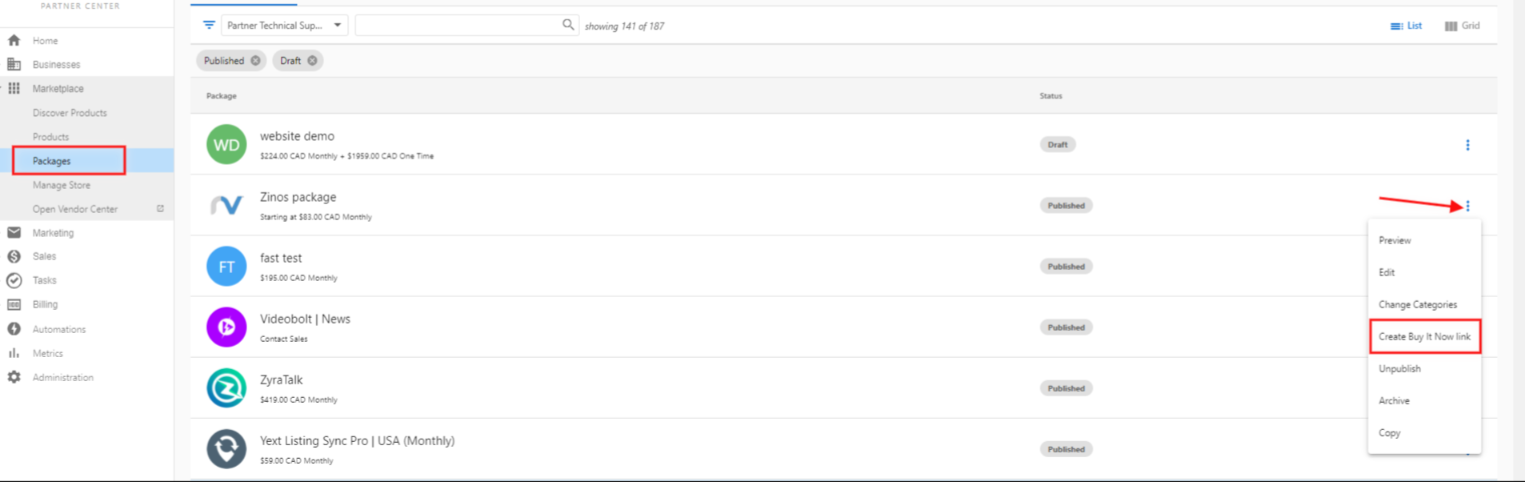
Partner Center→Marketplace→Packages - Click the
options menu(⋮) on the target package - Select
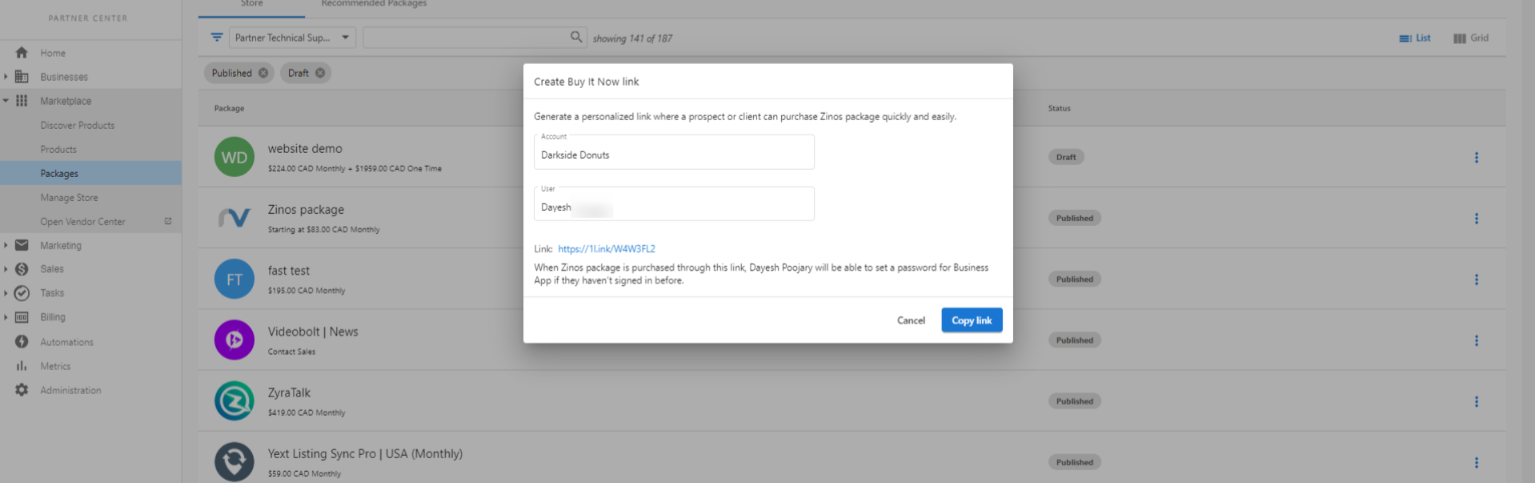
Create Buy it Now link - Choose specific
AccountandUser - Copy generated link for distribution
Requirements
- Package must be published
- Purchase behavior must be set to
Add to Shopping Cart - Target user must already exist in the system
User setup Before creating Buy it Now links, ensure target users exist:
- Navigate to
Partner Center→Accounts→Manage Accounts - Select the target account and click
Invite users - Type each user's email in the Invite users panel — existing users are matched as you type — and send the batch. Each invited user receives the onboarding email.
- Configure user permissions and access
Customer experience
- No Business App sign-in required for purchase
- Direct access to package information and checkout
- Password setup prompted after purchase completion (for new users)
- Smooth transition to full Business App access
Method 2: Direct package links
Purpose: General-purpose links that work for any customer but require Business App authentication.
Use cases
- Website integration and call-to-action buttons
- General marketing campaigns and advertisements
- Social media sharing and promotion
- Email marketing to broad audiences
Generate link
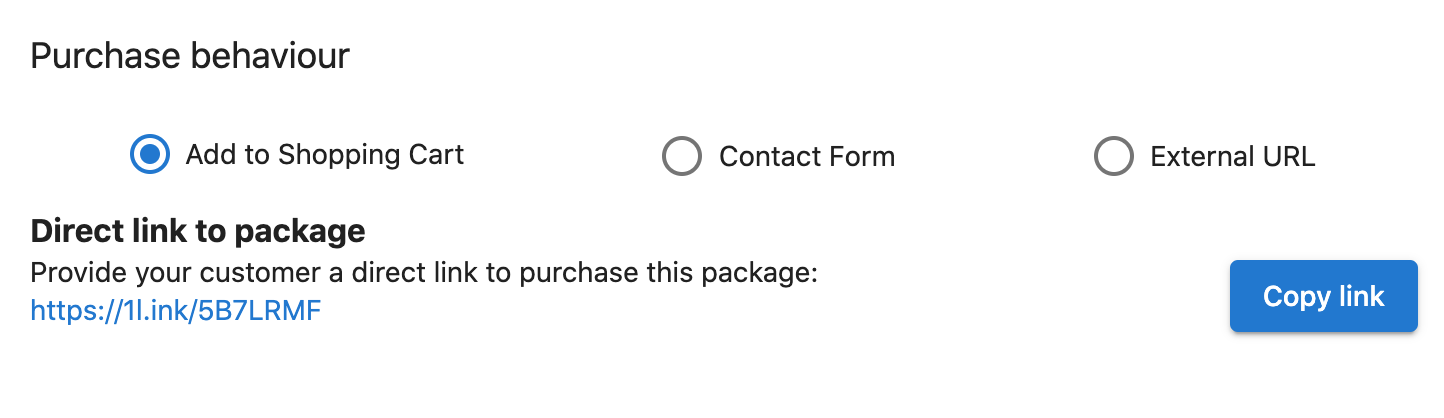
Direct links are automatically available for all published packages with Add to Shopping Cart purchase behavior. Access these links when viewing or editing packages in Partner Center → Marketplace → Packages.
Distribute link
- Copy shortened URL using
Copy linkbutton - Embed in websites, emails, or marketing materials
- Share through any communication channel
Customer experience
- Automatic package addition to shopping cart
- Redirect to
Cart Contentspage for review - Sign-in required for non-authenticated users
- Quick account creation option for new customers
Method 3: Marketing → Campaigns
Purpose: Add package or product links to emails you build under Partner Center → Marketing → Campaigns.
Steps
- Go to
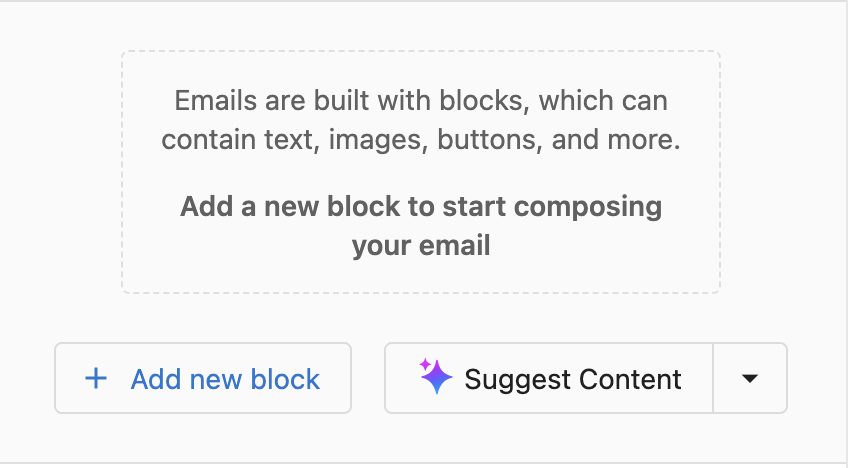
Partner Center→Marketing→Campaigns - Create a new campaign or edit a draft campaign
- Click
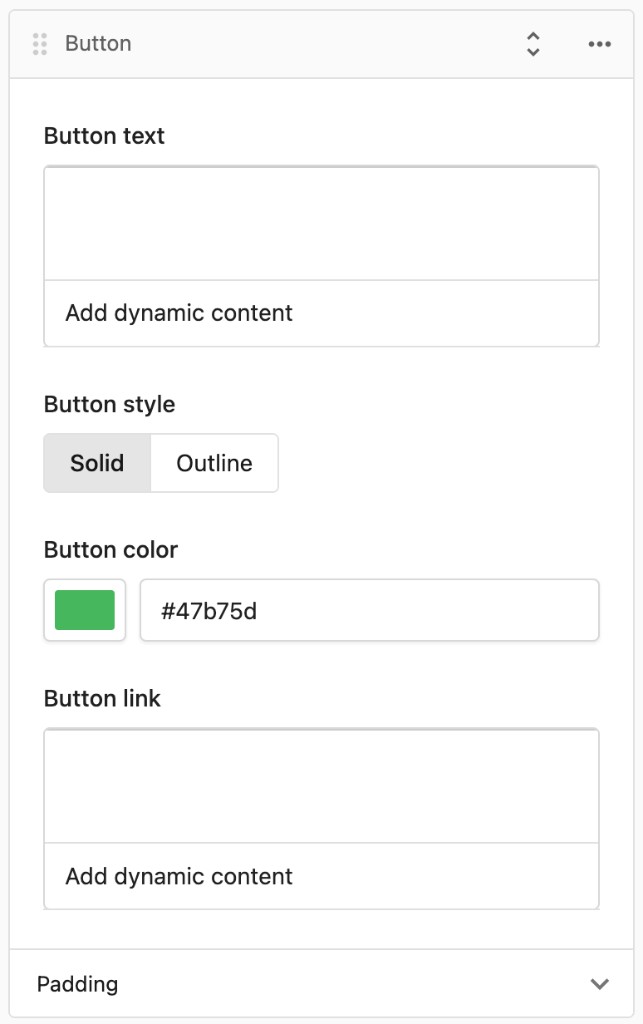
Add new block→Button - Enter
Button textyourself, or clickAdd dynamic contentand chooseProduct details→Product name(or another dynamic field you prefer) - For
Button link, either add dynamic content or paste the link to the product - Adjust the rest of the email as you like, then
Saveand send the campaign
Benefits
- Personalized package recommendations
- Same campaign editor and workflow as the rest of Marketing
- Performance tracking and analytics
- Automated customer segmentation and targeting
Buy it Now link workflow
When a customer clicks a Buy it Now link, the flow is:
- Customer is prompted to log in (or create an account)
- After login, they are directed to
Business App→Storewhere the package is pre-loaded - They complete checkout from there
The link does not take customers directly to a checkout page. It routes through Business App.
How do I add a Contact Sales button to a package?
For the Contact Sales button to appear on a package in the store, the package must have a salesperson assigned via a Contact Form. Without a salesperson configured, the Contact Sales option will not display even if Contact Sales is selected as the Purchase option. Set this up in Manage Store → [package] → Purchase behaviour → Contact Sales.
Upgrade Path and Call to Action text
The Upgrade Path setting (which product to upsell to) and the Call to Action button text are configured independently. Changing the Upgrade Path does not automatically update the CTA text. Update the button label manually to match.
Draft package preview URLs
Preview links for draft (unpublished) packages are accessible to anyone who has the URL, even though the package is not in the public Store. This is intentional. It lets you share a preview with stakeholders for review before publishing. The package will not appear in the store or be purchasable until it is published.
Business App Check out button prerequisites
The Check out button in Business App Store requires two things to be active:
- Orders must be enabled for the partner
- Vendasta Payments must be configured
If either is missing, the Check out button will not function or will not appear.
Package sharing best practices
Communication strategy
- Context Setting - Explain package value and relevance before sharing links
- Follow-Up Planning - Establish communication plan for post-share engagement
- Multiple Touchpoints - Use different sharing methods to reach more customers
- Performance Tracking - Monitor link usage and conversion rates
Security and access
- Buy it Now links are user-specific and should not be shared broadly
- Direct links can be shared publicly but require customer authentication
- Regular link performance review and optimization
- Consider link expiration for time-sensitive offers
How do I organize packages in the store?
Package order determines how customers see your offerings in both Business App store and Public Store. Package order can affect conversion rates and average order values.
Category management and organization
Assign categories for visibility Proper category assignment ensures packages appear in logical store sections and are discoverable through customer browsing. For creating categories, assigning packages, and controlling visibility by market, see Manage Store → Categories.
Configuration
- Package Categories - Assign packages to relevant business function categories
- Store Categories - Control which categories appear in customer-facing store
- Market Categories - Customize category visibility by geographic market
Store and visibility issues
For packages that do not appear in the Business App store, show up more than once in the Public Store, or look wrong across markets, use the Package Troubleshooting & Advanced Guide. Start with Common package visibility issues, Duplicate packages in Public Store, and Multi-market package synchronization.
Frequently asked questions
Why is the Create Buy it Now link option unavailable for my package?
A Buy it Now link requires the package to be published with its purchase behavior set to Add to Shopping Cart. The target user must also already exist on the account.
Why can't I see my package when I create an invoice?
Packages must use the line-item pricing model to work with invoices and Shopping Cart checkout. Open the package in Marketplace → Packages, save it, and try again.
Can I hide a published package from the store?
Yes. Archiving a package removes it from the customer store immediately and preserves its configuration. You can restore it later from the Archived filter.
Where do I find the direct link to a package?
Direct links are available for published packages with Add to Shopping Cart purchase behavior. Open the package in Partner Center → Marketplace → Packages and use the Copy link button.
Can I add the same product to a package more than once?
No. To sell multiple units of a product, create an add-on for the product in Vendor Center and add the base product plus the add-on to the package.