Packages overview
Packages in the Partner Center Marketplace bundle products and services into a single offering with its own pricing, marketing materials, and purchase behavior. You create and manage them at Marketplace → Packages and publish them to your Public Store and Business App.
Rather than selling individual products one at a time, you can offer packages at different price points that combine products and services that work together to meet your customers' needs.
Why use Packages?
Package-based selling provides strategic benefits:
- Efficient distribution: Customers purchase multiple products in one transaction
- Enhanced branding: Present yourself as a full-service solution provider
- Higher revenue: Substantially higher average order values and profit margins
- Simpler decisions: Customers choose complete solutions vs. individual components
- Clear growth paths: Natural upgrade and expansion opportunities
What's in this section
- Package Management & Store Integration – Package lifecycle (edit, archive, publish, delete); store categories and visibility; sharing with Buy it Now links, direct package links, and Marketing → Campaigns for email. For packages that are missing from the store, duplicated, or inconsistent across markets, that page links to the troubleshooting guide below.
- Package Troubleshooting & Advanced Guide – Step-by-step fixes for visibility, duplicate Public Store listings, links and purchase behavior, line-item pricing after you edit a package, multi-market sync, and escalation when you still need help.
What types of packages are available?
Store packages
- Overview of all packages in your Public Store
- Available in Business App and embeddable on your website
- Filter by status, product type, or LMI category
- Live availability updates in customer stores
- Shopping cart integration for immediate purchases
Recommended packages
- Vendasta-curated bundles for maximum customer value
- Proven combinations from successful partnerships
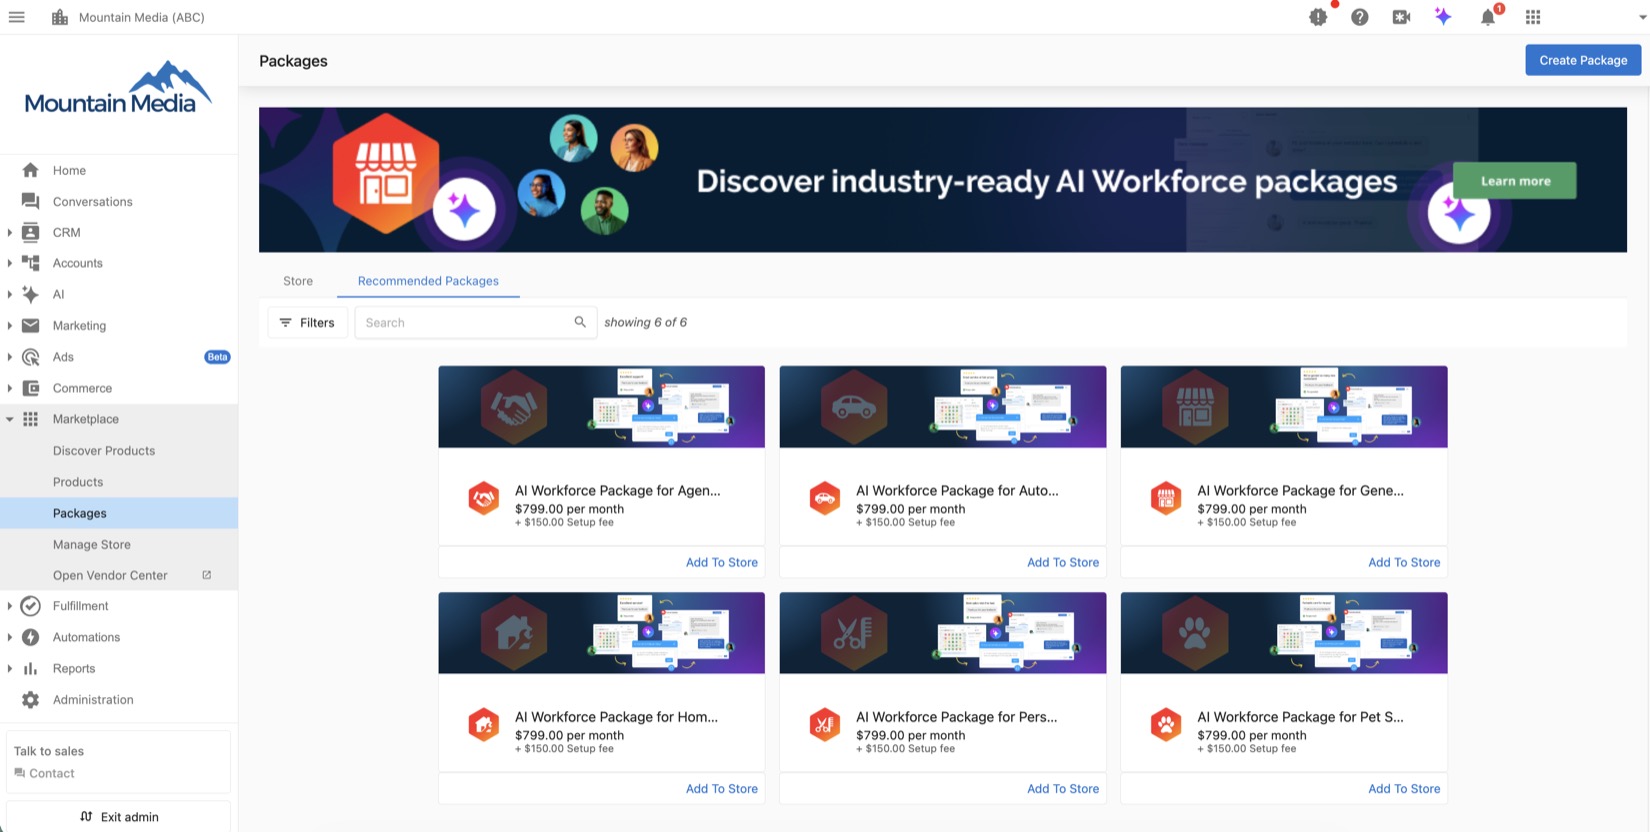
- Examples: Business App, AI Workforce packages for Agent & Broker Businesses, Automotive Services, General Business, Home Services, Personal Services, and Pet Services
Custom packages
- Create tailored combinations for your specific market
- Respond to unique customer requirements
- Address opportunities not covered by existing packages
What features do packages include?
- Filter by status, organize by product or category
- Live availability in customer stores
- Shopping cart integration
- Real-time preview and editing
- Market-specific configurations
- Toggle between list and grid views in Partner Center
How do I create and use packages?
Use recommended packages
- Go to
Partner Center→Marketplace→Packages→Recommended Packages - Browse packages designed for maximum customer value
- Customize contents, pricing, and marketing materials
- Select target markets for package availability
- Save as draft or publish immediately
Create custom packages
- Navigate to
Partner Center→Marketplace→Packages - Click Create Package
- Configure package settings:
- Descriptive package naming
- Product selection and organization
- Pricing strategy and setup fees
- Purchase behavior settings
- Develop marketing materials:
- Custom icons and banner images
- Compelling taglines and descriptions
- Product display preferences
- Preview and publish package
Access recommended packages
Navigate to Partner Center → Marketplace → Packages and select the Recommended Packages tab to browse through available options.
Evaluate recommended packages
- Browse Available Packages – Review all recommended options in the dedicated tab
- Package Preview – Click on any package to view included products and store preview
- Customization Options – Edit package contents, pricing, and purchase behavior
- Store Integration – Preview how packages will appear in your customer-facing store
Add recommended packages to your store
Quick method
- Navigate to
Partner Center→Marketplace→Packages - Click the Recommended Packages tab
- Browse or search for desired packages
- Click Add to Store on the package card for immediate addition
- Review and edit package information as needed
- Select target Market (if using Markets feature)
- Click Save and publish for immediate availability
Detailed customization
- Click Copy on the Package Details page for full customization
- Modify package components, pricing, and marketing materials
- Configure purchase behavior and customer experience
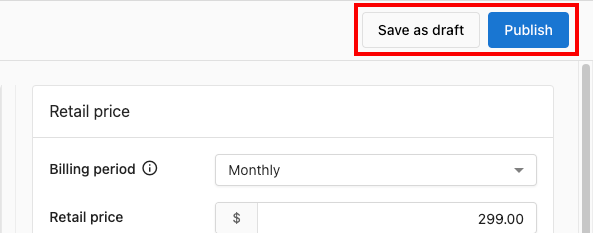
- Save as draft for further editing or publish immediately
How do I create a custom package?
Custom package creation gives you complete control over product combinations, pricing strategies, and customer experience design.
Existing packages automatically convert to the line-item pricing model the first time they are edited and saved in the package constructor. No manual migration is required — simply open, review, and save your package.
Workflow
Step 1: Initial setup
Navigate to Partner Center → Marketplace → Packages and select Create Package.
Market selection: if you use Markets, select the target market in the Packages table before creating.
Step 2: Naming
Package Name Configuration:
- Choose a descriptive name that appears in your Store
- Consider customer language and search terms
- For single-product packages, the product name is used automatically
- Ensure brand consistency across your package portfolio
Step 3: Product selection and organization
Adding products
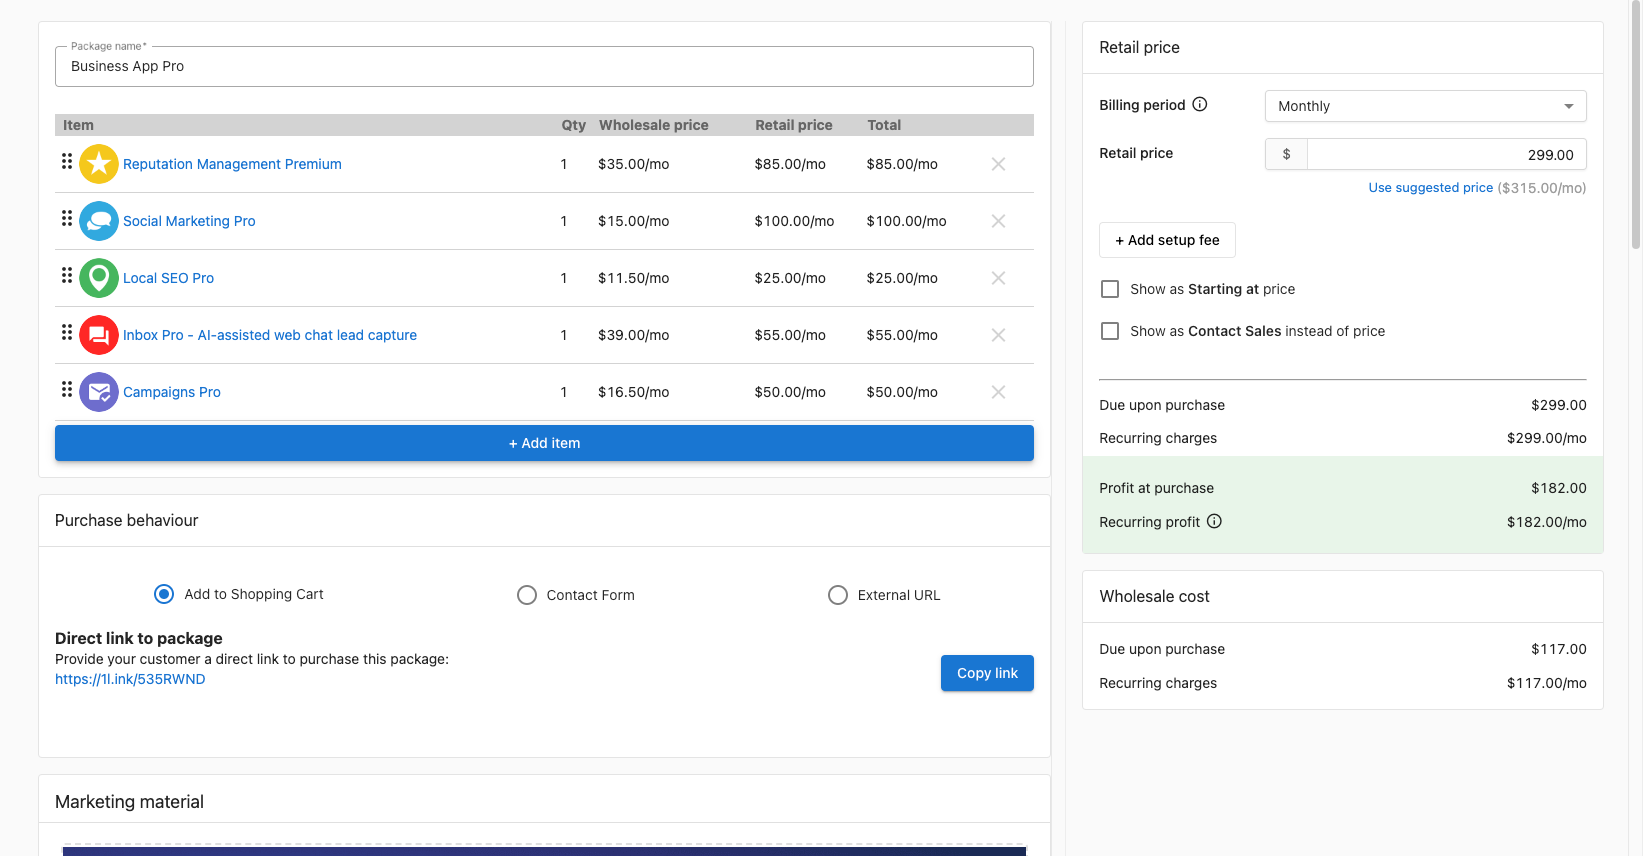
- Click + Add item to select products for your package
- Only products you're selling appear in the selection list
- Organize Contents: Drag items to reorder them logically
- Remove Items: Click the X icon to remove unwanted products
- Product Availability: Ensure all included products are enabled for sale
Packages support multi-frequency billing, so you can combine items with different billing cycles — monthly, yearly, and one-time — into a single package. Each item retains its own frequency, and retail subscriptions automatically reflect the correct cycle for each line item.
Selection strategy
- Group complementary products that solve related problems
- Consider customer workflow and implementation order
- Balance package value with price point accessibility
- Plan for natural upgrade paths to higher-tier packages
- Mix billing frequencies when it makes sense (e.g., a monthly service with a one-time setup product)
Step 4: Purchase behavior
Package purchase behavior determines customer interaction with your packages and significantly impacts conversion rates.
Options
- Add to Shopping Cart – Standard e-commerce experience with immediate purchase capability
- Contact Sales – Launches contact form for sales team interaction
- External URL – Redirects to custom landing page or external system
Guidelines
- Use Shopping Cart for standardized packages with fixed pricing
- Choose Contact Sales for complex solutions requiring consultation
- Select External URL for integration with existing sales systems
How to set up "Contact Sales" as a purchase option
You can configure your store to show Contact Sales instead of displaying the price for individual products. This allows potential customers to reach out directly to your sales team for customized pricing or package details.
Important: The Contact Sales option can only be applied when you create a package that includes the individual product. It cannot be enabled for products directly available in the My Products section of the Store.
Steps to enable "Contact Sales"
- Go to
Partner Center→Marketplace→Packages - Create a new package and add the desired individual product(s)
- In the Retail price panel on the right, enable the checkbox Show as Contact Sales instead of price to display "Contact Sales" in place of a retail price
- Save your changes and publish the package
Once completed, your store will display Contact Sales for that package, prompting customers to inquire about pricing or further details instead of seeing a fixed price.
Step 5: Pricing and cost analysis
Overview The package constructor provides real-time financial analysis displayed on the right side of the screen. You have two flexible approaches to pricing your package — use them independently or together.
Item-level pricing control Set a specific price and billing frequency for each line item in the package. This gives you complete control over how every item is priced.
- Click the price on any line item to set a custom price
- Each item can have its own billing frequency (monthly, yearly, or one-time)
- The package total updates automatically as you adjust individual item prices
Smart price allocation Prefer to set a single package price and let the system handle the rest? Enter a total package price and the system automatically distributes it across all items using a weighted breakdown based on each item's retail value and billing frequency.
- Click the package total to enter your desired price
- The system recalculates each line item's share proportionally
- Useful when you want to offer a bundled discount without manually adjusting every item
You can combine both approaches — set the total first using smart allocation, then fine-tune individual items as needed.
Price display options
- Show as Starting at price – Indicates variable pricing based on customization
- Show Contact Sales instead of price – Hides specific pricing for consultation-based sales
Setup fees
- Add one-time implementation or setup charges
- Separate recurring costs from initial investment
- If a setup fee is present, it is allocated to any one-time billed items in the package; if none exist, it applies to the first item
Cost analysis
- Wholesale Cost: Your total cost for all package components
- Profit at Purchase: Immediate margin calculation (retail price minus wholesale cost)
- Margin Optimization: Real-time profit analysis for pricing decisions
Shopping cart compatibility "Starting at" pricing and "Contact Sales" pricing options make packages incompatible with shopping cart functionality. Use these settings with Contact Form purchase behavior for optimal customer experience.
Step 6: Marketing materials
Customer‑facing content Marketing materials appear when customers view packages in your Public Store or Business App Store tab.
Editable elements
- Package Icon – Visual identifier for quick recognition
- Banner Image – Hero image for package promotion
- Tagline – Compelling value proposition summary
- Description – Detailed explanation of package benefits and included services
Preset visibility settings Control what customers see by default when viewing a package. Choose one of the following presets:
- Package name only – Customers see the package name and total price. Individual contents and item pricing are hidden.
- Show contents – Customers see the package name and the list of included products, but individual item prices are hidden.
- Show contents and pricing – Customers see the package name, included products, and the price for each individual line item.
These presets apply to how the package appears in your Store, Business App, and on invoices.
Best practices
- Focus on customer outcomes rather than product features
- Use specific, measurable benefits when possible
- Maintain consistent brand voice and messaging
- Include social proof and credibility indicators
Step 7: Publication and availability
Publishing Options:
- Publish – Makes package immediately available in Public Store and Business App
- Save Draft – Saves progress for future editing without customer visibility
- Draft Management – Access drafts anytime from
Marketplace→Packagesusing Draft filter
Add products and packages to your store
Individual product addition
Quick enablement When you start selling a product, you receive prompts to:
- Skip adding to store for backend-only sales
- Add to store at suggested retail price for immediate customer availability
Availability management
- Stop Selling: Navigate to
Marketplace→Discover Products, search for product, and click Stop Selling at bottom of product page - Market-Specific Availability: Control product visibility per market in
Marketplace→Productson the "Available in-store" section - Store Integration: Enabled products appear in Public Store (preview in
Marketplace→Manage Store) andBusiness App→Store
Custom product integration
Partners can also sell their own products and services through the marketplace by creating custom products in Vendor Center, expanding beyond the 250+ curated marketplace solutions.
Advanced management
Preview and testing
- Navigate to
Partner Center→Marketplace→Packages - Click the options menu (⋮) on the package card
- Select Preview to test customer-facing display
- Review package appearance in both Public Store and Business App contexts
Multi‑market management
- Configure different packages for different geographic markets
- Customize pricing and product availability by region
- Maintain market-specific branding and messaging
- Monitor performance across different markets
Pricing strategies
Value‑based packaging
- Solution-Oriented Pricing – Price based on customer value delivered
- Competitive Analysis – Research similar solutions in your market
- Margin Optimization – Balance profitability with market accessibility
- Tiered Offerings – Create good, better, best package hierarchies
Dynamic pricing options
- Promotional Pricing – Limited-time offers and seasonal discounts
- Market-Specific Pricing – Regional optimization based on local markets
- Volume Discounts – Incentives for larger commitments
- Custom Pricing – Consultation-based pricing for complex solutions
Best practices
Design principles
- Customer-Centric Design – Start with customer needs and pain points
- Logical Grouping – Bundle products that naturally work together
- Clear Value Proposition – Articulate why the package is better than individual products
- Scalability Planning – Design packages that support customer growth
Marketing and positioning
- Compelling Naming – Use customer language and benefit-focused titles
- Visual Consistency – Maintain brand standards across all package materials
- Benefit-Focused Messaging – Emphasize outcomes rather than features
- Social Proof Integration – Include testimonials and success stories
Performance optimization
- Regular Review – Monitor package performance and customer feedback
- A/B Testing – Test different pricing, messaging, and product combinations
- Customer Feedback – Incorporate user insights into package improvements
- Market Adaptation – Adjust packages based on market conditions and competition
Frequently asked questions
How can I add a package to multiple Markets?
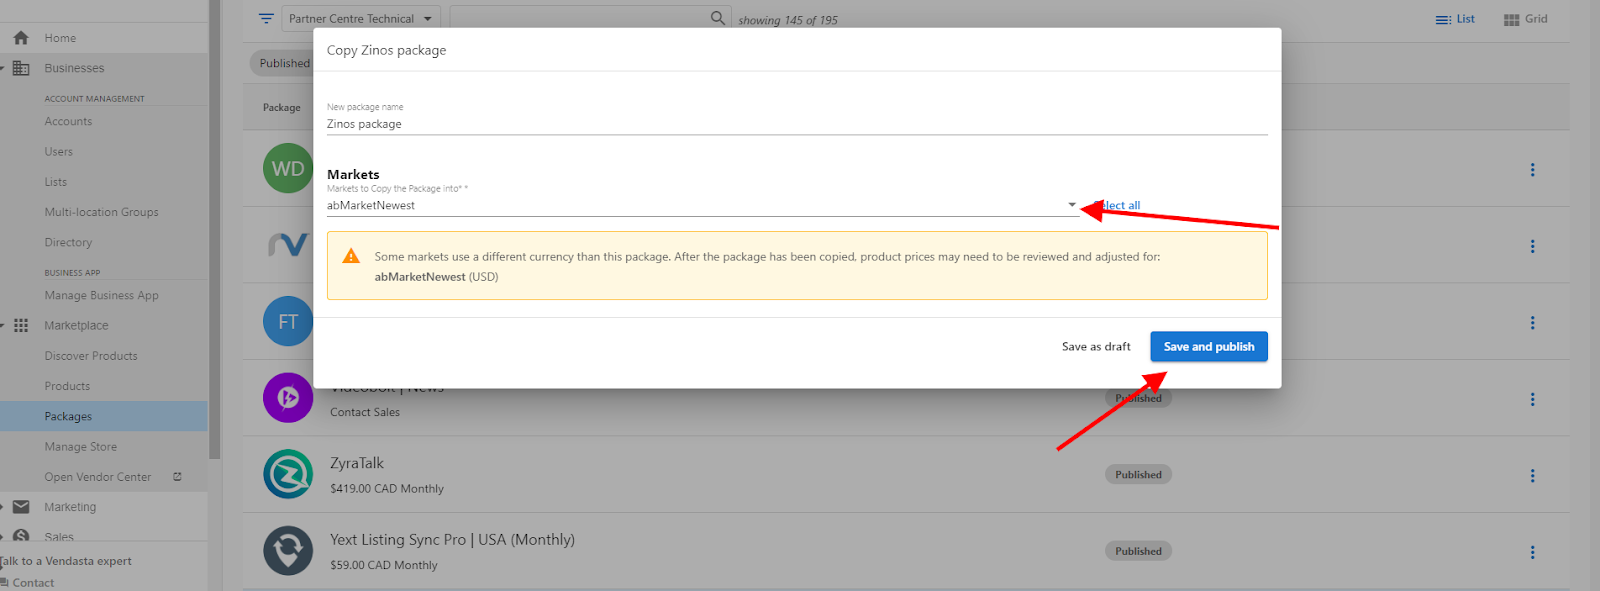
If you have an existing package in one market and want the same package in other markets without rebuilding it, you can copy it:
- Navigate to
Partner Center→Marketplace→Packages - Select the package and click the options menu (⋮) beside it
- Choose Copy
- Select the target market and click Save and Publish
- Switch to the other market to confirm package availability
Will the direct link to package work if the user has no access to the store?
Yes! Users can purchase packages through direct links because the link leads to the shopping cart in Business App. The purchase workflow doesn't require navigation to the Store tab, making packages accessible even to users without store access.
Can I delete multiple packages at once?
Packages can only be deleted one by one, not collectively. To permanently remove packages:
- Archive First: Navigate to
Marketplace→Packages, click the options menu (⋮) next to the package, and select Archive - Then Delete: Access archived packages using filters, then select Delete
- Restoration Option: Archived packages can be restored if needed by selecting Restore from the options menu (⋮)
What happens when I publish a package?
Publish makes the package available in your Public Store and in Business App. Save Draft saves your progress without making the package visible to customers, and you can find drafts in Marketplace → Packages using the Draft filter.
Can I create a package with only one product?
Yes. For single-product packages, the product name is used automatically as the package name.
Do I need to create a package to show a single product in my store?
No. When you start selling a product, you're prompted to either skip adding it to the store for backend-only sales or add it to the store at the suggested retail price. Enabled products appear in your Public Store and in Business App → Store.
How do I show Contact Sales instead of a price?
Create a package that includes the product, enable Show as Contact Sales instead of price in the Retail price panel, and publish the package. You can't enable Contact Sales for products directly in the My Products section of the Store.
Why can't I find a product when adding items to a package?
Only products you're selling appear in the selection list when you click + Add item. Make sure the product is enabled for sale.
Can a package include items with different billing frequencies?
Yes. Packages support multi-frequency billing, so you can combine monthly, yearly, and one-time items in a single package. Each item keeps its own billing frequency.