Manage Store overview
Your Marketplace store is the main place customers browse and buy. Set it up in Partner Center → Marketplace → Manage Store: theme, categories, currency, products, and packages.
Why use Manage Store?
- Self-serve sales – Customers can purchase without sales intervention
- Brand consistency – One visual identity across your store
- Higher conversion – Clear layout and navigation improve order values
- Less admin – Automated flows reduce overhead
- Better UX – Intuitive navigation and mobile-friendly design
What's in this section
- Store sharing & embedding – How to embed your store on your website and share it with customers
- Customer experience – How customers interact with your store, including account creation, shopping cart, and troubleshooting
What you can do here
Enable and configure products and packages, set theme (colors, fonts, transparent background), categories (custom categories and package assignment), and currency (one per market; conversion for non-USD/CAD/AUD). Multi-market stores can customize each market separately.
How to set up your store
1. Enable products and packages
Partner Center → Marketplace → Discover Products: browse, click Start Selling on products you want. Products get all editions and add-ons. Use Marketplace → Packages to add recommended or custom bundles. No upfront cost. You pay when customers buy.
2. Configure product settings
Partner Center → Marketplace → Products: adjust retail pricing (lock icon), billing frequency, auto-activation, white-label branding, upgrade paths, and team access.
3. Add custom products
Marketplace → Products → Create Product: name, description, type, icon; billing (one-time or subscription); marketing copy; then publish or refine in Vendor Center.
4. Add packages
Customers can only purchase from your store if a product has been added to a package. Navigate to Marketplace → Packages to get started.
- Recommended packages: Click
Recommended Packagesto browse pre-built bundles. Customize, assign to markets, and publish. - Custom packages: Click
Create Packageto build your own. Set a name, add products, configure pricing, add icons/banners/taglines, then preview and publish.
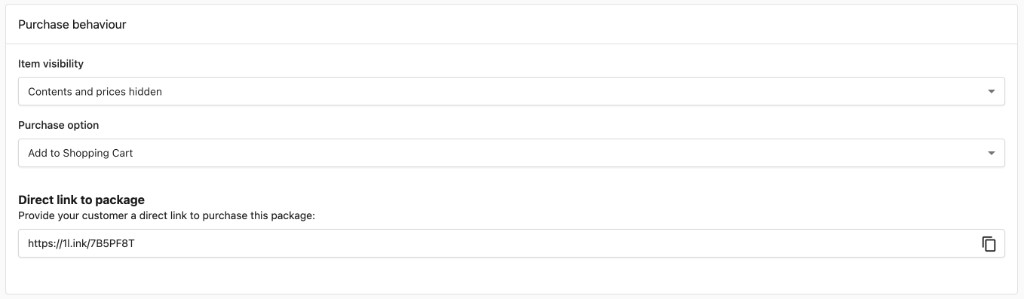
Each package has a Purchase behaviour section with the following settings:
Item visibility: Controls what customers see in your store:Customer can see contents and prices: Full transparency.Customer can see contents, prices hidden: Products are visible but pricing is not shown.Contents and prices hidden: The package appears in the store but its contents and pricing are not visible.
Purchase option: Determines how customers interact with the package:Add to Shopping Cart: Customers can purchase the package on their own.Contact Sales: Customers submit a request and your team follows up.External URL: Redirects customers to an external page.
Direct link to package: A shareable URL you can send directly to a customer to purchase a specific package.
Store customization
Theme
Manage Store → Theme: set colors (logo bar, background, accent, category colors), typography (primary and secondary fonts), and options like transparent background and real-time preview.
Public Store theme does not change Business App Store appearance.
Categories
Manage Store → Categories: use + Add Category to create custom categories, assign packages, and control visibility by market. Use clear names and group related packages.
Currency
Manage Store → Currency: choose the primary currency for display and payments. Default currency does not override existing retail prices. One currency per market; wholesale follows your Vendasta contract. For non-USD/CAD/AUD, set a conversion rate (based on USD suggested retail); update it regularly.
Video walkthroughs
Step-by-step videos: product discovery and configuration, product settings and pricing, custom product creation, package development, and store customization.
Store configuration and customization notes
Public Store URL
The Public Store URL is derived from your Business App URL. It cannot be set independently. To change your Public Store URL, update your Business App subdomain in Administration → Partner branding.
Favicon scope
Your favicon applies to Business App only. It does not appear on the Public Store URL. The Public Store uses the browser default favicon unless your Public Store is embedded on a website that has its own favicon.
Editing the Need Help card
The Need Help section that appears in the Store is configured in Vendor Center → Marketing. Update the contact details, messaging, or links there to customize what customers see.
Disabling account creation from the Store
By default, customers can create a new account directly from the Public Store. To disable this:
- Go to
Administration→Customize Business App - Find the
Store / Shopping Cartsettings - Disable the
Allow account creation from Storeoption
Reordering packages in the All category
The All category cannot be reordered via drag-and-drop in the default list view. To reorder packages within it:
- Switch to
Grid viewinMarketplace→Packages - Click
Edit Order - Drag packages into your preferred order and save
Removing a product from your store
Removing a product from the store requires updating every package that contains it:
- Go to
Marketplace→Packagesand identify packages containing the product - Edit each package to remove the product line item
- Save and republish the affected packages
If you only want to stop new activations without removing the product from all packages, use Suspend new activations in Vendor Center instead.
Advanced and testing
- Multi-market: Customize per market (products, pricing, categories, theme). If availability or pricing looks wrong, check product and package assignments per market and customer-to-market assignment.
- Performance: Use sized images and clear navigation; test on mobile and key browsers. Track conversion, order value, and category performance; keep content current and use feedback to improve.
- Before launch: Confirm product and package display, categories, search, and purchase flow (cart, checkout, payments). Test on desktop, tablet, and mobile.