How do I create a lead generation form?
To create a lead generation form in Partner Center, go to Marketing → Forms, click Create form, and select the Lead generation template. You then add and configure fields, style the form, connect automations, embed the form on your website, and test it.
Step 1 — How do I start from the Lead generation template?
- Navigate to
Marketing→Forms - Click Create form
- Select the Lead generation template and click Use template
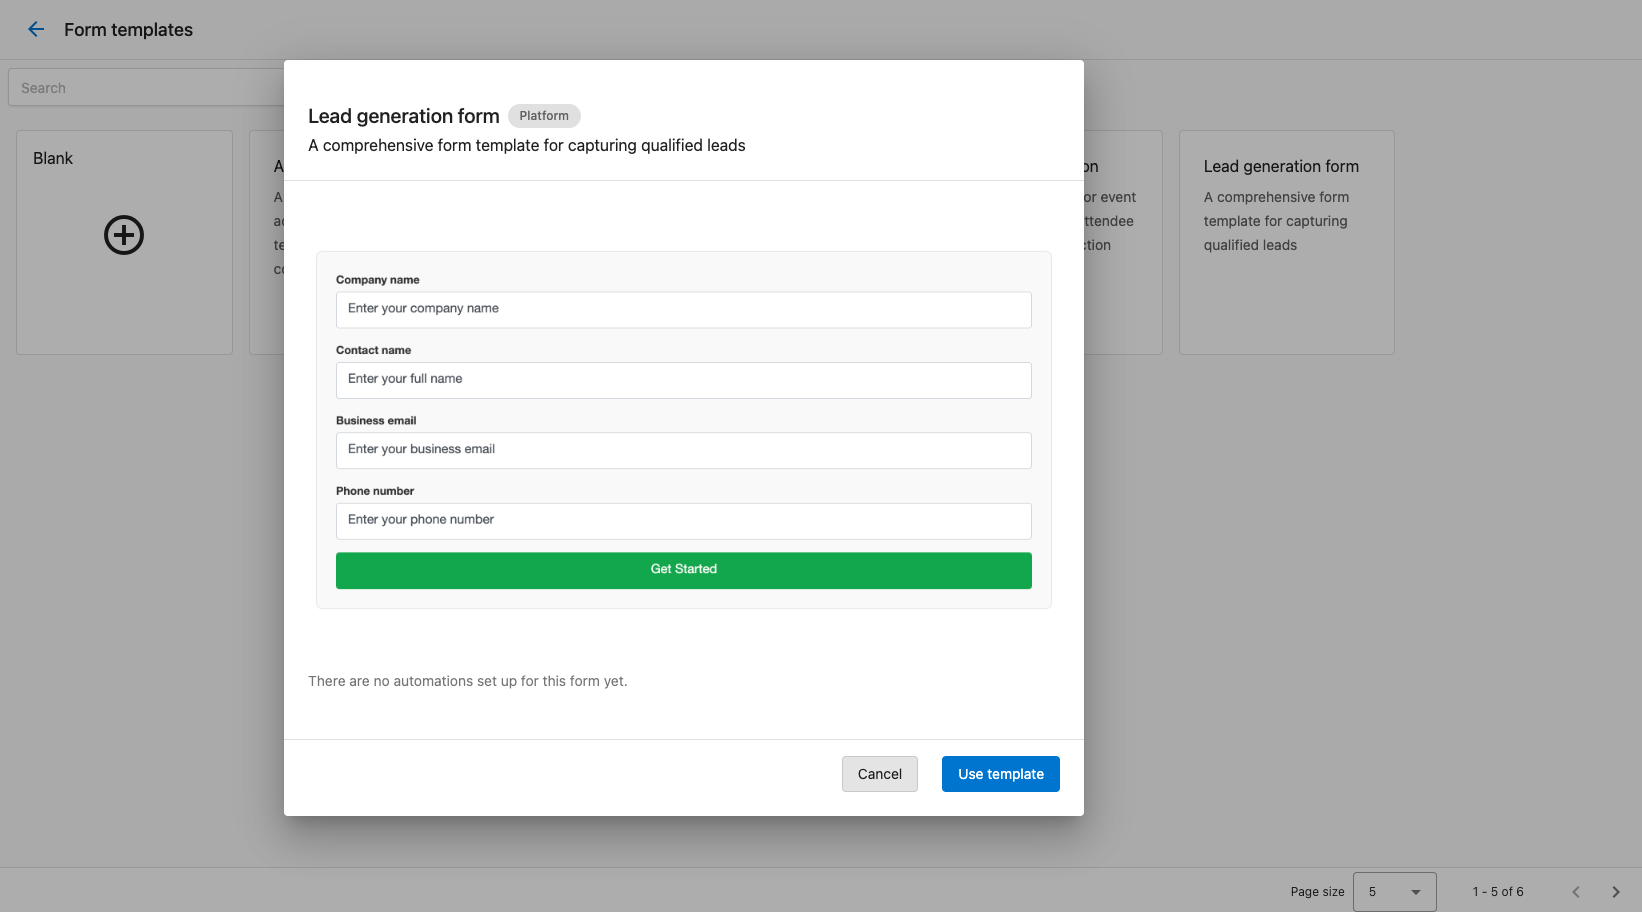
The lead generation template includes four fields by default:
- Company Name
- Contact Name
- Business Email
- Phone Number
These fields will be used to automatically create a new contact and company record in the CRM with the information provided by the visitor.
Step 2 — How do I add and organize additional fields?
You can add more fields to your form to capture more information from your visitor by clicking Add Field and selecting the field type you need.
- Element fields allow you to add information to the form that a user can see, but not interact with. These are useful for adding a description or instructions to your form.
- Contact fields are fields that will be linked to the Contact record in the CRM. These are useful for capturing information about the contact who is filling out the form.
- Company fields are fields that will be linked to the Company record in the CRM. These are useful for capturing information about the company who is filling out the form.
- Generic fields are fields that are not linked to a specific record in the CRM. These are useful for capturing information that is not related to a contact or company.
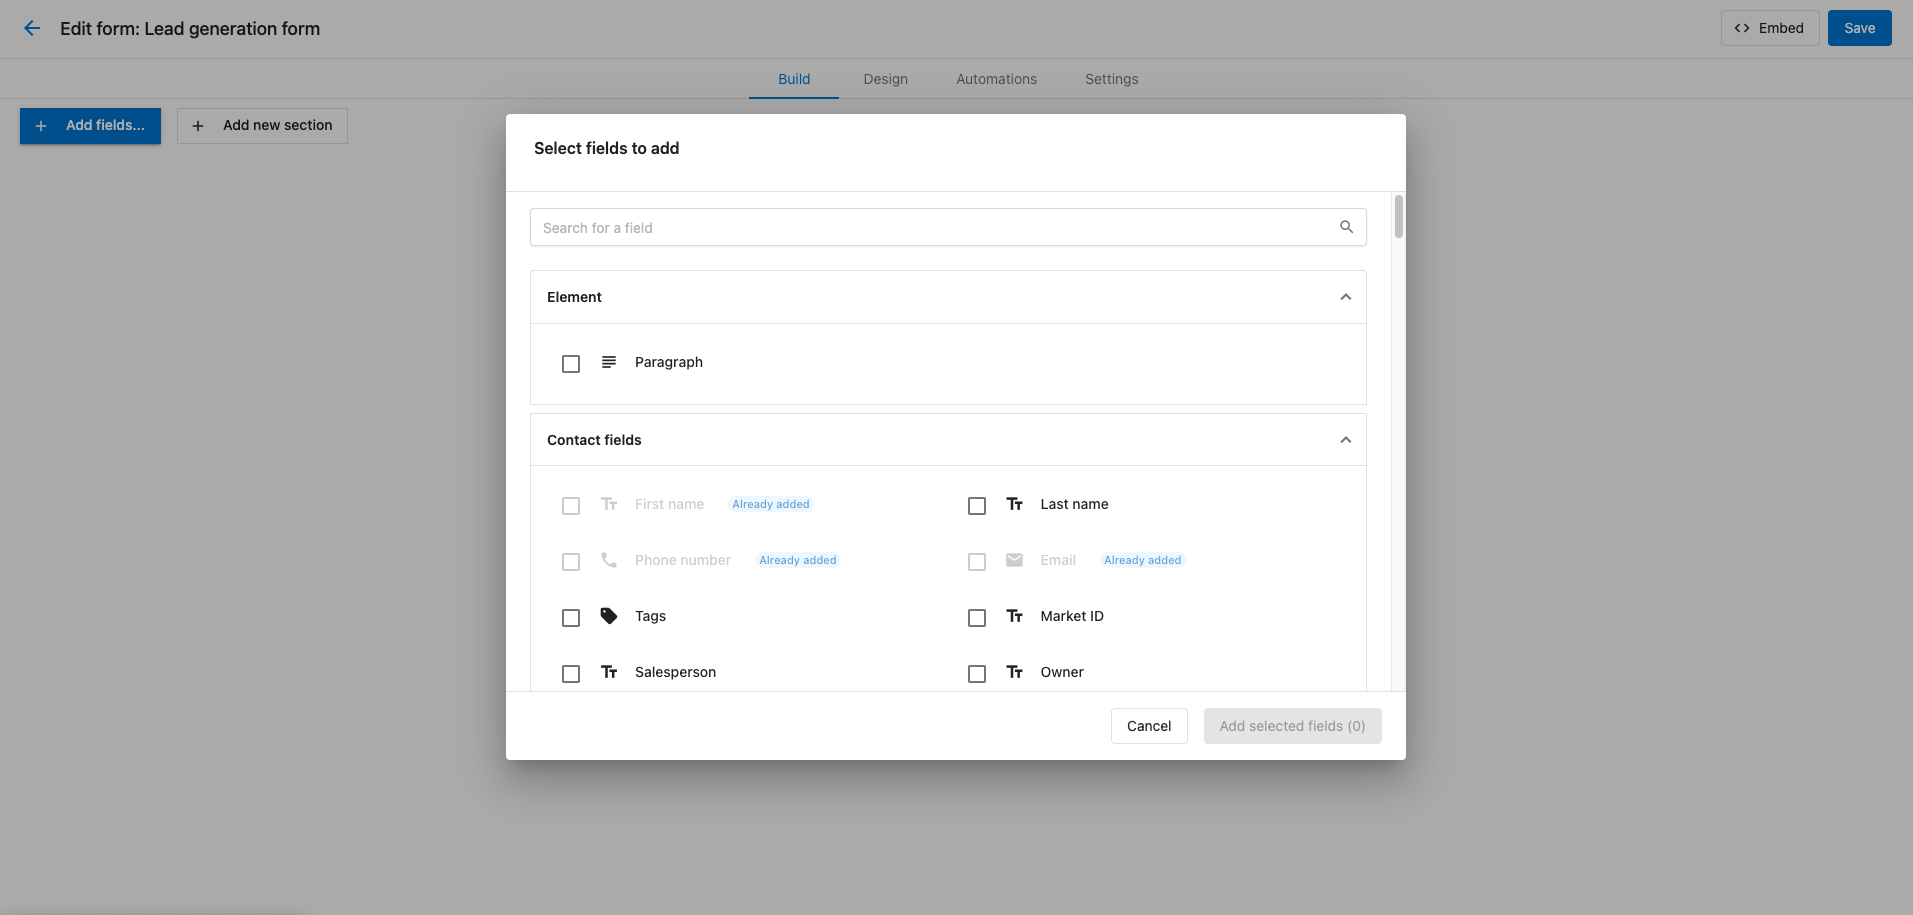
For this lead generation form, get consent from the visitor to send them more emails by adding the Contact fields Marketing email consent and Marketing email consent source.
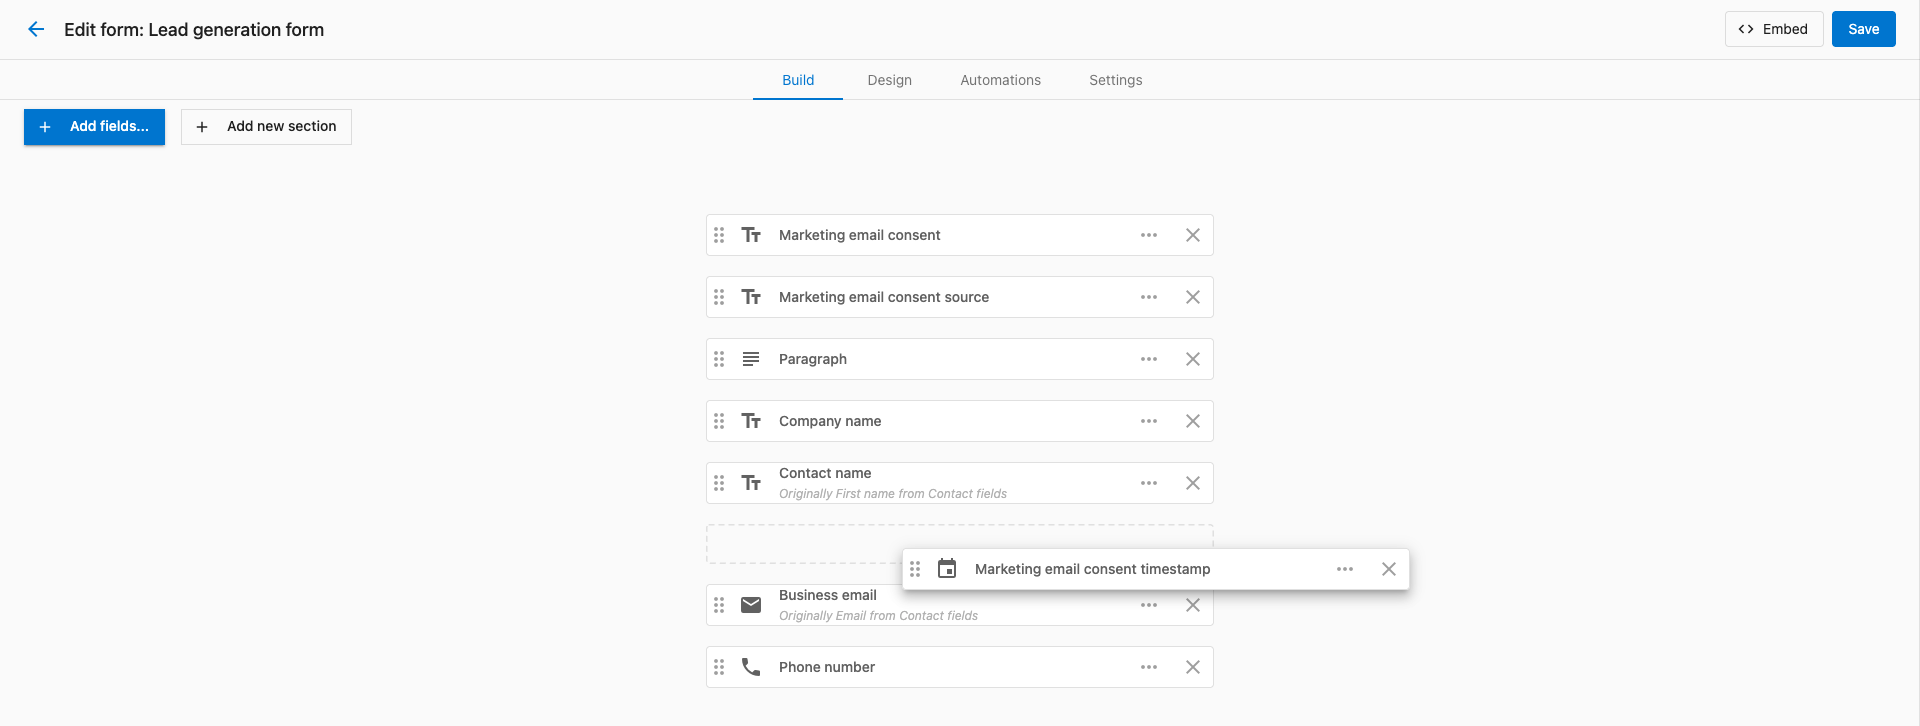
Move the marketing consent fields to the bottom of the form by clicking and dragging them below the other fields. These types of consent fields are typically placed at the bottom of the form so that a user has filled out the other fields and is more likely to consent to receive more emails.
Step 3 — How do I customize field properties?
Once your fields are in place, you can customize how they behave and appear using field properties. Field properties control display options, default values, dynamic behaviors, and the information that gets captured when the form is submitted.
Creating a dropdown field on forms
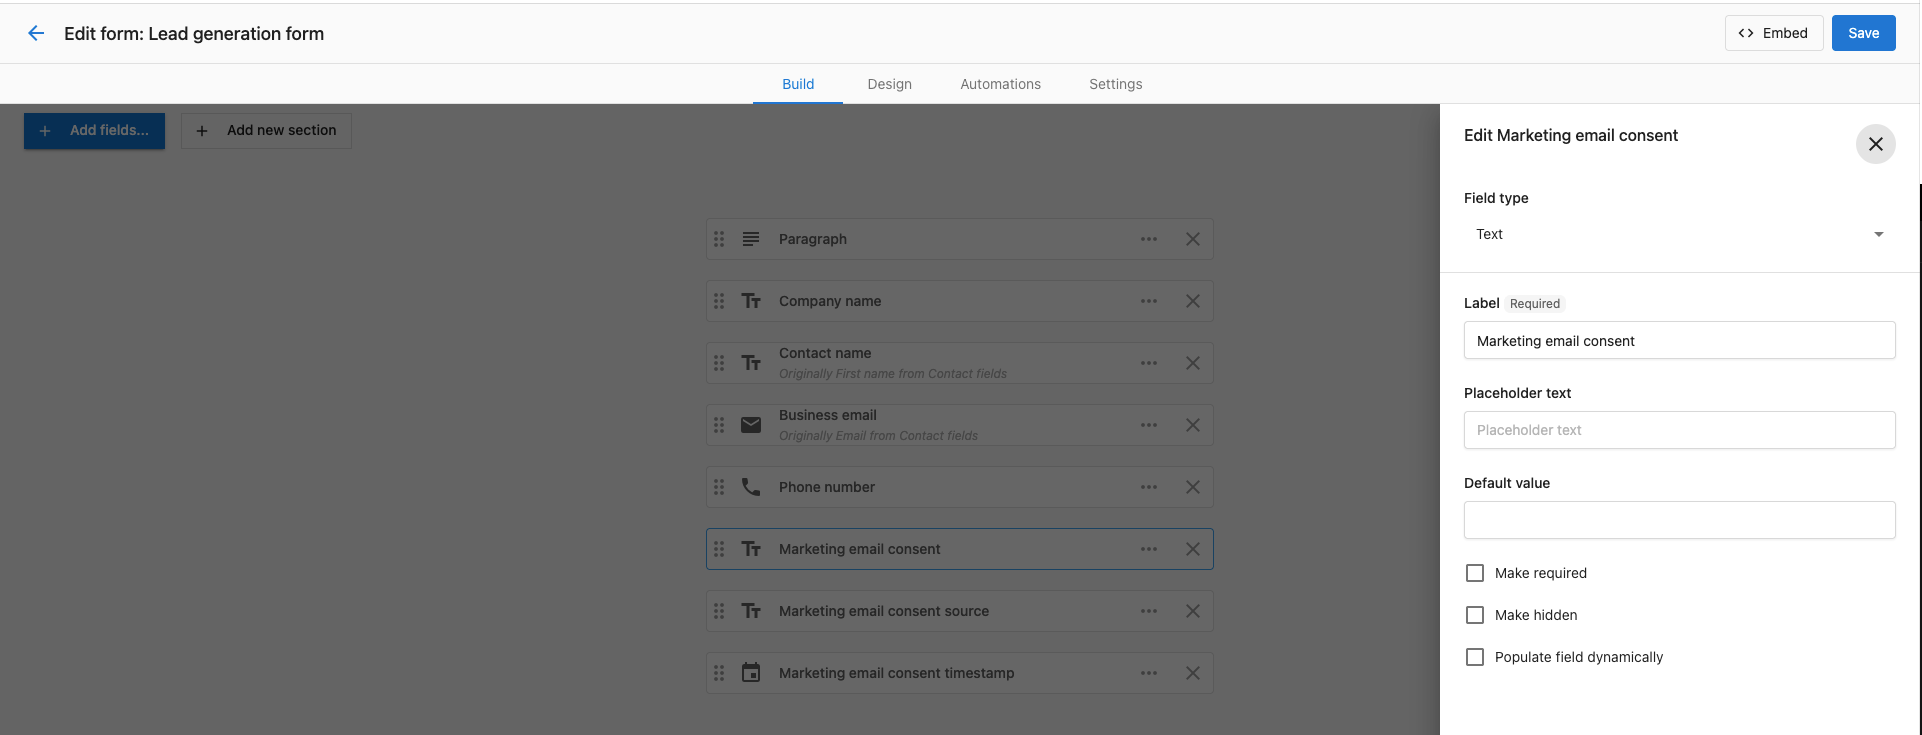
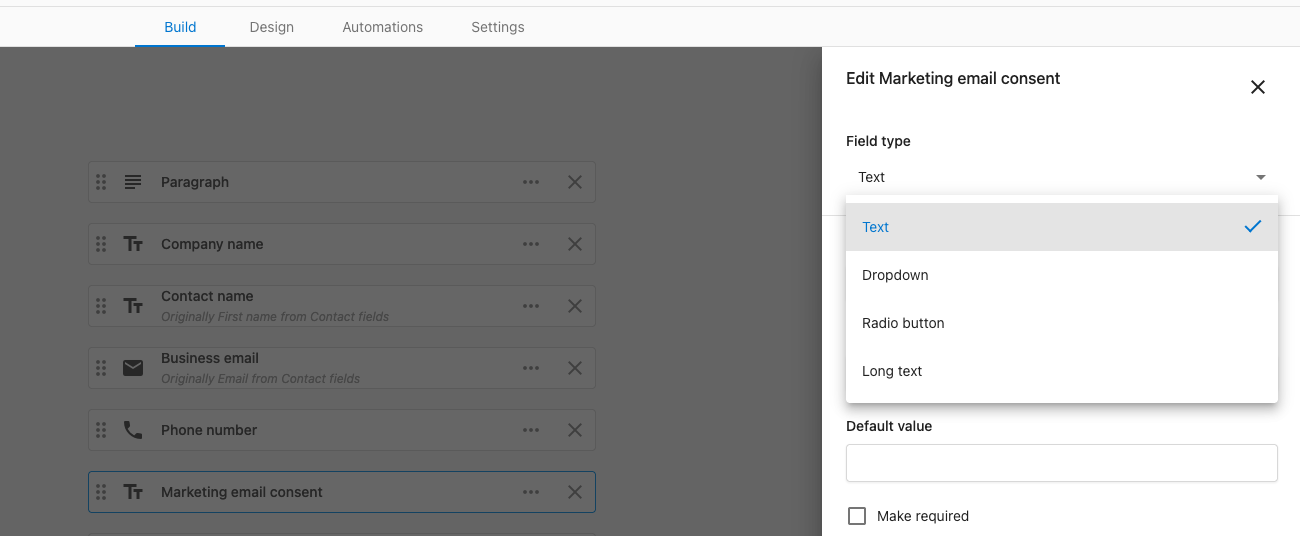
Click on the Marketing email consent field to open the properties panel. Click on the Field type dropdown and change the field type from Text to Dropdown. This will make it so the user can only select from one of the predefined options: Yes or No.
 The label field is what will be displayed above the dropdown. For this field, frame it as a question like: "Would you like to receive more emails from us?"
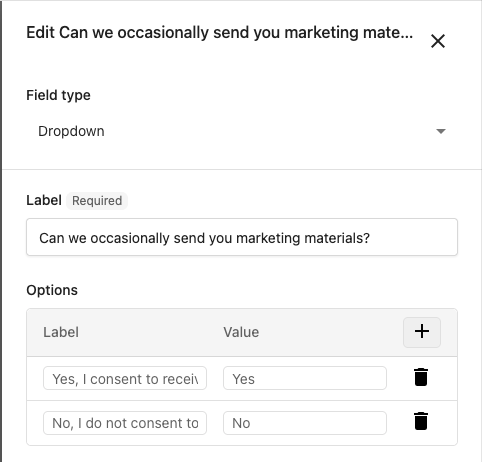
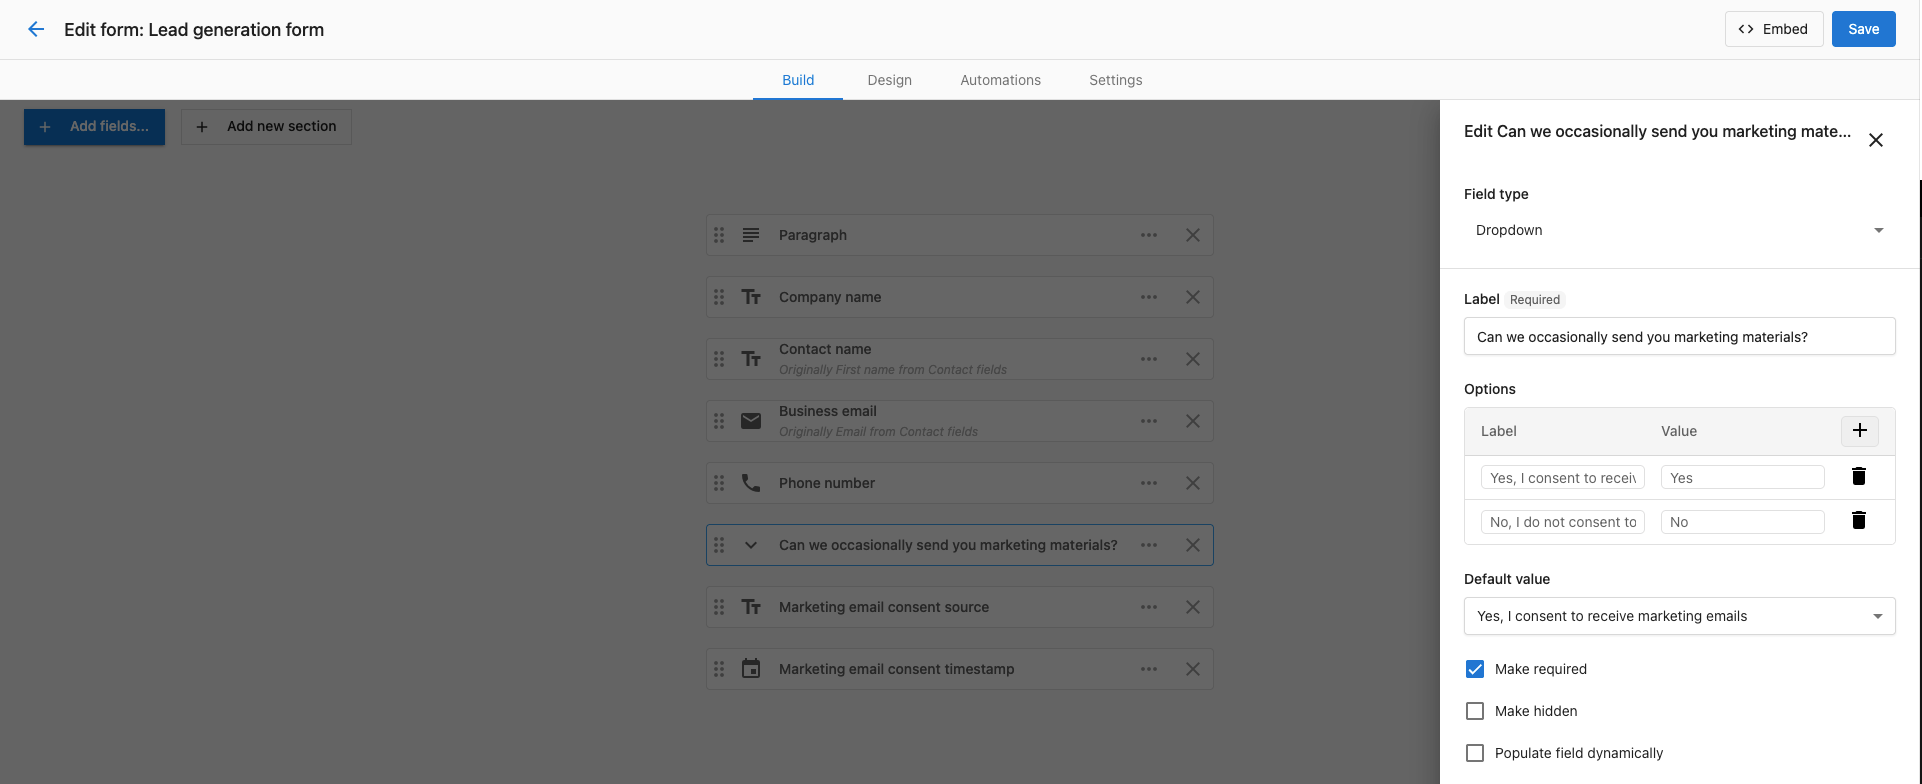
Click the + button to add a new option to the dropdown. Here, the label field is what will be displayed to the user as an option when they are filling out the form and the value field is what will be captured when the form is submitted. Add the options Yes and No.
Finally, set the default value to the Yes option that was created. This ensures that the user is opted in to receive more emails by default.
Hiding form fields
Adding a hidden field to your form allows you to capture information that is not displayed to the user, but is still useful for your business, like knowing the source of the form submission. In this case, you use a hidden field to set our consent source to the form name.
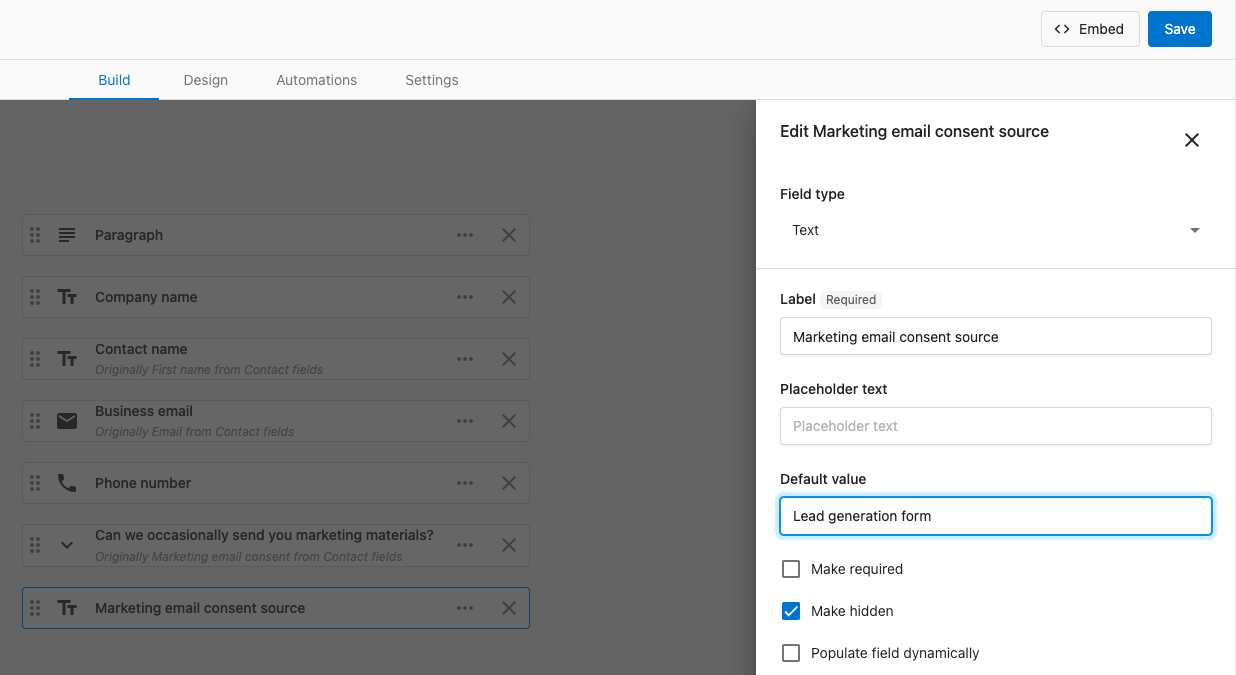
Click on Marketing email consent source to open the properties panel and check off the box Make hidden to hide this field from the user. Enter the name of the form as the Default value for the field so that the value is automatically set in the CRM when the form is submitted.
Dynamically filling form fields
Form fields can be dynamically filled with the information from the URL using query parameters. Combined with hidden fields, this can be used to capture information about the source of the form submission.
For example, if you have a form that is put on a link like this: https://www.example.com/form?campaign=spring-promotion, the value of the campaign query parameter will be captured and set on any field that has the Populate field dynamically option checked and the query parameter campaign selected.
Forms automatically capture common UTM parameters like utm_source, utm_medium, utm_campaign, utm_content, and utm_term. If you don't need to store these on other fields, you can rely on this automatic capture and skip adding extra hidden fields for UTMs.
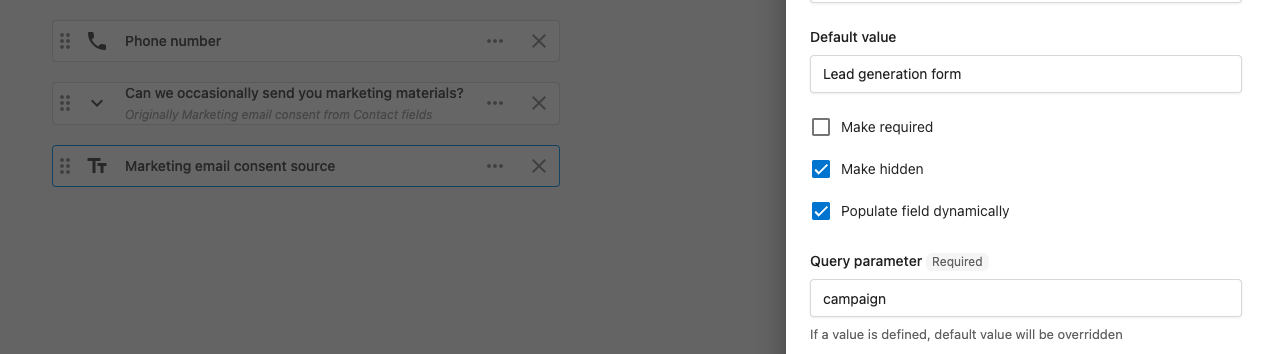
Click on the Marketing email consent source field to open the properties panel and check off the box Populate field dynamically to enable this feature. Type in the query parameter campaign into the input box.
Whenever someone consents to receive more emails, the CRM will automatically update to show if they came from a specific campaign. This lets you know which campaigns are specifically driving more sign-ups to our email list.
For more detailed information on tracking form submissions, see Track form submissions in GA4.
Step 4 — How do I match my form design to my website?
You can customize the appearance of the form to match your website's design and branding by clicking the Design tab. Simple changes like the form width and colors can be made using the interactive controls inside of the Design tab and will be reflected in the preview on the right.
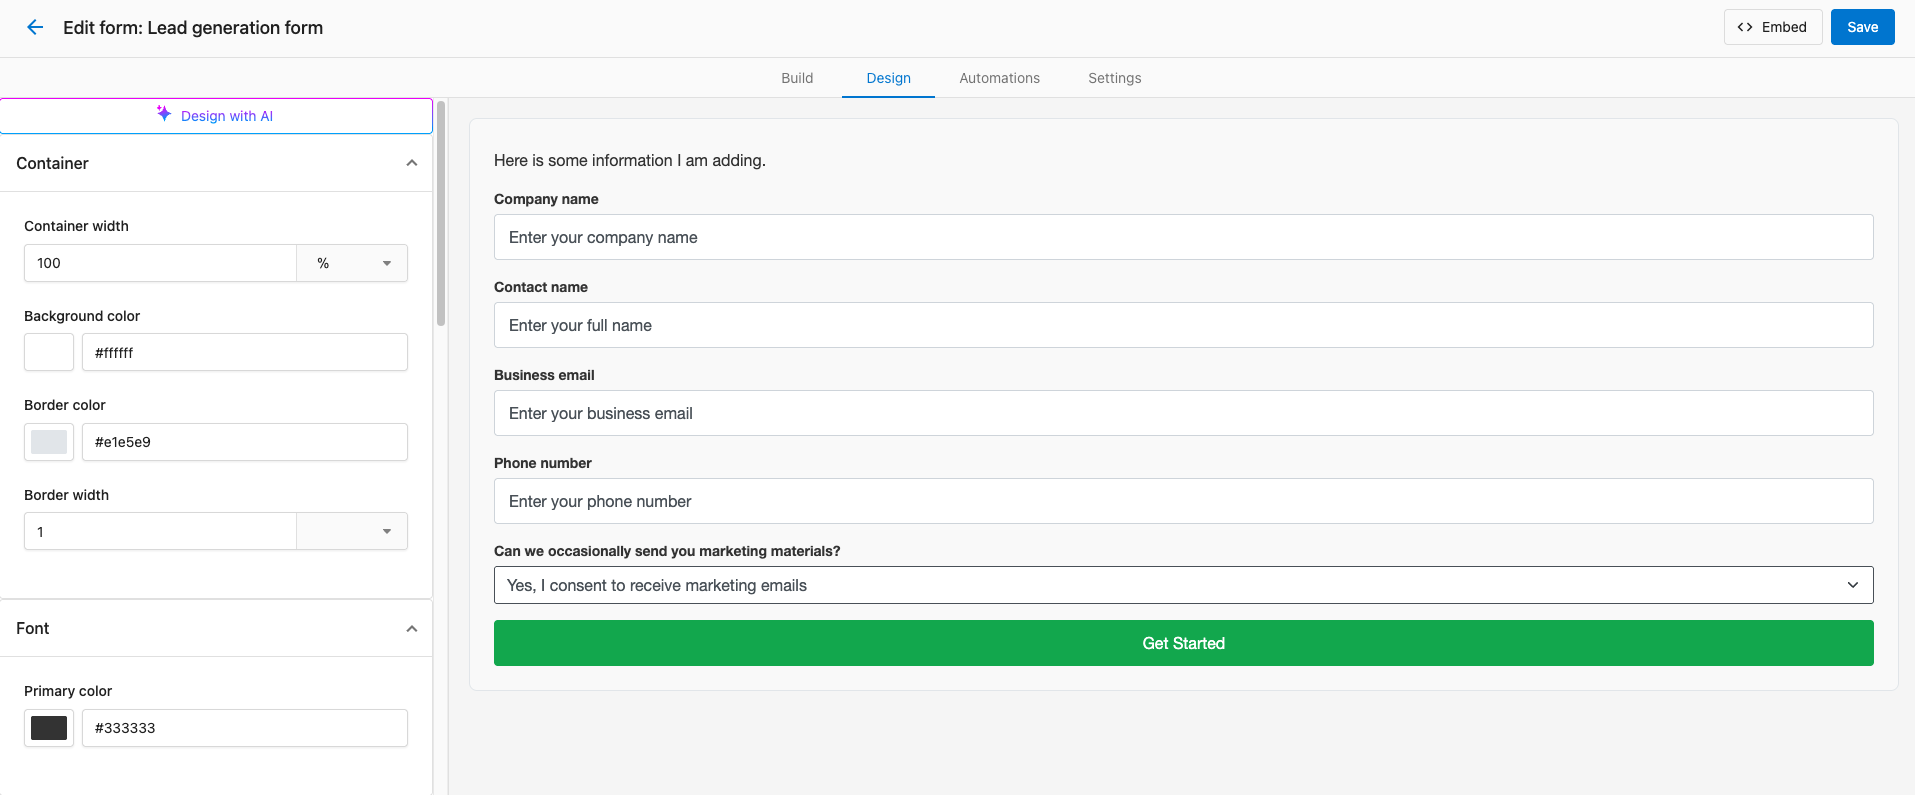
More complex changes to other elements can be made by using the Custom CSS field visible in the Design tab. CSS code can be used to style virtually any element of the form to make it look exactly how you want it to look.
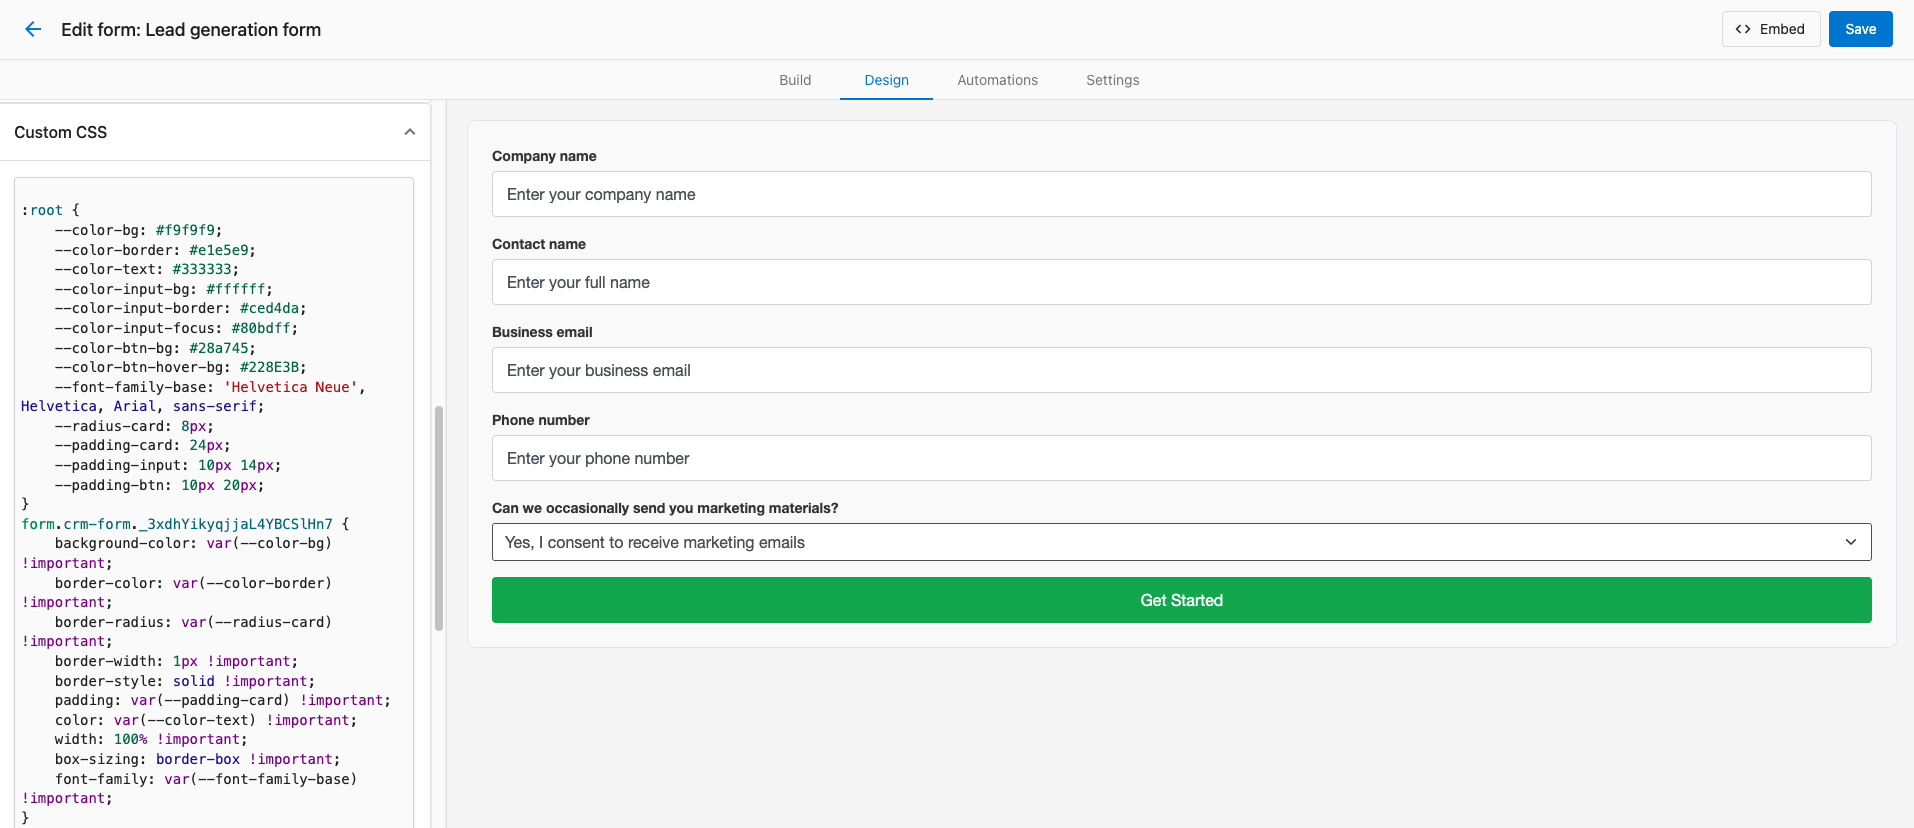
Make note of the CSS class names from the template that are used to style the form elements. These will be used to target specific elements when styling the form with CSS and are a good starting point for your own CSS code.
Design and style your form with AI
If you are not familiar with CSS or it takes you a while to get the desired look and feel of your form, you can use the Design with AI feature to generate a starting point for your CSS code!
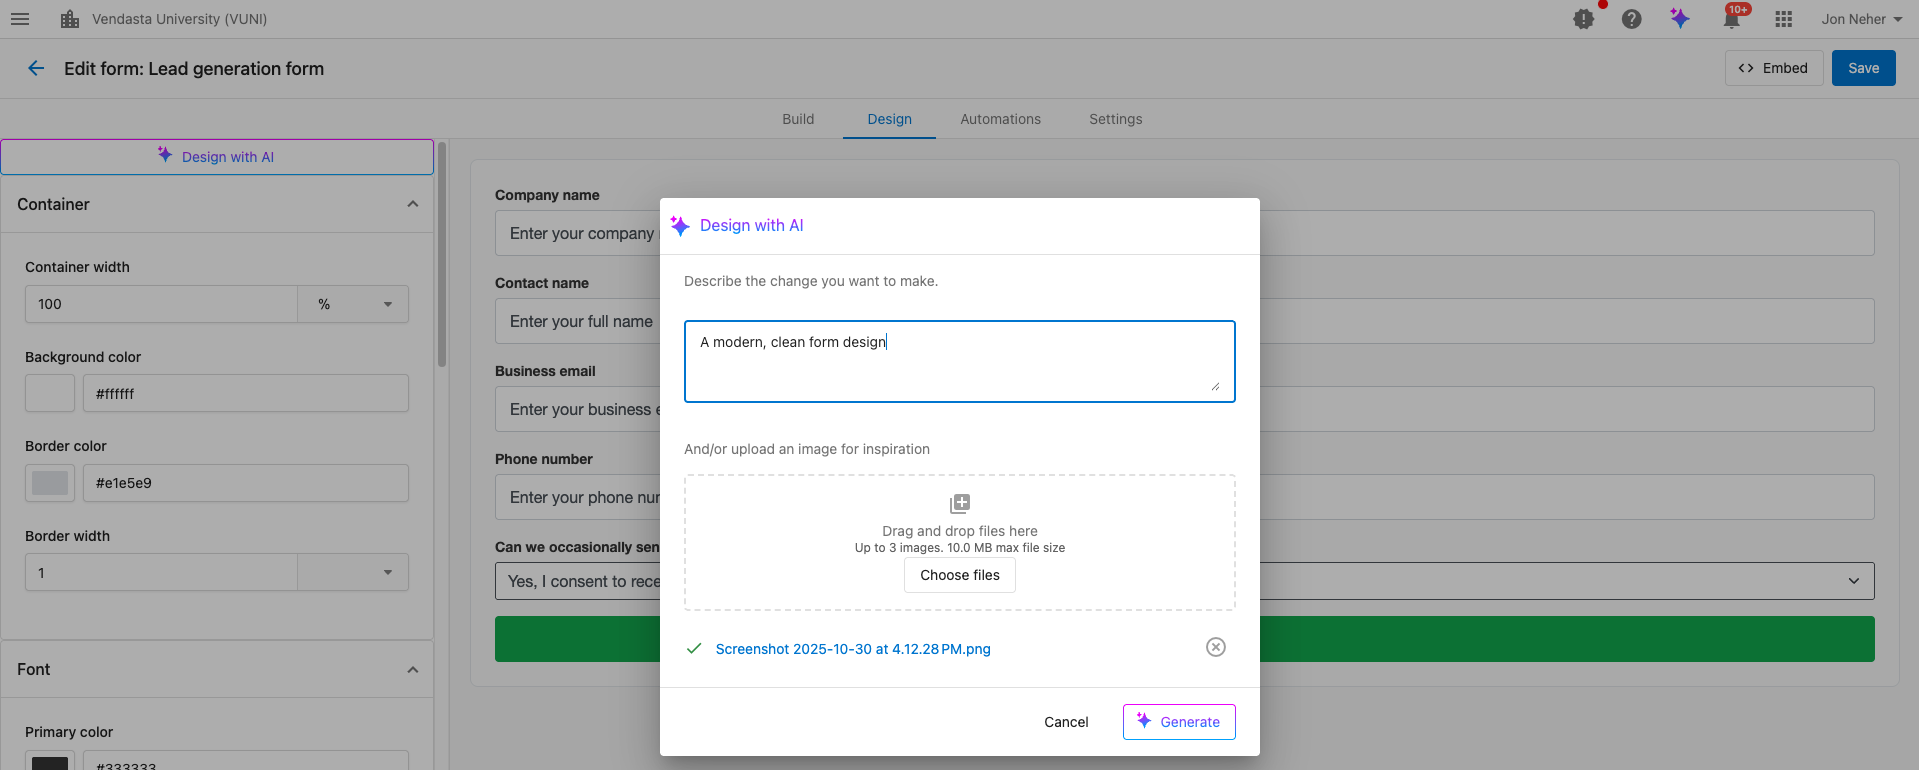
- Go to the Design tab
- Click Design with AI
- Upload an image (for example, your website) and add a prompt with specific instructions if needed (for example, "A modern, clean form design with contact name and business email on the same row")
- Review the generated CSS and fine-tune under Custom CSS
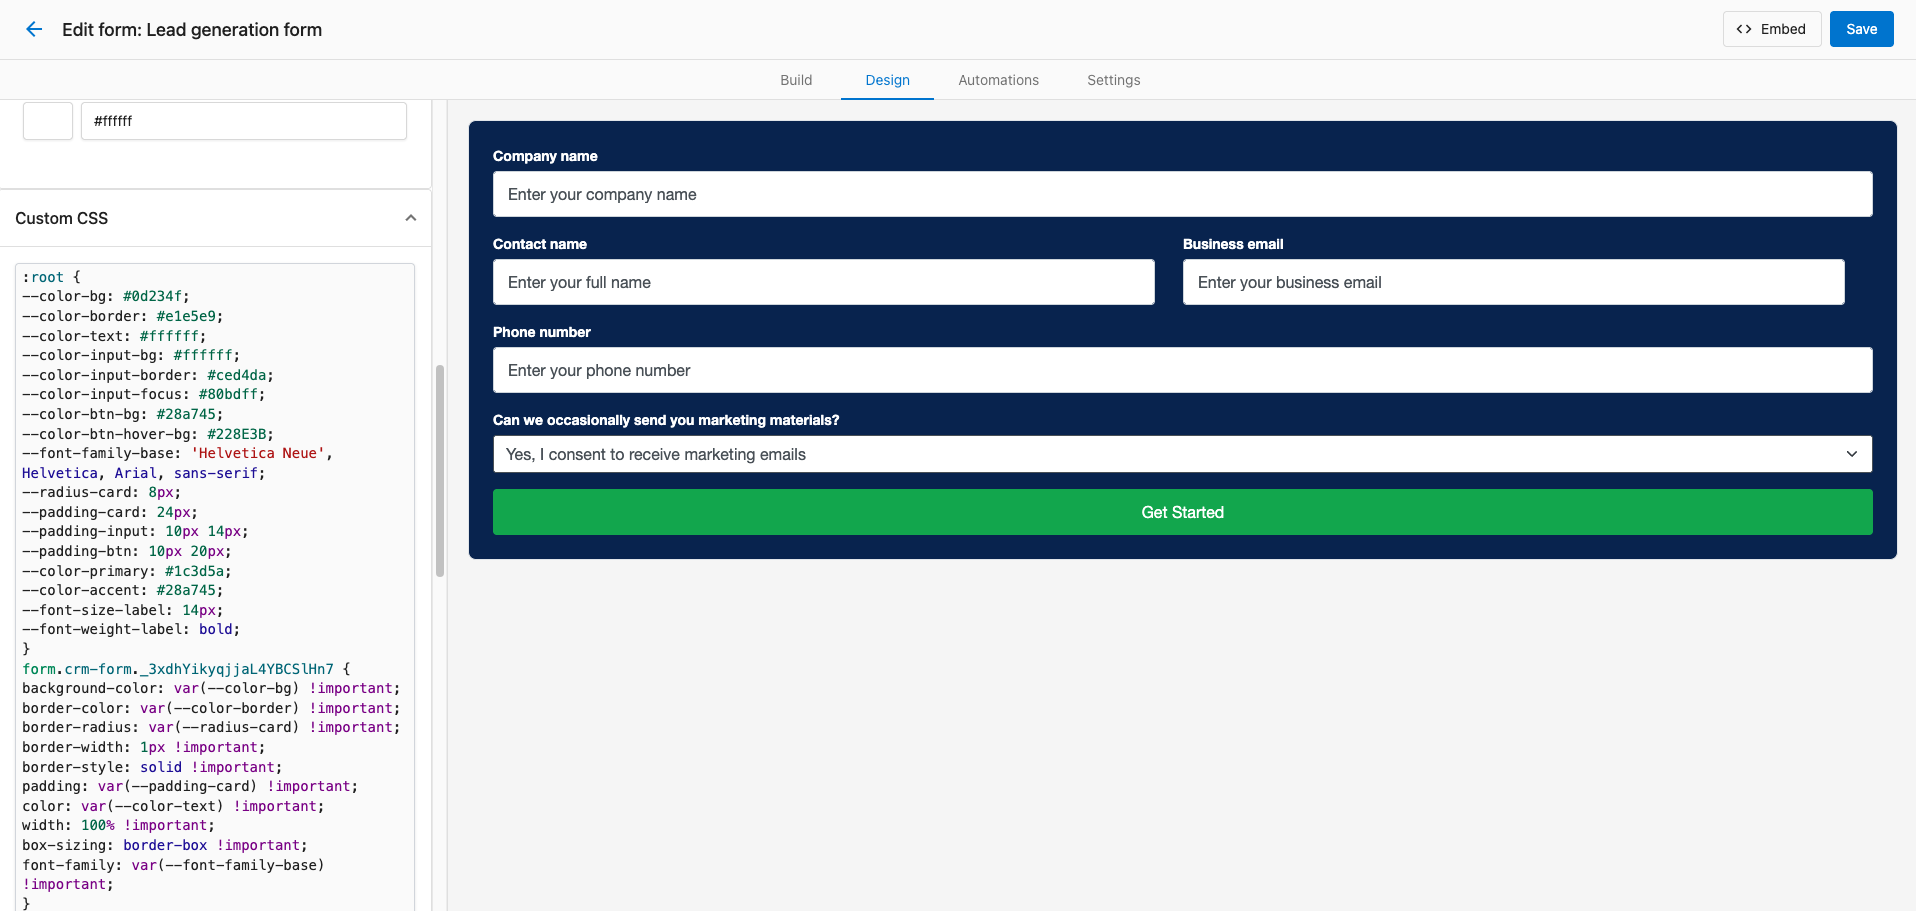
Give AI a screenshot of your website and ask it to style the form to match your website's design and branding with any additional formatting or styling you need. The CSS code will automatically be generated and present when you embed the form on your website later.
Step 5 — How do I configure form automations?
Automations can be used to trigger actions when a form is submitted. For example, you can send an email notification to a team member, add the contact to a specific list, assign the contact to a team member, or trigger a workflow.
While you can build your own automations from scratch, there are a few pre-built templates that you can use to get started quickly. Click on the automations tab and select the template "Send a follow up email when a form is submitted" and click Use template.
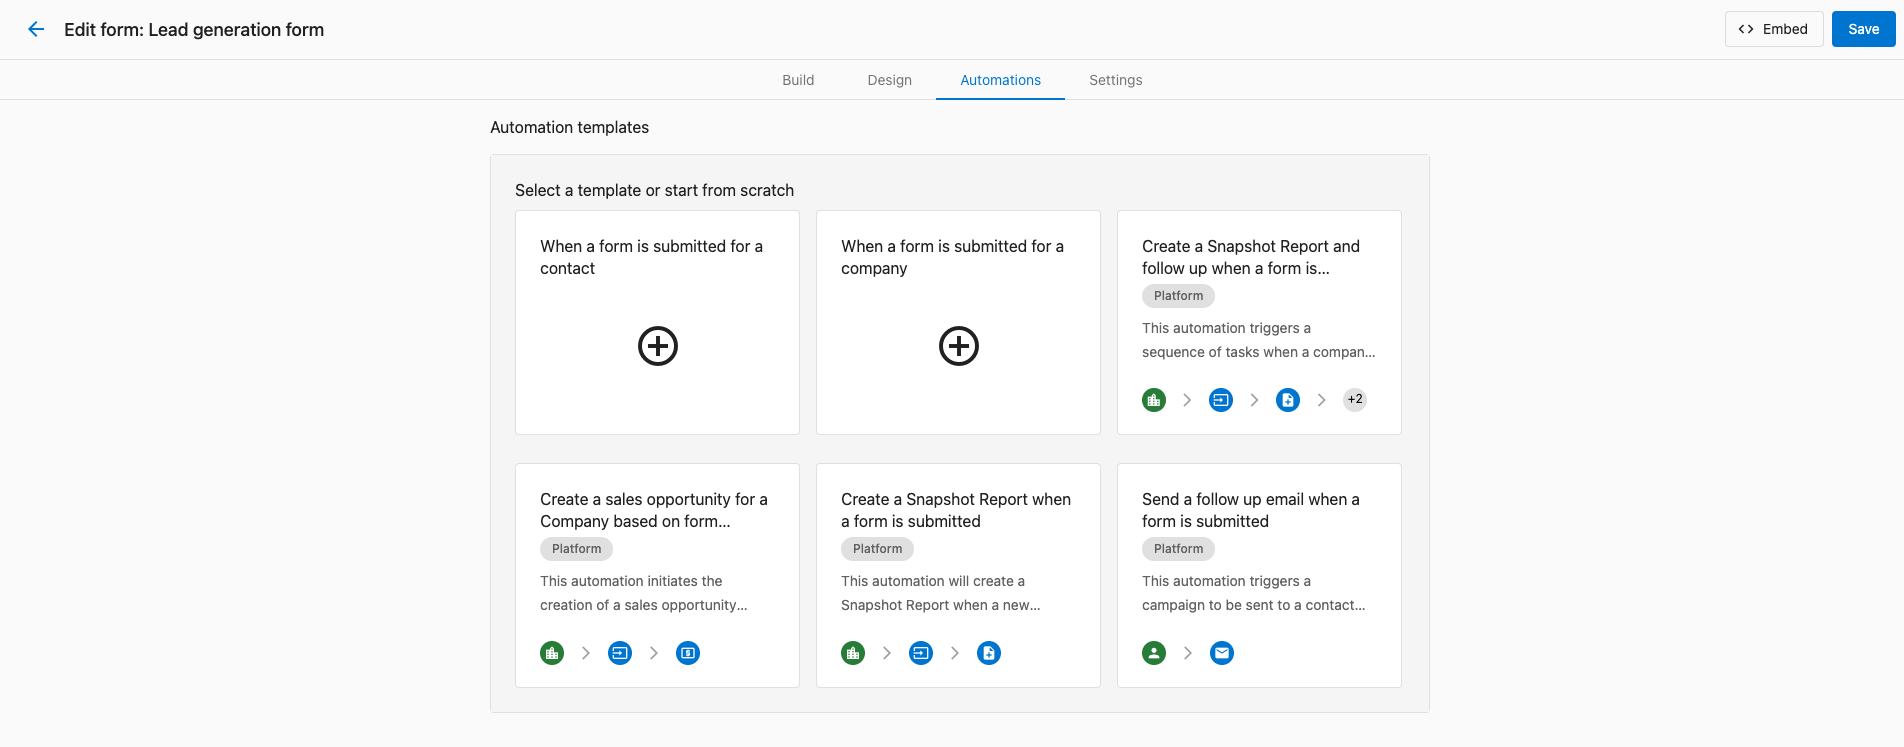
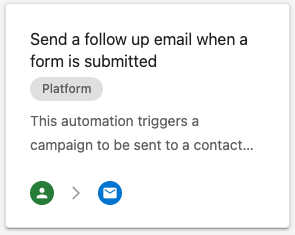
Forms can either trigger an automation for a contact or a company. The green icon in an automation template lets you know which type of record the automation will be triggered for.
You will see an error message when you select the template. This automation template requires you to choose an email campaign that will be sent to the contact when the form is submitted. Choose an existing campaign from the dropdown and then click Save automation.
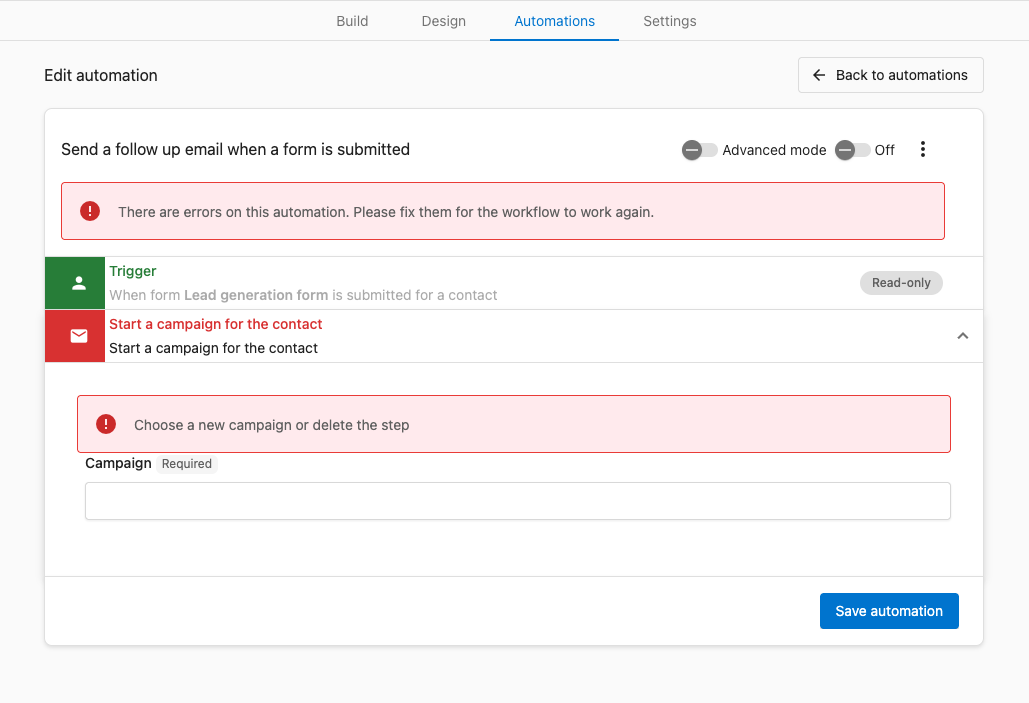
If you do not have an appropriate campaign created, you can save the automation and come back later. For more information on creating email templates for campaigns and automations, see Create marketing emails to get started.
You can edit existing form automation templates by using the Advanced mode toggle in Forms. The automation builder provides you many more actions and conditional logic you can use to build more complex automations for forms.
For more information on building automations with the automation builder, see Creating and configuring automations.
Step 6 — How do I configure submission settings and publish the form?
With the majority of the form setup complete, you can now configure the form settings and publish it to your website. These aren't directly related to how the form looks itself or the information it captures, but are important for how the form behaves and is used.
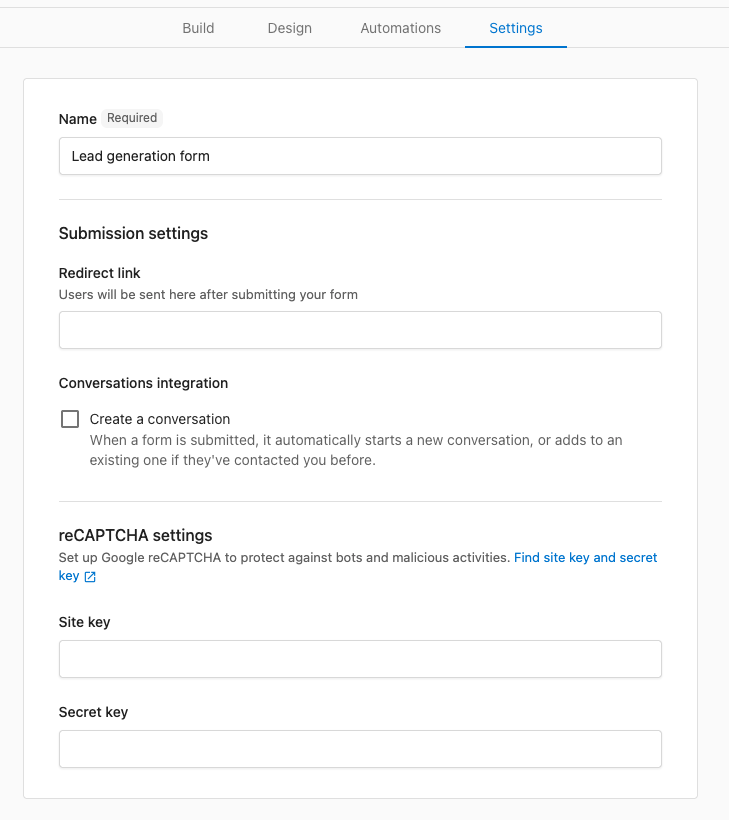
The Redirect link field lets you send users to another URL after they submit a form. Set this to an appropriate URL if you have one. If you leave this field blank, the user will get a confirmation message after they submit the form.
The Conversations integration makes every new form submission appear as either a new conversation or a new message for an existing conversation. This lets you see form submissions as part of the holistic conversation history for a contact or company. Check the box next to Create a conversation if it is not already turned on.

You can protect your forms from spam submissions by enabling reCAPTCHA. This will require users to complete a CAPTCHA challenge before they can submit the form. While this is important, it requires some additional setup and configuration.
For more information on enabling reCAPTCHA, see reCAPTCHA key configuration.
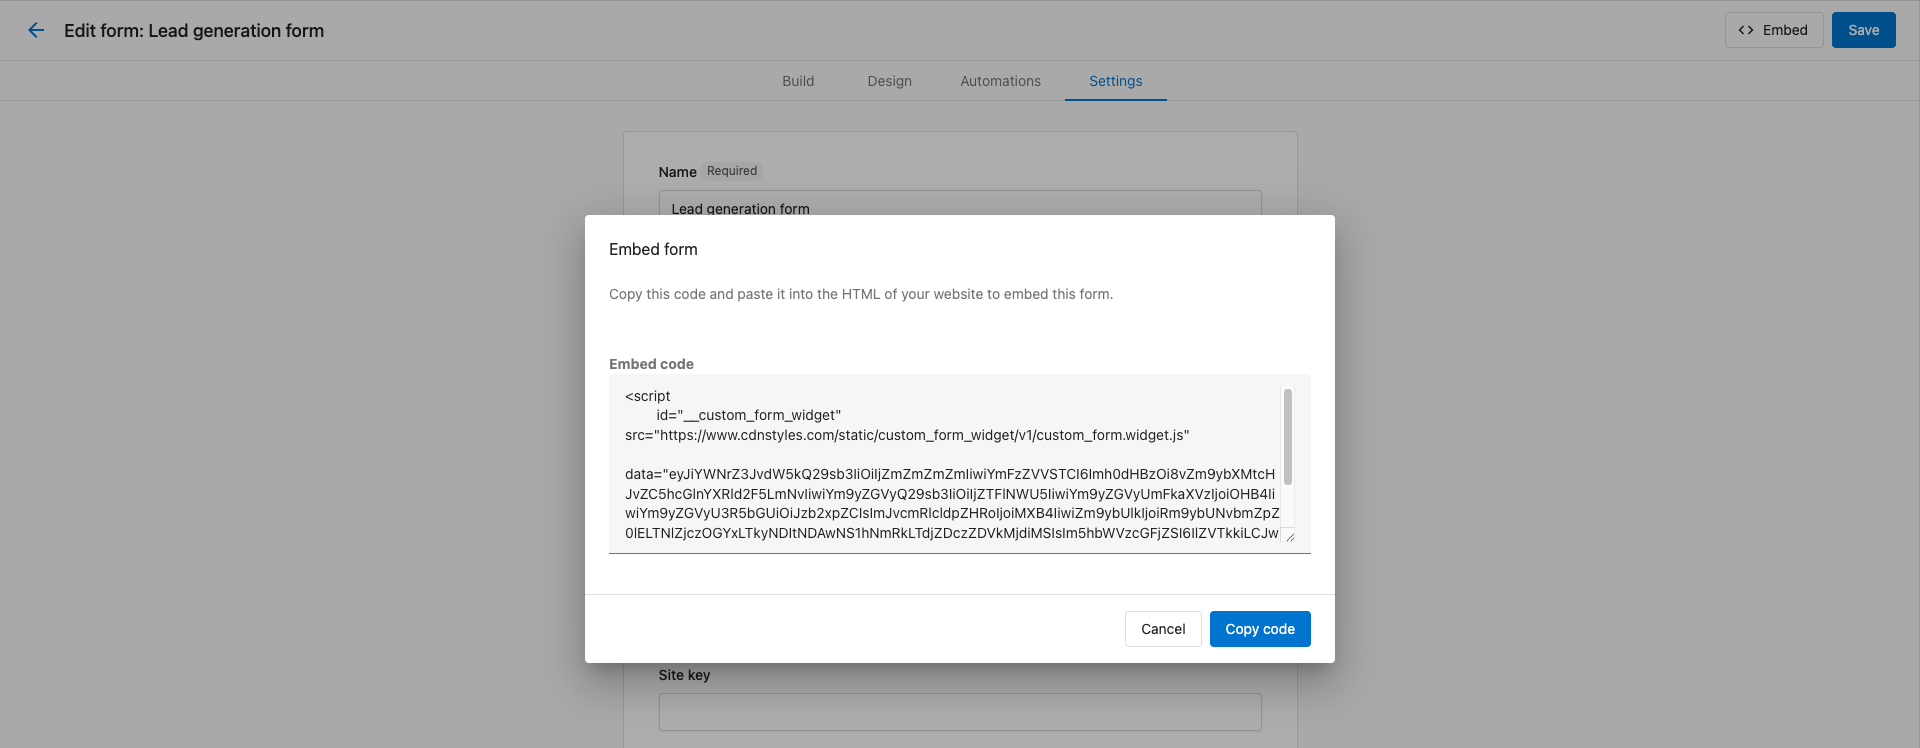
Click on the Embed button to view the code you need to embed the form on your website. You can copy the code and paste it into your website's HTML code to embed the form.
Step 7 — How do I test my form?
Before turning your form live, you should test it to make sure it is working as expected. For this tutorial form that means:
- Submit a test lead and verify the contact/company are created
- Check that the automation sends a campaign as expected
- Verify that a conversation is created as expected
Once these steps are complete, you can turn your form live and start capturing leads!
How do I embed multiple forms on a page?
You can safely place more than one form embed on the same page. Each form renders inside its own isolated shadow DOM, so styles and scripts from one form never affect another.
Duplicate the <script> embed tag for each form you want to display, changing only the data= attribute:
<!-- First form -->
<script
  async
  data-crm-form-widget
  src="https://www.cdnlinks.vendasta.com/.../custom_form.widget.js"
  data="YOUR_BASE64_DATA_FORM_1"
></script>

<!-- Second form -->
<script
  async
  data-crm-form-widget
  src="https://www.cdnlinks.vendasta.com/.../custom_form.widget.js"
  data="YOUR_BASE64_DATA_FORM_2"
></script>
Copy the embed code from the Embed tab in the form editor for each form — the data= value (a Base64 string) is the only attribute that differs between instances. The src= URL stays the same.
Older embed codes using id="__custom_form_widget" still work for pages with a single form. Upgrade to the data-crm-form-widget pattern when you need multiple forms on the same page.
If your site inserts form embed tags dynamically after the page loads, call window.CRMFormsInit() after inserting the tags to trigger initialization without a page reload.
How do I style forms from the host page?
Each form renders inside a shadow DOM for CSS isolation. Standard CSS selectors in your page's stylesheets cannot cross the shadow boundary — they have no effect on elements inside the form:
/* ❌ These selectors do NOT reach inside the form */
.crm-form-host input { border: 2px solid blue; }
.crm-form-host label { color: navy; }
Use the CSS ::part() pseudo-element to style form elements from outside the shadow root:
/* ✅ ::part() crosses the shadow DOM boundary */
.crm-form-host::part(input) {
  border: 2px solid #3b82f6;
  border-radius: 6px;
}

.crm-form-host::part(label) {
  font-weight: 600;
  color: #1d4ed8;
}

.crm-form-host::part(submit-button) {
  background-color: #2563eb;
  color: white;
  border-radius: 999px;
  padding: 10px 28px;
}
Available part names
| Part name | What it targets |
|---|---|
form | The form container element |
input | All input, textarea, and select elements |
label | All field labels |
submit-button | The submit button |
section-button | Next/back buttons on multi-section forms |
{type}-input | Input by field type, e.g. email-input, text-input |
{type}-label | Label by field type, e.g. email-label |
{fieldId}-input | A specific field's input element |
{fieldId}-label | A specific field's label |
consent-input | Consent checkbox inputs |
consent-field-label | Label above a consent field group |
consent-description | Consent field description text |
promo-card | Promo section cards |
success-page | Success page container shown after submission |
success-icon | Checkmark icon on the success page |
success-heading | Heading on the success page |
success-body | Body text on the success page |
Scoping styles to a specific form instance
When multiple forms are on the same page, you can scope ::part() rules to one specific form using its form ID as an additional part name. The form ID is the FormConfigID-... value visible in your embed code.
/* Style inputs only in the contact form */
.crm-form-host::part(FormConfigID-abc123 input) {
  border-color: #7c3aed;
  border-radius: 12px;
}

/* Style the submit button only in the newsletter form */
.crm-form-host::part(FormConfigID-xyz456 submit-button) {
  background-color: #059669;
}
Your form ID appears in the embed code from the form editor. It follows the pattern FormConfigID-xxxxxxxx-xxxx-xxxx-xxxx-xxxxxxxxxxxx. You can also inspect the rendered page in browser DevTools and look for the host element: <div class="crm-form-host" data-form-id="FormConfigID-...">.
How do I interact with forms using JavaScript?
Because each form renders inside a shadow root, document.querySelector() alone cannot reach elements inside it. Use the host element's shadowRoot property to query inside the shadow tree.
Selecting a form instance
Each form's host element has the class crm-form-host and a data-form-id attribute. Use these to target a specific form when multiple are on the page:
// Select a specific form by its form ID
const host = document.querySelector('[data-form-id="FormConfigID-abc123"]');
const shadowRoot = host?.shadowRoot;
Pre-filling field values
Once you have the shadow root, query and set values the same way you would with normal DOM elements:
const host = document.querySelector('[data-form-id="FormConfigID-abc123"]');
const shadowRoot = host?.shadowRoot;
if (!shadowRoot) return;

// Pre-fill a text input by its name attribute
const nameInput = shadowRoot.querySelector('input[name="contactName"]');
if (nameInput) {
  nameInput.value = 'Jane Smith';
}

// Select an option in a dropdown
const sourceSelect = shadowRoot.querySelector('select[name="leadSource"]');
if (sourceSelect) {
  sourceSelect.value = 'website';
}
Forms load asynchronously. Run any JavaScript that reads or writes form fields after the form has rendered — for example, in response to a user interaction. Avoid running pre-fill logic immediately on page load before the form's shadow root exists.
Frequently asked questions
Can I create forms without using templates?
Yes! While templates provide a quick starting point, you can create a blank form from scratch. Go to Marketing → Forms and click Create form to start with a completely empty form and build it exactly as you need.
How do I make my form mobile-responsive?
Forms are automatically mobile-responsive by default and the AI design assistant can help ensure your form looks great on all devices. Test your form on different screen sizes using your browser's developer tools.
Can I integrate forms with other platforms?
Yes! Forms can integrate with various platforms through automations and webhooks. For example, you can send form data to CRMs, marketing automation tools, or custom applications. Check the Automations documentation for tips on how to build integrations with other systems.
How do I prevent spam submissions?
Enable reCAPTCHA protection in the form settings to prevent automated spam. You can choose between visible checkbox verification or invisible protection. See reCAPTCHA key configuration for setup instructions.
How do I send a thank-you or follow-up email after someone submits a form?
Open the form's automations tab, select the template "Send a follow up email when a form is submitted", and click Use template. Choose an existing email campaign from the dropdown, then click Save automation.
Why do I see an error message when I use the follow-up email automation template?
The template requires you to choose an email campaign to send to the contact when the form is submitted. Choose an existing campaign from the dropdown and click Save automation, or save the automation and come back after you create a campaign.
How do I capture UTM parameters or the lead source in a hidden field?
Forms automatically capture common UTM parameters like utm_source, utm_medium, utm_campaign, utm_content, and utm_term. To store a query parameter on a specific field, open the field's properties, check Make hidden, check Populate field dynamically, and enter the query parameter name.
How do I set a default value for a form field?
Click the field to open its properties panel and set the Default value. For dropdown fields, set the default to one of the options you created.
Where do form submissions go?
Contact and Company fields are linked to the matching records in the CRM, so a submission creates or updates those records. If Create a conversation is turned on in the form settings, each submission also appears in Conversations as a new conversation or a new message in an existing one.
How do I find my form ID?
Your form ID appears in the embed code from the form editor and follows the pattern FormConfigID-xxxxxxxx-xxxx-xxxx-xxxx-xxxxxxxxxxxx. You can also inspect the rendered page in browser DevTools and look for the data-form-id attribute on the crm-form-host element.