How do I create and send invoices?
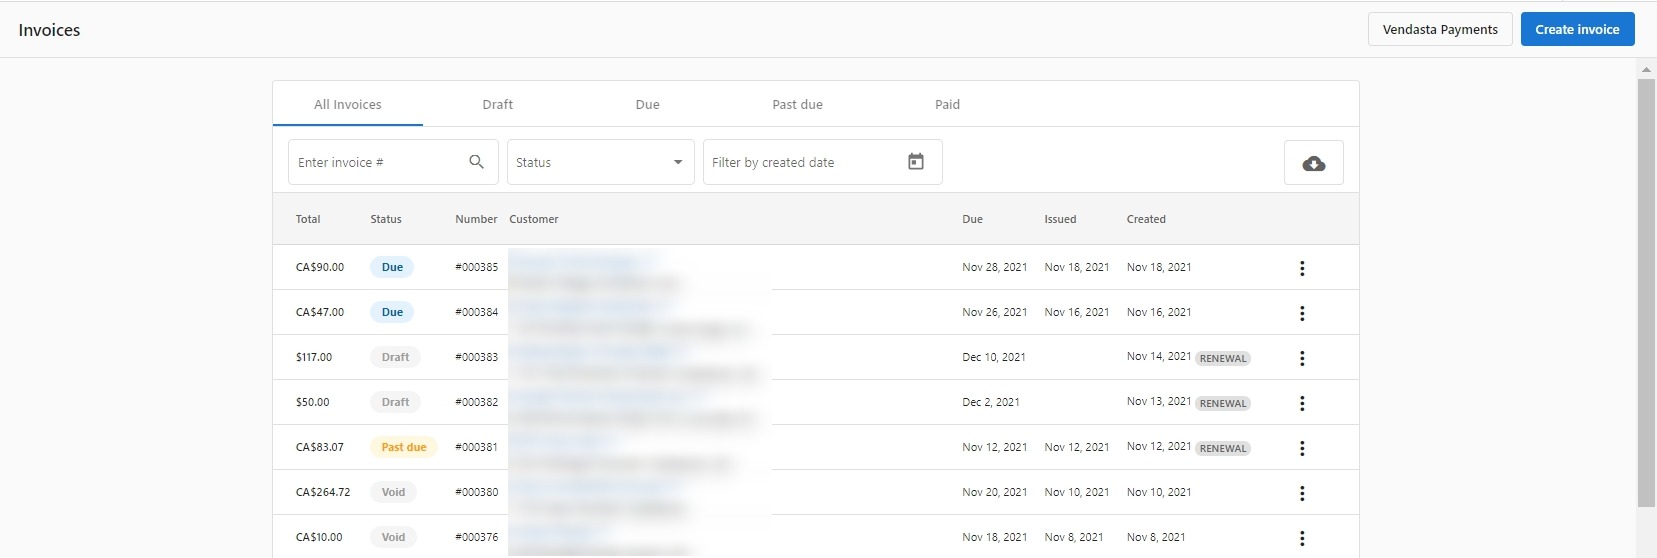
Invoices in Partner Center let you request and collect payment for the products and services you provide your customers. To create one, go to Commerce → Invoices, click New → Invoice, add line items, and then click Send Invoice or charge a payment method on file.
Invoices can be manually created or can be automatically generated according to an account's subscriptions and product renewal dates.
Invoices function differently depending on whether you have set up Vendasta Payments. If you haven't set up Vendasta Payments, you can create, edit, and send invoices to your customers, but you can't collect payments directly within the invoice email.
Note that it is possible to invoice a customer for any product you're selling or any package (draft or published) in your Store. However, if you are invoicing a customer for a product that is not already active on their account, the product will not automatically activate once the invoice has been paid. You can instead activate the product by following the usual steps for product activation at any stage of the invoicing process.
What do I need before using invoices?
Invoices can be used most effectively when the following criteria are met:
- You have set retail prices and added the product/package to your Store
- Your Store uses packages with line-item pricing (existing packages are automatically migrated when edited and saved in the package constructor)
- An account exists for the business that you intend to invoice
- You have set up Vendasta Payments and are capable of accepting payments and receiving payouts
- You have created tax rates (if applicable)
How do I create an invoice?
Invoices can be created at any time from the Commerce → Invoices tab in Partner Center, or by going into the account you wish to create an invoice for and clicking on the invoice tab.
The minimum invoice amount is $1.00. Attempting to charge or send an invoice below this threshold will result in an error.
- Click
New→Invoiceand select an account to create a draft invoice - Select a Due date for the invoice. The due date controls the date displayed to the client on the invoice — it does not determine when payment is collected. If you use automatic charging, payment is collected immediately when the invoice is charged, regardless of the due date.
- Select a User (recipient) for the invoice
- Click Add Item to add an individual product to the invoice. You can add any product that you're currently selling in your Marketplace, or type any text into the text box to represent a line item that does not exist in your Marketplace
- If the product you select already has a retail price set, it will automatically populate the Unit Price and currency for that item. The price and currency can also be overwritten on an individual invoice (note that invoices only accept payments in USD and CAD)
- To add a discount as a line item, input the description of the discount and enter a negative dollar amount. The negative value entered will be subtracted from the invoice total
- You can also click Add Custom Item to create your own line item.
- If your invoice includes more than one of a certain item, this can be specified using the Quantity column
- Use the Options ⋮ menu to remove an item from the invoice or apply a tax rate to a line item. Note: Tax rates do not apply to invoices automatically — they must be manually added to each line item individually.
- If necessary, add additional information to the invoice using the Memo field at the bottom of the invoice
Invoices can also be created at any time when viewing an individual account in Partner Center → Manage Accounts by clicking the Options ⋮ menu next to the Open Business App button.
How do I create an invoice from an opportunity?
You can also create an invoice directly from an opportunity by clicking Create invoice on the opportunity. The invoice is created with the opportunity's products already added as line items, and stays linked to the opportunity, so its status is visible from the opportunity as it moves from due to paid.
How do I send or charge an invoice?
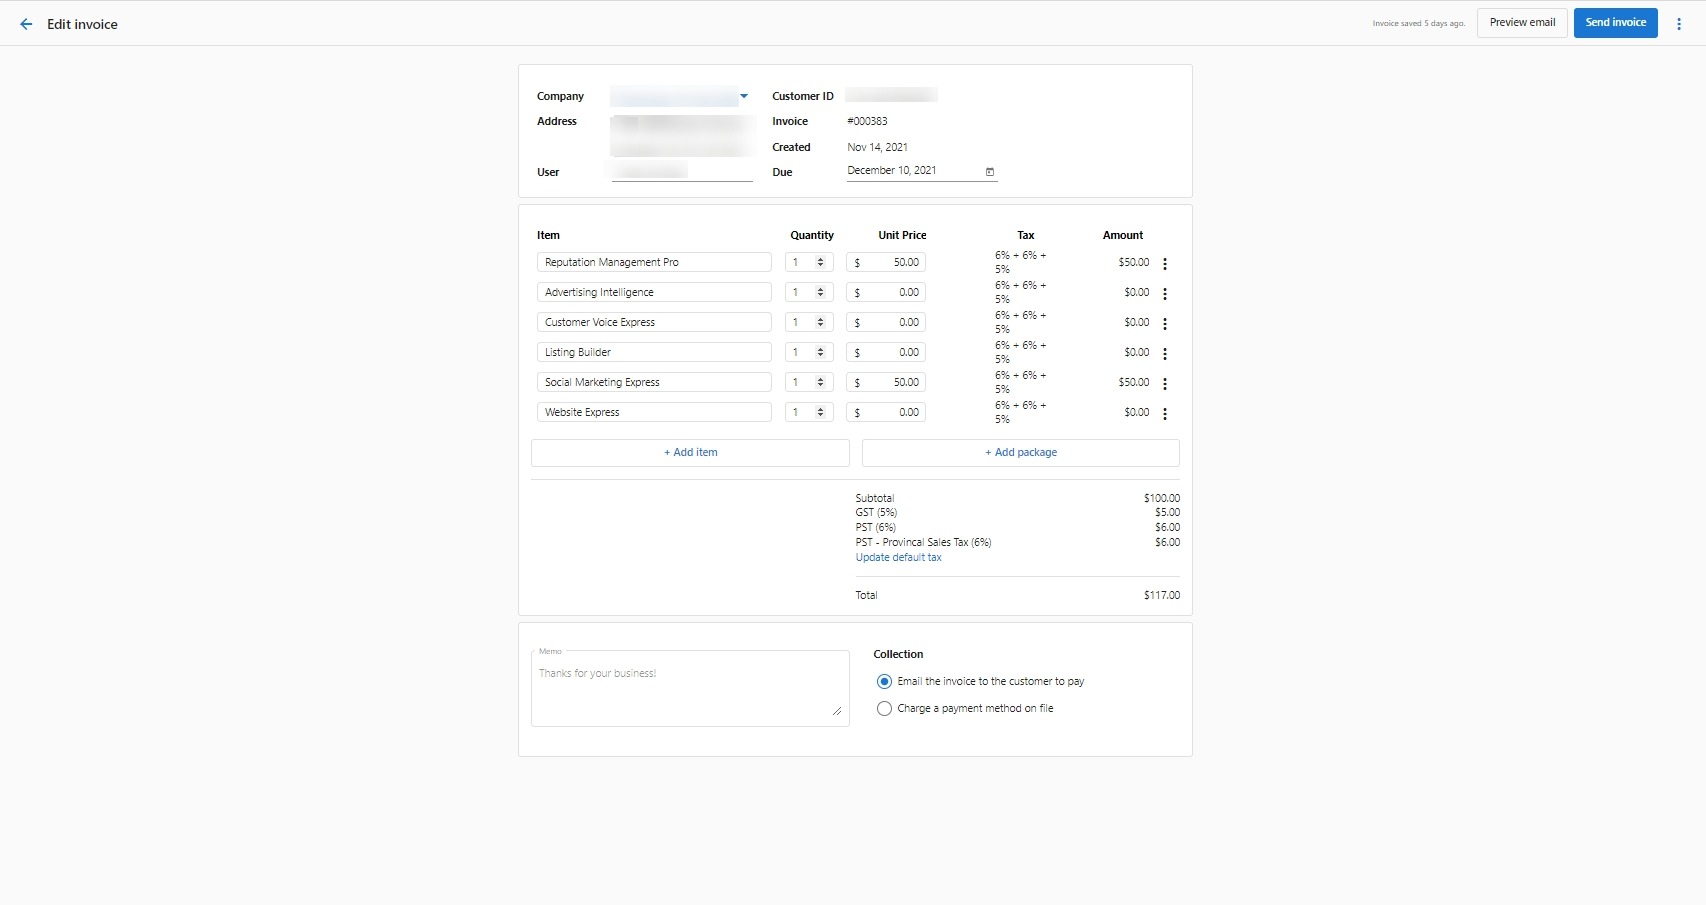
Before sending an invoice, we recommend reviewing the Subtotal, Discount, and Total fields to ensure that the invoice was properly assembled. A draft invoice can be edited as many times as necessary, but once an invoice has been sent, it cannot be edited.
When your invoice is ready, click Send Invoice to choose one or more recipients from the users that exist on the given account. The window will also display a preview of the email that each recipient will receive.
Alternatively, you may instantly charge your customer for the contents of the invoice by selecting Automatically charge a payment method on file under the Collection section. This will change the Send Invoice button at the top-right of the page to Charge invoice. After a successful charge, your customer will receive a receipt via email. This requires your customer to have at least one payment method saved in Vendasta Payments. Your customer will have a payment method saved if they have previously paid an invoice or made a purchase using the Shopping Cart. If your customer does not have a saved payment method, it is possible to enter a payment method on behalf of your customer by clicking Edit next to the payment method field in the Collection section.
Sent invoices can be viewed at any time from the table on Partner Center → Commerce → Invoices.
If an invoice has been missed or misplaced by its recipient, it can be sent again at any time. Clicking Resend Invoice while viewing a Due invoice will allow you to choose any recipient on the account to resend the invoice.
How does my customer pay an invoice?
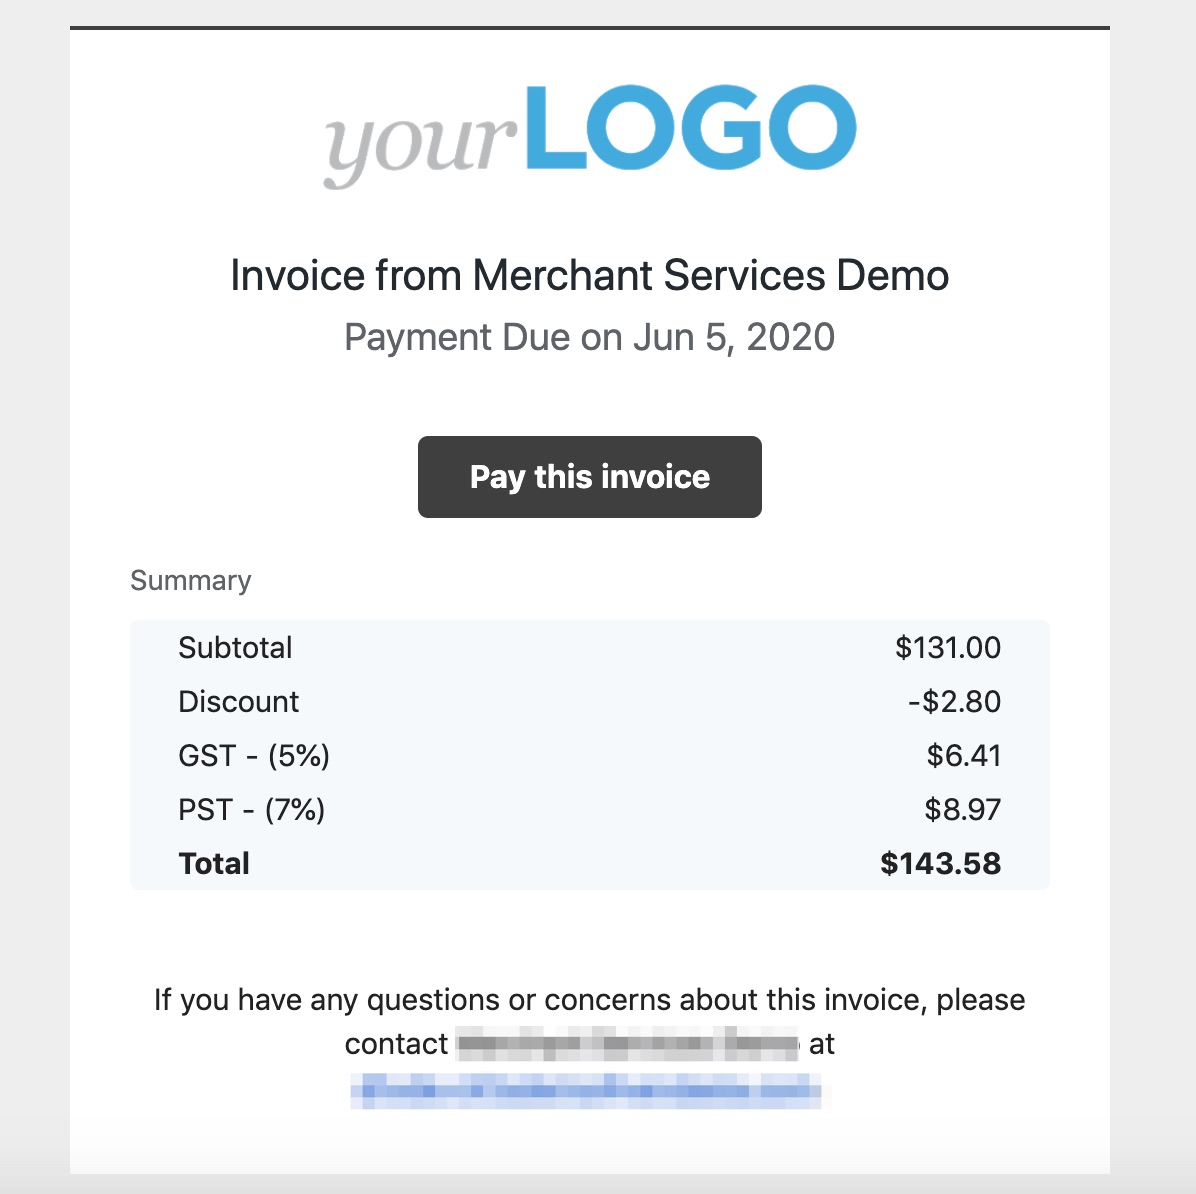
After sending an invoice, the recipient that you've chosen will be emailed a digital copy of the invoice. Invoices sent to an account will also appear under the Invoices tab in Business App.
If Vendasta Payments is enabled when the invoice is sent, the recipient will have the option to pay the invoice directly by clicking Pay this invoice while viewing the invoice. This will direct the recipient to a landing page that displays all line items on the invoice and allows them to pay via credit card.
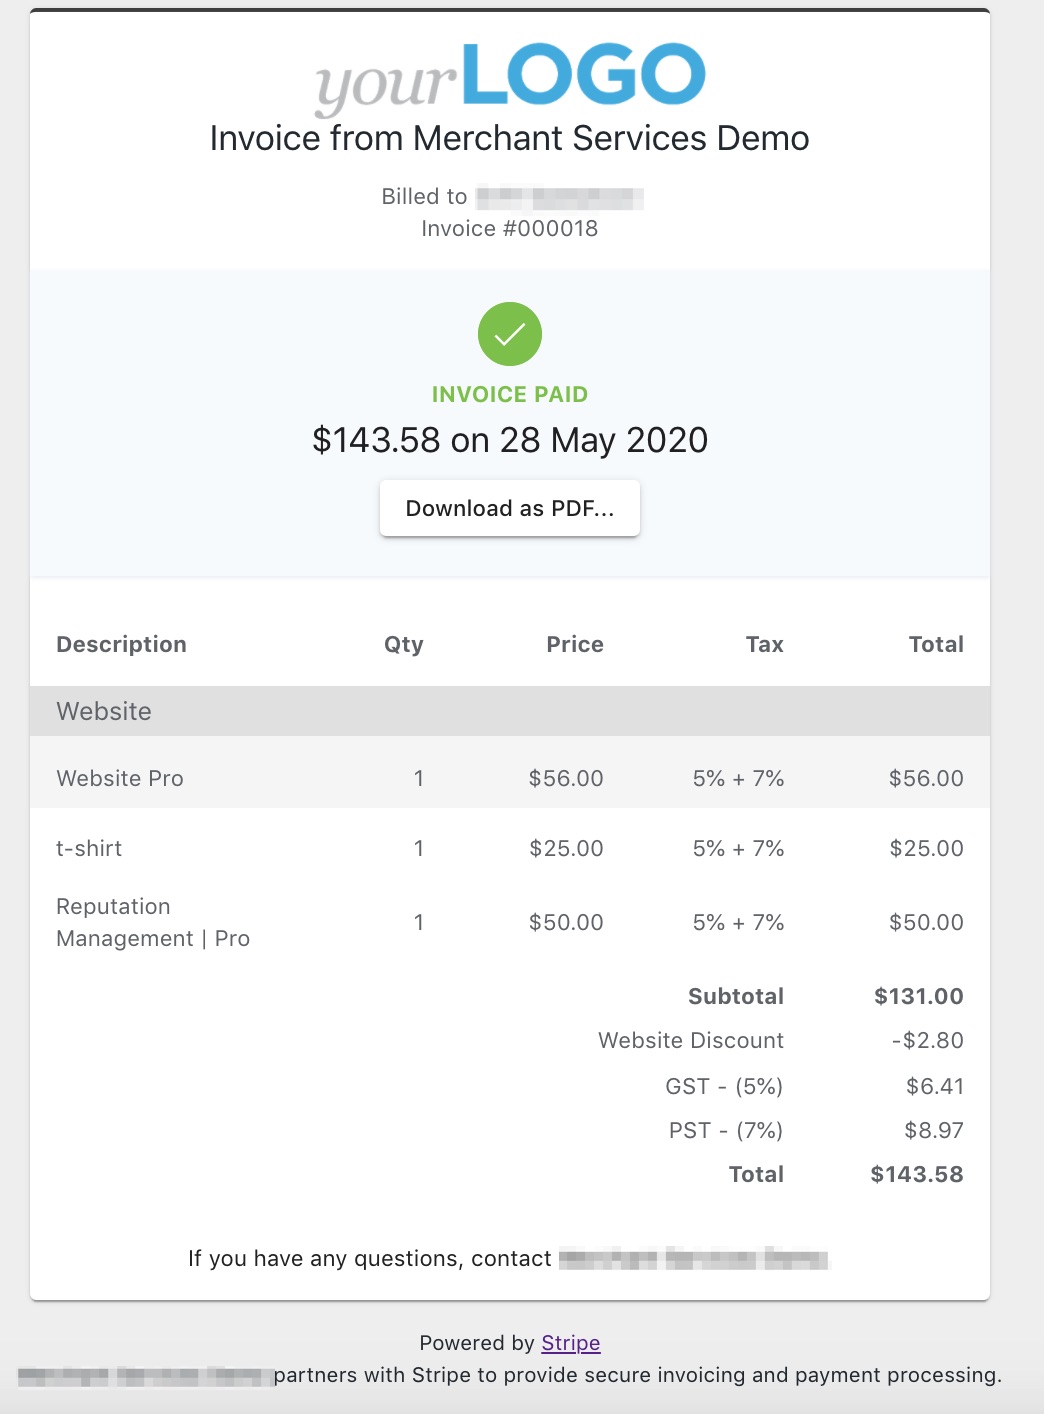
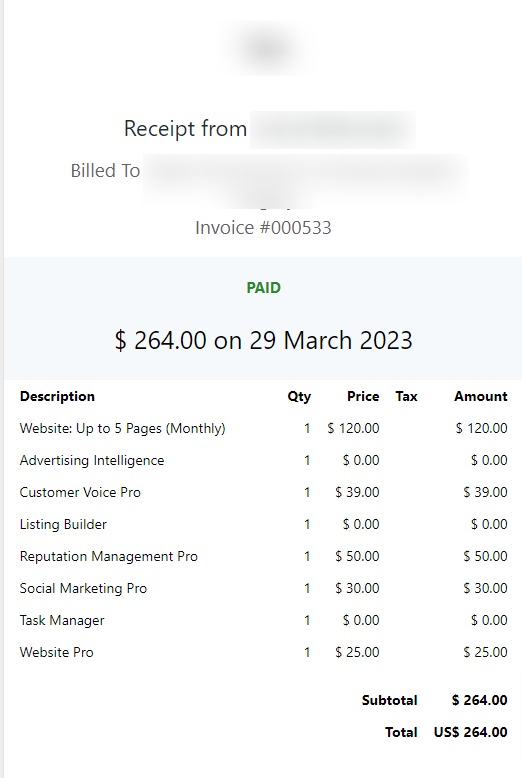
After an invoice has been paid, the recipient can click Download as PDF to save a receipt in PDF format.
How do I manage invoices?
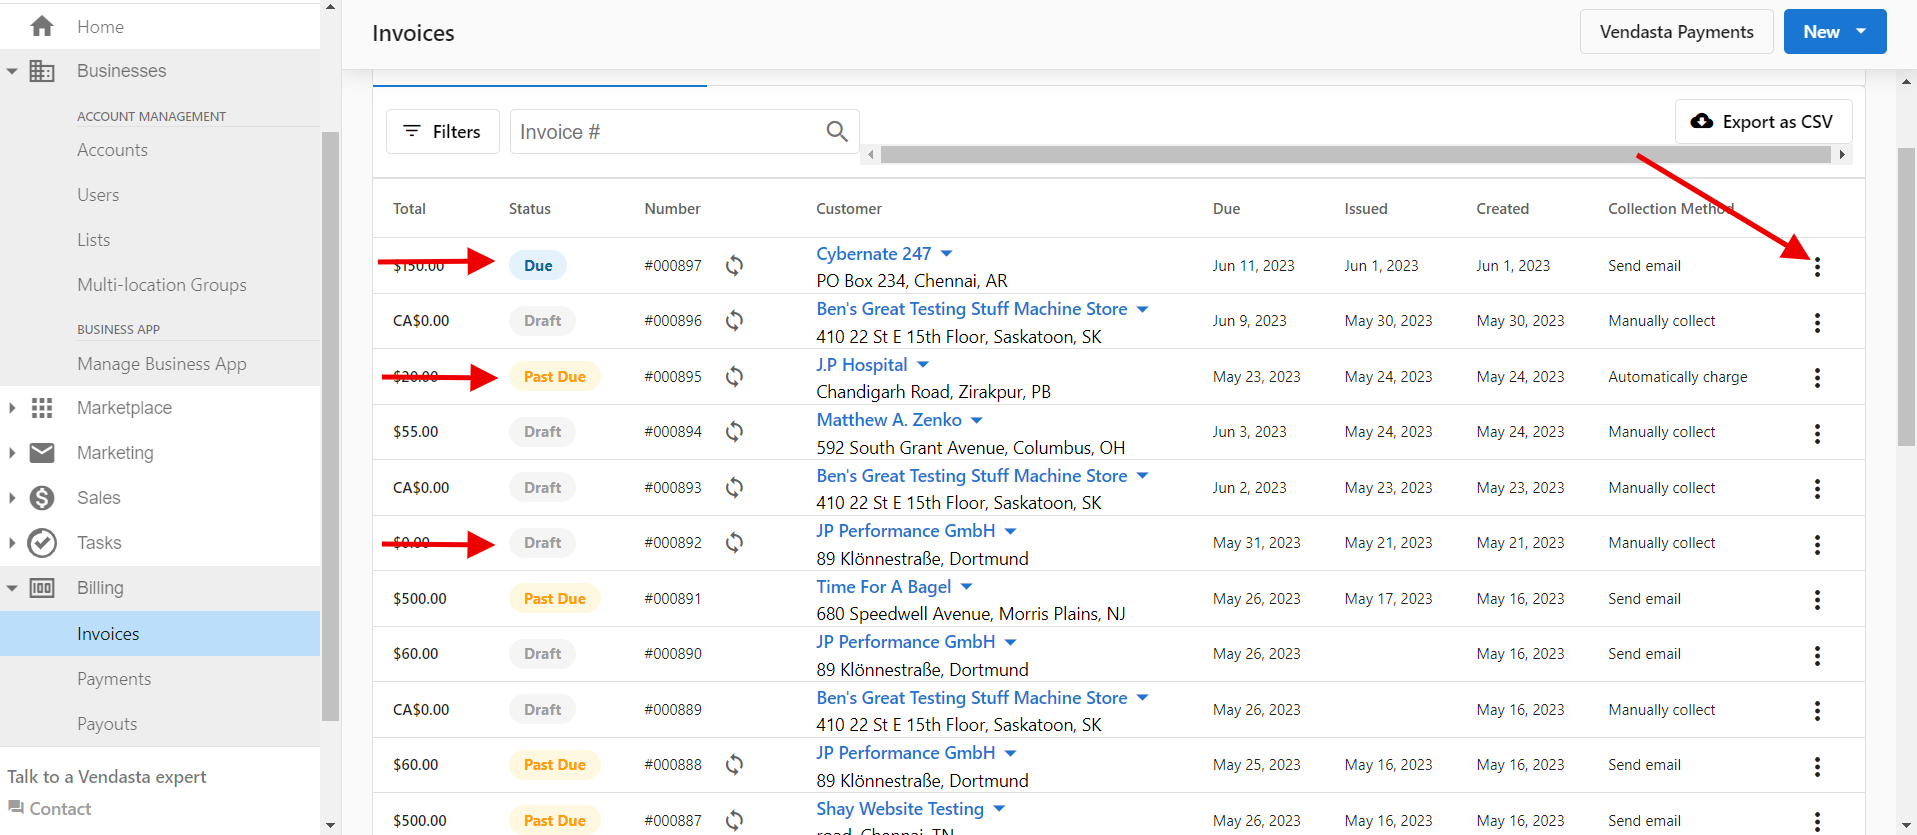
All invoices can be viewed at any time from the table on Partner Center → Commerce → Invoices. Clicking the Options ⋮ menu on an invoice allows users to edit or delete a draft invoice, download a copy of an invoice in PDF format, or download a receipt for a paid invoice in PDF format.
Business App users can view the complete list of invoices they have received using the Invoices tab in the Business App.
Partners can download a complete table of all sent non-voided invoices by clicking the Export as CSV button in the top right corner of the Invoices table.
What do the invoice statuses mean?
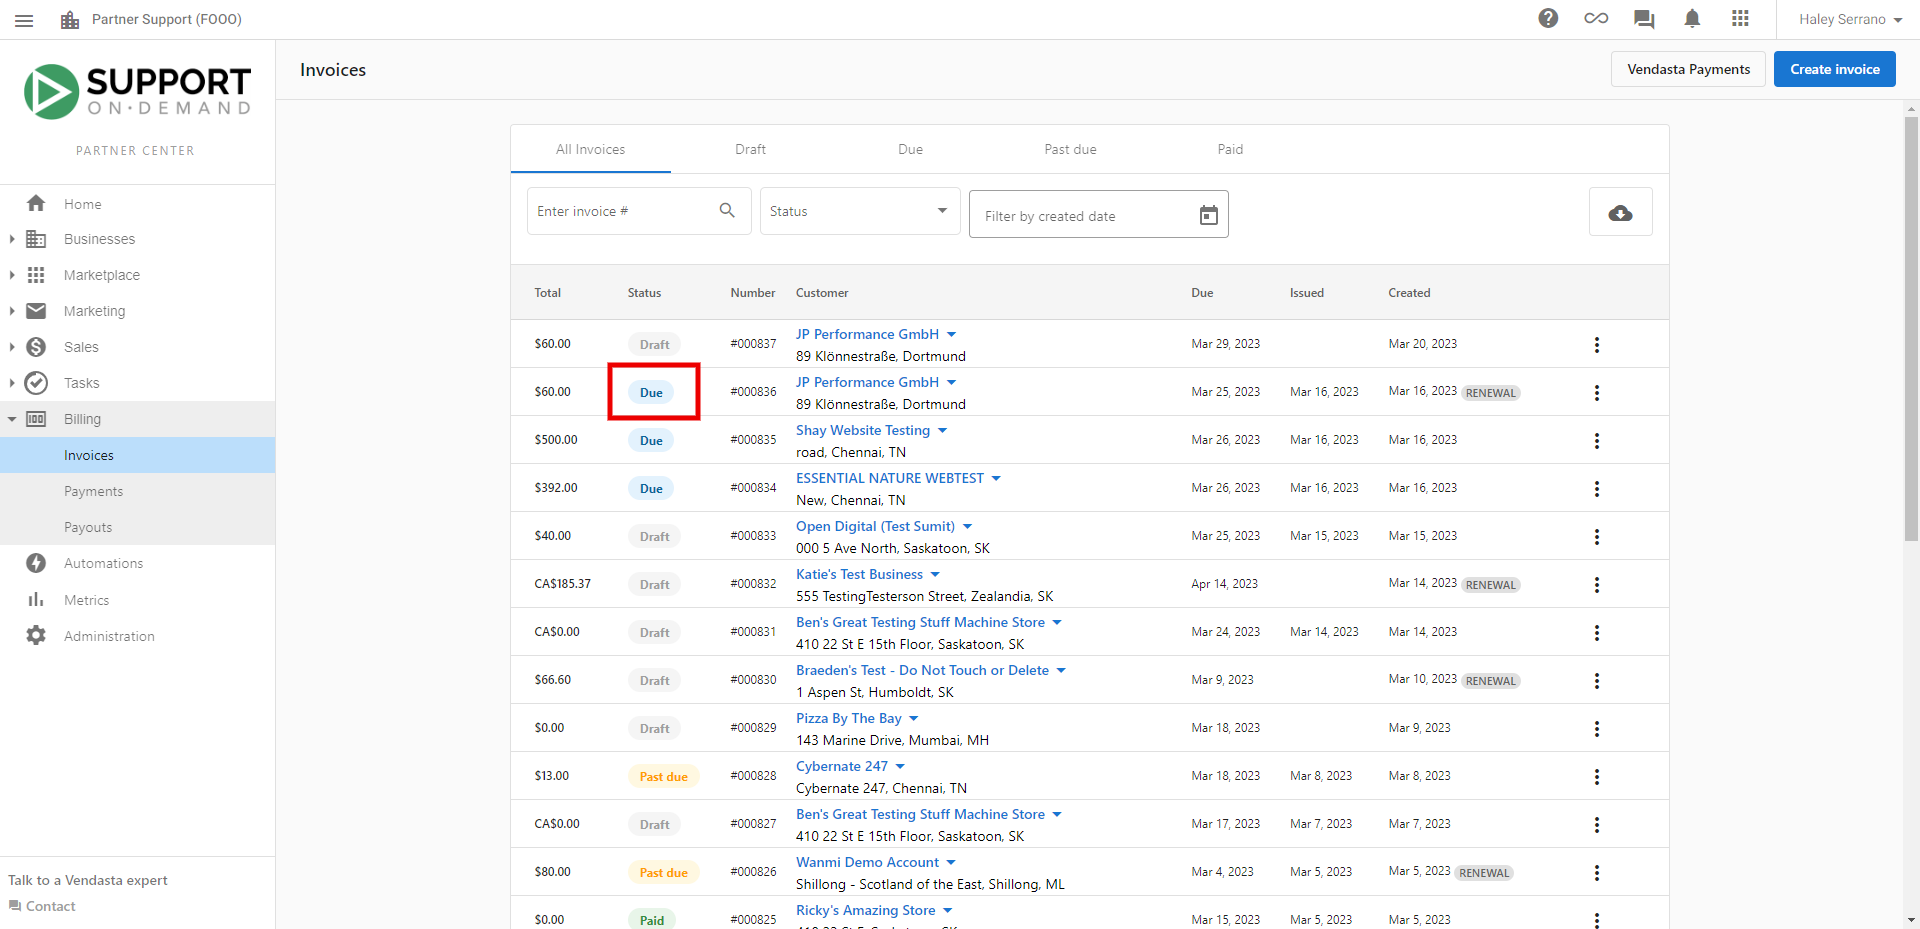
An invoice's status is displayed in the Status column on the table in Partner Center → Commerce → Invoices. An invoice can have one of the following statuses.
- Draft: A draft invoice can be edited, and has not yet been sent to a recipient.
- Due: A Due invoice has been sent to a recipient and can no longer be edited. Clicking Resend Invoice allows you to reselect a recipient and send the invoice again.
- Paid: A Due invoice will be marked as Paid when its recipient pays for it via the Pay this invoice button. Alternately, if payment was collected outside of Vendasta Payments, an invoice can be marked as Paid by clicking the Options ⋮ menu, selecting Change invoice status, and selecting Paid.
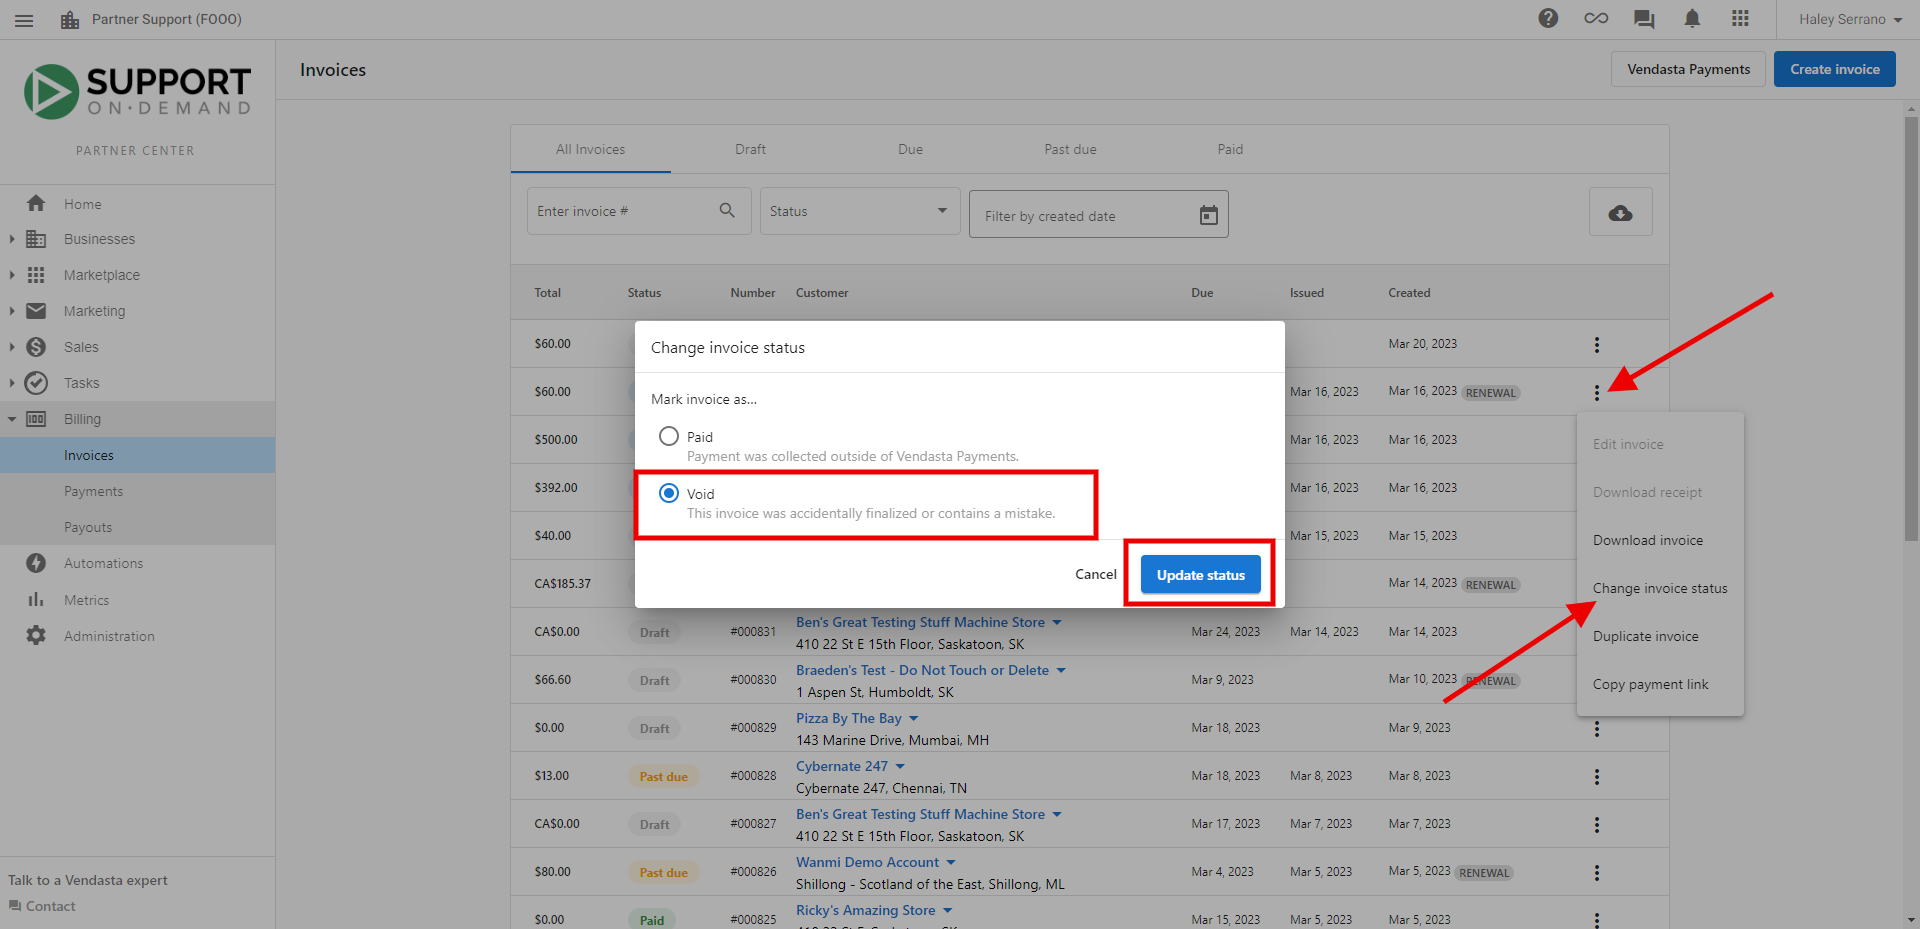
- Void: If an invoice has been sent in error or is no longer relevant, an invoice can be marked as Void by clicking the Options ⋮ menu, selecting Change invoice status, and selecting Void.
Note that an account's Invoicing settings are all off by default. To edit these settings for a particular account, go to the Products section on the account's page under Partner Center → Accounts → Manage Accounts → Select account and click Invoices.
How do I customize invoice numbers?
Next invoice number customization lets you define the next number sequence for your upcoming invoices, so your invoice numbers stay consistent with your existing billing records.
Common reasons to customize invoice numbers:
- Continuity from Previous Platforms: New Partners can continue the numbering sequence from their previous billing system.
- Professional Appearance: New Partners can avoid starting their invoice number sequence from 001.
To customize the next invoice number:
- Navigate to
Partner Center→Commerce→Invoices - To access the setting, select the three dots in the top right hand corner of the page, and click Set new invoice number
- Input the desired next invoice number. Note: The number must be greater than any previously used invoice number
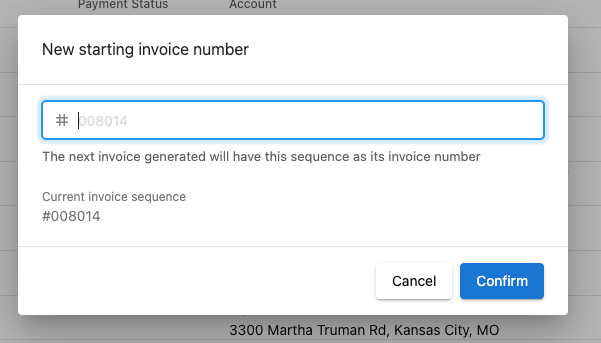
- Click Confirm, and your next invoice generated will follow the new number sequence
Invoice number customization notes:
- The invoice number only supports numeric values (no alphanumeric prefixes)
- You can only set the next invoice number to a value greater than any number already used on an invoice
- The invoice number sequence applies to all your transactions across all customers
How do I change invoice email settings?
The email address showing at the bottom of the invoice sent to clients can be changed by going to Partner Center → Administration → Customize → Under partner defaults tab; click on Email Settings → Sender Email → Change it and then apply the changes.
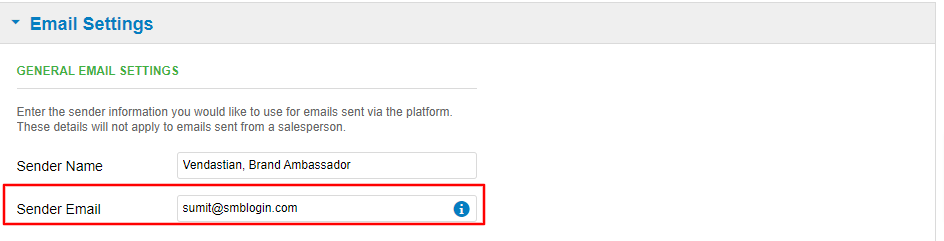
This is also the email address from which the platform will send reports, to which recipients can reply.
For Partners with multiple markets, repeat the same steps under the 'Markets' heading → click the pencil icon to select market and update email accordingly or simply apply the Partner branding configurations to the additional market(s).
Frequently asked questions
Can I change an invoice status after it is marked "paid"?
No - Once an invoice has been marked as "paid," it cannot be adjusted to another status (such as "due" or "past due.") If an invoice needs to be sent to a client again, recreate the original invoice and send it again.

Can I delete an invoice?
Draft invoices can be deleted using the Options ⋮ menu on the invoice.
Sent or paid invoices cannot be deleted — they are financial records. If you need to reverse the charge on a paid invoice, issue a credit note instead. If a sent invoice was created in error and has not been paid, void it by selecting Change invoice status → Void from the Options ⋮ menu.
You can't retract or delete an invoice that has already been sent.
If you have sent an incorrect invoice, create and send a new invoice to your customer.
If you have sent an invoice to the incorrect recipient, an invoice can be sent to a different recipient at any time by clicking Send Invoice and choosing a different recipient.

If the invoice is still under the status 'due,' it can also be voided.
To void the invoice, navigate to Partner Center → Commerce → Invoices → Click the 3 dots next to the invoice and select Change Invoice Status. Select the void status, and save.
How do I mark an invoice as "paid" if it has not been paid through Vendasta Payments?
If you want to generate an invoice on an account but do not want to send it to your client, or the client has already paid, you can mark the invoice status as "Paid" for your records:
In Partner Center → Commerce → Invoices → Select the invoice (any invoice that is Past Due, or Due status) → Click the three dots at the end of the row → Change invoice status → Paid:
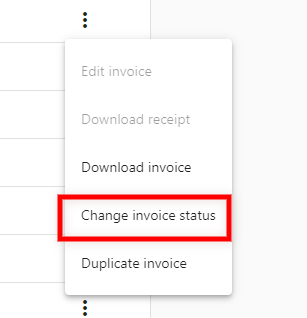
Please note that invoices with the status "Paid" or "Void" do not have the option to change the invoice status.
Can invoices and receipts from Vendasta be sent to multiple users?
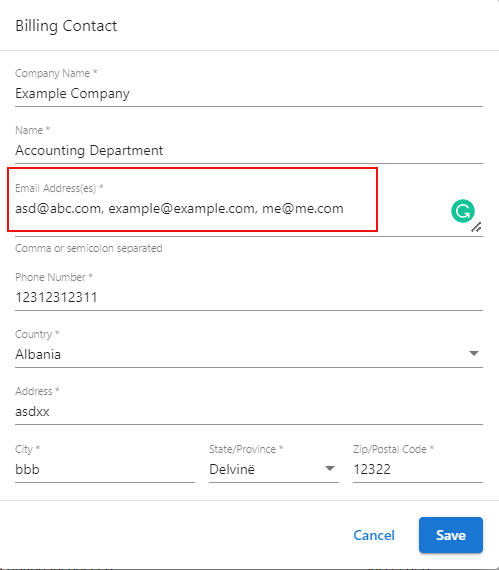
Yes - a comma-separated list of email addresses can be added to the Billing Contact Information card in Partner Center → Administration → My billing. Addresses listed here will receive invoices and email notifications regarding successful and failed payments, etc.
Will I be notified when an invoice is sent to my customer?
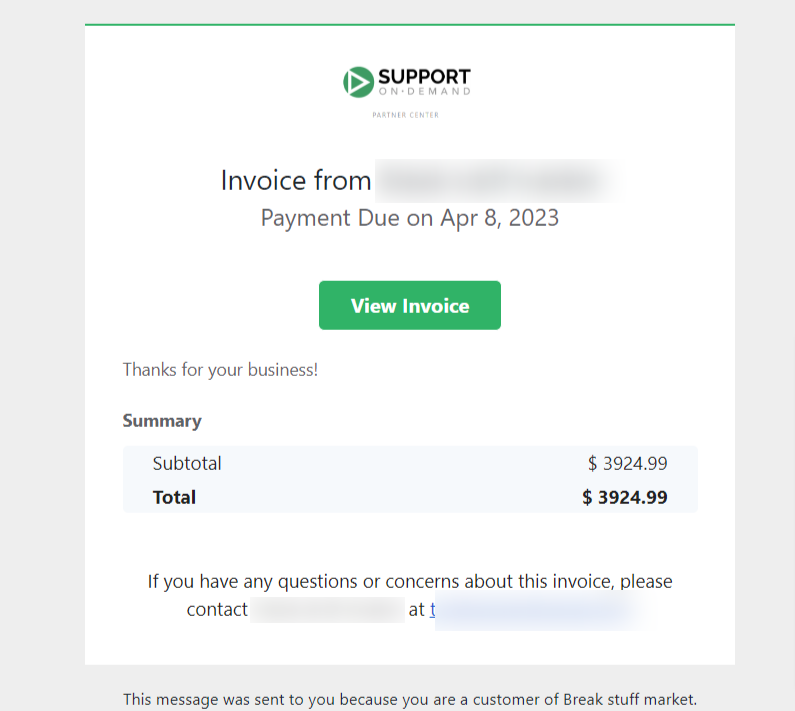
Yes! You will receive an email every time an invoice is generated and sent to your customer.
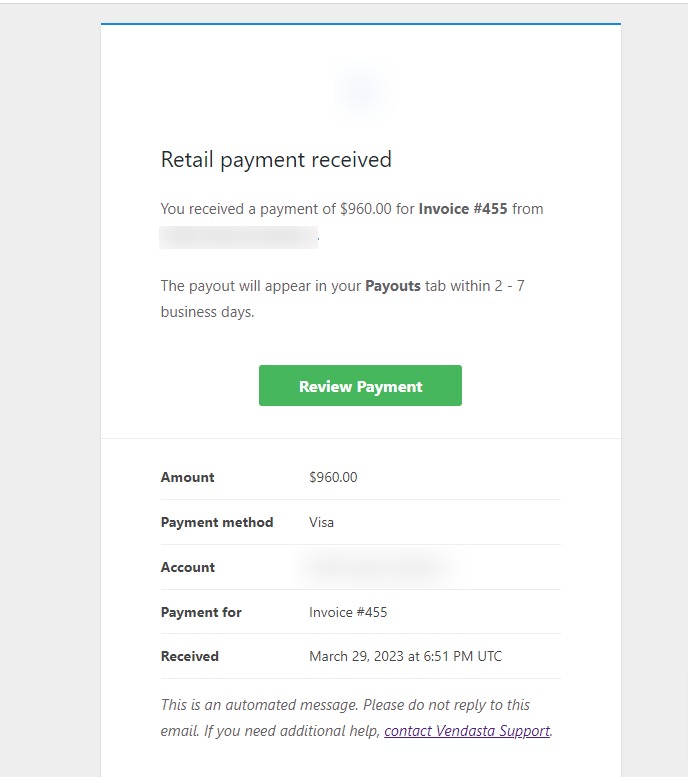
The customer will also receive an email invoice (if you have chosen the payment option to Email Invoice). Otherwise, the customer will receive an email receipt for the charge to their Credit Card.
Why is my invoice showing the wrong currency?
If the invoice appears in a different currency than expected, it's possible that the invoice was duplicated. When an invoice is duplicated, it retains the currency of the original invoice along with the same line item values.
If you create a new invoice from scratch, the default currency will be CAD, which can be identified by the "CA$" prefix in the dollar values.
How to Differentiate Between CAD and USD:
- CA$: Indicates the invoice is in CAD (Canadian Dollars).
- $ (without "CA"): Indicates the invoice is in USD (US Dollars).
Why isn't my package appearing when I try to add it to an invoice?
Packages must use the line-item pricing model to be added to an invoice. If your package was created before this model was available, open it in the package constructor, review the pricing, and save. The package will automatically migrate to the line-item pricing model on save.
Note: Packages that have not yet been migrated also cannot be purchased through the Shopping Cart.
Is the client payment transaction fee calculated before or after tax?
Transaction fees are calculated based on the total amount the client has paid.
If a Partner has set up their invoicing to include taxes, the transaction fee is calculated from the total amount which already includes taxes.
If taxes haven't been set up, the transaction fee is still based on the total invoice amount the client paid, but without taxes, since taxes weren't indicated on the invoice.
Are client account owners allowed to remove stored Credit Card on file?
Yes, the Billing Settings functionality within Business App allows users within an account the ability to 'replace' a credit card provided another one has been added.
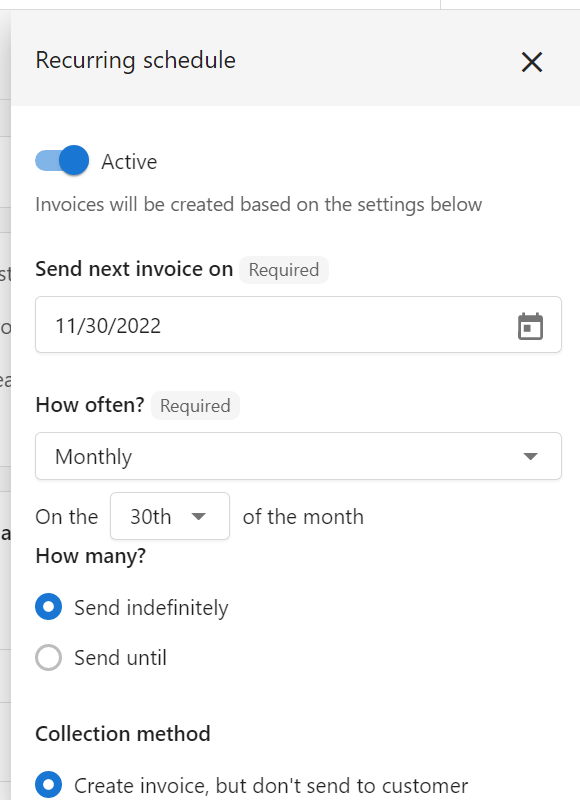
What is a recurring invoice template?
The Recurring Invoice functionality has been discontinued for new Partners. Use the Subscription Billing feature, which replaces it.
A recurring invoice template can be used to repeatedly invoice a customer for products or services they have bought that have a monthly renewal and can be automatically invoiced every month.
The processes will run continuously according to your set schedule in the template.
Why is my invoice showing past due before the due date?
If your invoice is showing as past due before the actual due date, this could be due to timezone differences or system processing timing. Check the due date and time zone settings in your invoice configuration.
Why does my package product have an unexpected price when I add it to an invoice?
If a package shows an unexpected price when added to an invoice, it may not have been migrated to the line-item pricing model yet. Open the package in the package constructor, review the pricing, and save to trigger the automatic migration. Once migrated, the invoice will reflect the correct line-item pricing based on each product's retail price and billing frequency.
Where can I find the payment link for an invoice?
The payment link can be found for any sent invoice from Partner Center → Commerce → Click the three dots to the left of the desired invoice → Copy payment link. Draft invoices do not have a payment link.
Why isn't my invoice email sending to my client?
If an invoice email is not being received by your client, check the following:
- Invoice status — Only invoices in Open (Due) status can be sent. Draft invoices cannot be emailed until they are sent.
- Valid email address — Confirm the contact on the account has a valid, correctly formatted email address.
- Recipient selection — When clicking Send Invoice, ensure you have selected at least one recipient from the list.
- Spam or junk folder — Ask the client to check their spam or junk folder, as invoice emails can sometimes be filtered.
If the client has previously unsubscribed from platform emails, their address may be suppressed. In that case, they will need to contact support@vendasta.com to be re-subscribed.
The date filter seems to be missing invoices from the last day of my selected range
This is a known behavior. When filtering invoices by date range, the end date is treated as exclusive — meaning invoices dated on the last day of the range may not appear. To work around this, set your end date one day later than your intended range. For example, to see all invoices through June 30, set the end date to July 1.
Why doesn't the net amount on my invoice report match after issuing a credit note?
Credit notes are reported separately from invoices. An invoice export from Commerce → Invoices → Export as CSV shows gross invoice amounts only — it does not deduct credit notes from the totals.
To calculate accurate net revenue, export both your invoices and your credit notes separately, then subtract the credit note totals from your invoice totals.
I'm seeing "Failed to charge invoice: An invalid request occurred" — how do I fix this?
This error is caused by an invoice that contains an empty line item — a line with no product description and a $0.00 value. To resolve it:
- Open the invoice showing the error
- Review all line items and look for a line with a blank description and a $0.00 amount
- Duplicate the invoice using the Options ⋮ menu
- On the duplicate, delete the empty line item
- Charge the duplicate invoice
- Void the original invoice
To prevent this in future, ensure every line item has a product description and a value greater than $0.00 before saving.