Creating & Managing Your Own Products
You can create your own products in Marketplace at Marketplace → Products → Create Product. Enter the basic information, pricing, and marketing content, then publish the product or continue editing it in Vendor Center for advanced settings.
In addition to the 250+ solutions you can resell, the marketplace lets you create, market, sell, bill, and fulfill your own products and services. This guide covers quick creation through advanced management.
Why create your own products?
Expand your service portfolio
- Use marketplace infrastructure
- Integrate with the platform
- Use billing, invoicing, and customer management tools
- Utilize sales and marketing frameworks
Platform integration
- Product categories for discovery
- Invoicing
- Custom marketing pages (full HTML)
- Custom order forms
- Unlimited add‑ons
- Webhooks and SSO
How do I create a product?
How do I create a product quickly?
The fastest way to get your product into the marketplace with essential features configured.
Access: Marketplace → Products → Create Product.
Step 1: Basic information
- Product Name (required) — A clear, descriptive name displayed to admins, salespeople, and customers (max 75 characters).
- Product Type (required) — Choose Product or Service based on what you're offering.
- Icon — Upload a product icon. Recommended format: 240x240px (1:1 aspect ratio), JPG or PNG, displayed as a circle. Max file size 5 MB.
- Short description — Describe your product in 200 characters or fewer.
- Vendor contact email — Add one or more contact emails for vendor communication.
Step 2: Pricing configuration
Pricing
- Pricing model (required) — Select a pricing model (e.g. Fixed price).
- Wholesale price — What resellers are charged for each activation of this product.
- Retail price — What customers are charged for this product.
All prices are set in USD.
Setup fee — Charge an optional one-time fee when a customer purchases this product.
- Wholesale setup fee — The setup fee charged to resellers for an activation.
- Suggested setup fee — The default setup fee used by resellers.
Billing period — How often customers are billed for their subscription (e.g. Monthly).
Subscription term — How long customers are committed to their subscription, set in billing periods. At the end of the subscription term, choose:
- Renew with same term — The subscription renews with the same commitment length.
- Renew with a different subscription term — The subscription renews with a different term length.
Step 3: Marketing content
Marketing Description:
- Concise, compelling 1-2 paragraph overview
- Communicate what the product is and its unique value
- Explain why customers will love using it
- Focus on benefits rather than features
Key Selling Points:
- 3-6 unique value propositions
- Specific, measurable benefits when possible
- Address common customer pain points
- Differentiate from competitive solutions
Step 4: Publishing decision
Continue Editing in Vendor Center:
- Saves product as draft for advanced configuration
- Access to additional features: order forms, advanced integrations, HTML marketing
- Recommended for complex products requiring detailed setup
Publish and Enable:
- Immediately publishes and enables the product
- Makes product available for packaging and store addition
- Can be edited later but goes live immediately
How do I use advanced product creation?
For full product setup with access to all features, use Vendor Center for advanced configuration options.
Access: Through Vendor Center for advanced configuration.
What can I configure in the Product info tab?
The Product info tab contains your product's core settings.
Editions
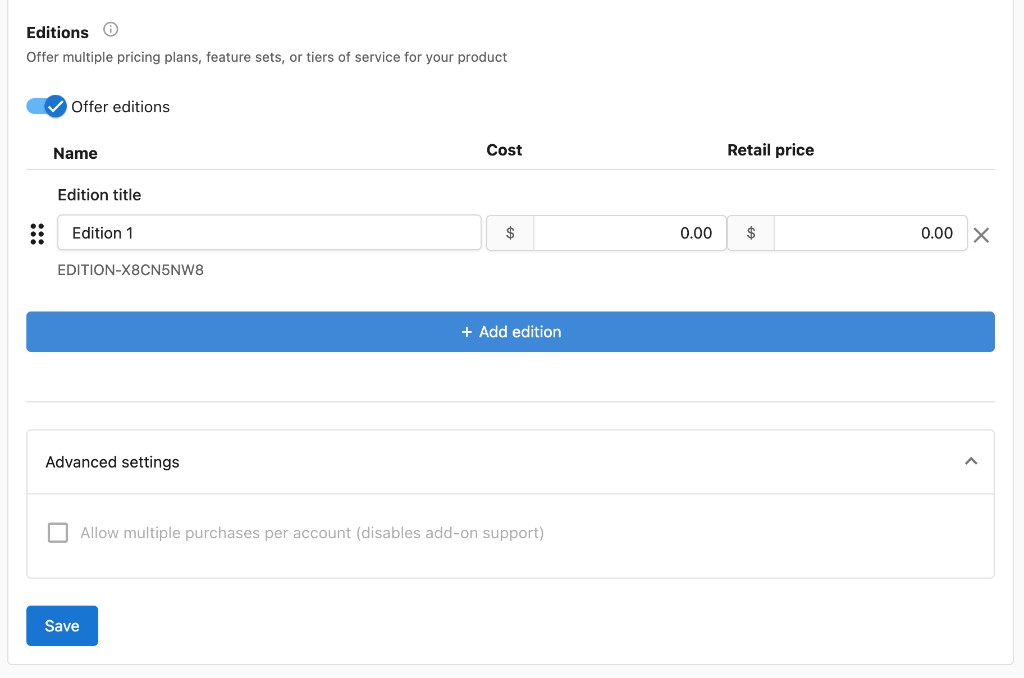
Toggle Offer editions to create multiple pricing plans, feature sets, or tiers of service for your product. Each edition has a name, cost (wholesale), and retail price. Use + Add edition to add more.
Under Advanced settings, you can check Allow multiple purchases per account, which disables add-on support.
Product activation
Configure the steps taken when provisioning your product:
- Activation message — A message displayed to the customer upon activation (e.g. "Thank you for your purchase, enjoy!").
- Notifications — Add one or more recipient email addresses to receive notifications when the product is activated, canceled, or deactivated.
- Required products — Select products that must be purchased before your product can be activated.
Auto Activation Toggle
The Auto Activation toggle (found in Marketplace → Products → your product → Product Info) allows the product to activate automatically without requiring an admin to manually process an order.
Auto Activation only works if the product has no Order Form configured. If an Order Form is attached, the toggle has no effect — the order must be manually processed so the form can be completed. Remove the Order Form first if you want auto activation to apply.
How do I auto-activate a product when a new account is created?
To activate a custom product automatically every time a new account is created:
- Go to
Partner Center→Administration→Customize→Account Creation - Under Products to activate on account creation, add your custom product
The product will activate on every new account without requiring a separate order.
Notification recipients behavior
Email addresses added to Notifications receive alerts whenever the product is activated, canceled, or deactivated. These recipients persist on the product record regardless of whether the email address is still an active user in your platform. If someone unexpected is receiving activation emails, check the Notifications list in Vendor Center and remove any outdated addresses.
Order form
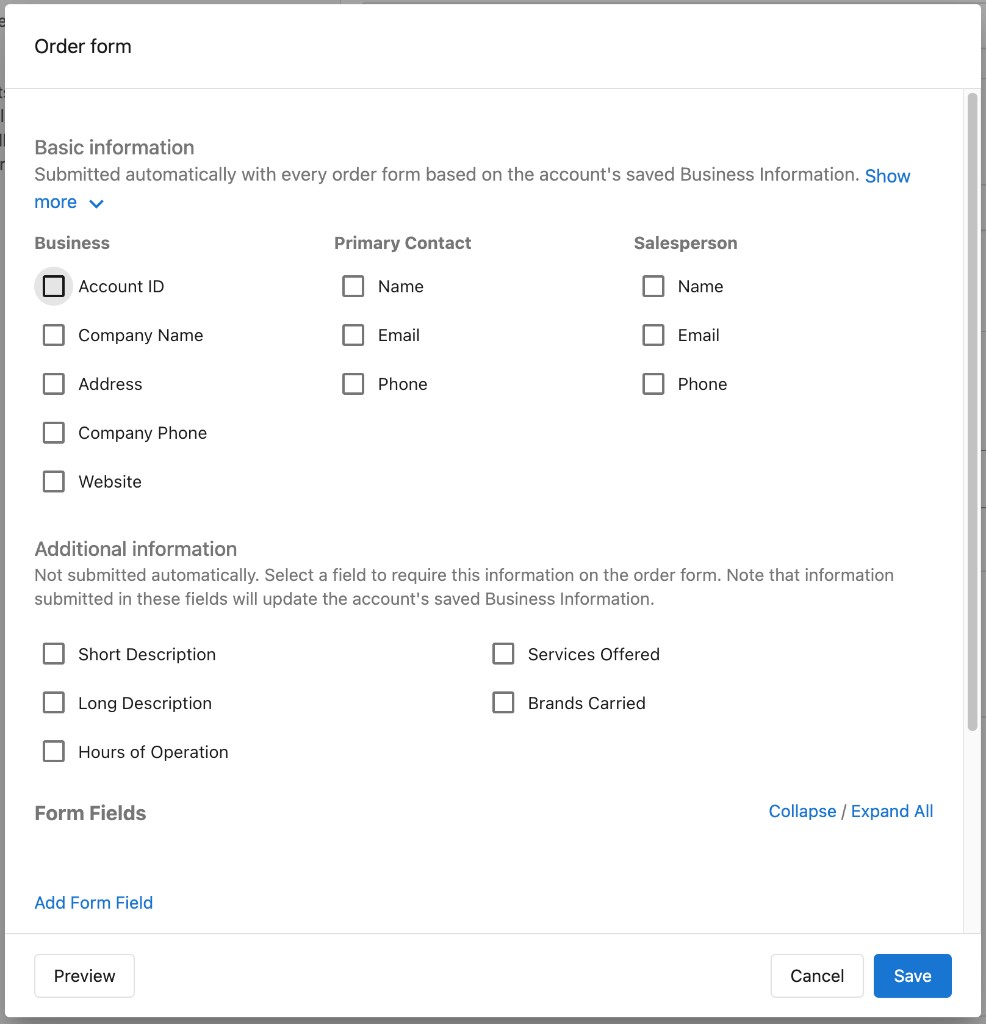
Build a custom order form to collect information when customers purchase your product. The form includes:
- Basic information — Automatically submitted based on the account's saved Business Information. You can select which fields to include across Business (Account ID, Company Name, Address, Company Phone, Website), Primary Contact (Name, Email, Phone), and Salesperson (Name, Email, Phone) categories.
- Additional information — Fields that are not submitted automatically. Information submitted in these fields will update the account's saved Business Information. Options include Short Description, Long Description, Hours of Operation, Services Offered, and Brands Carried.
- Form Fields — Add custom form fields to collect any additional information you need.
- Order Form Footer — A rich text field that appears at the bottom of the order form. Use this to include information regarding the order or its fulfillment.
Fulfillment form
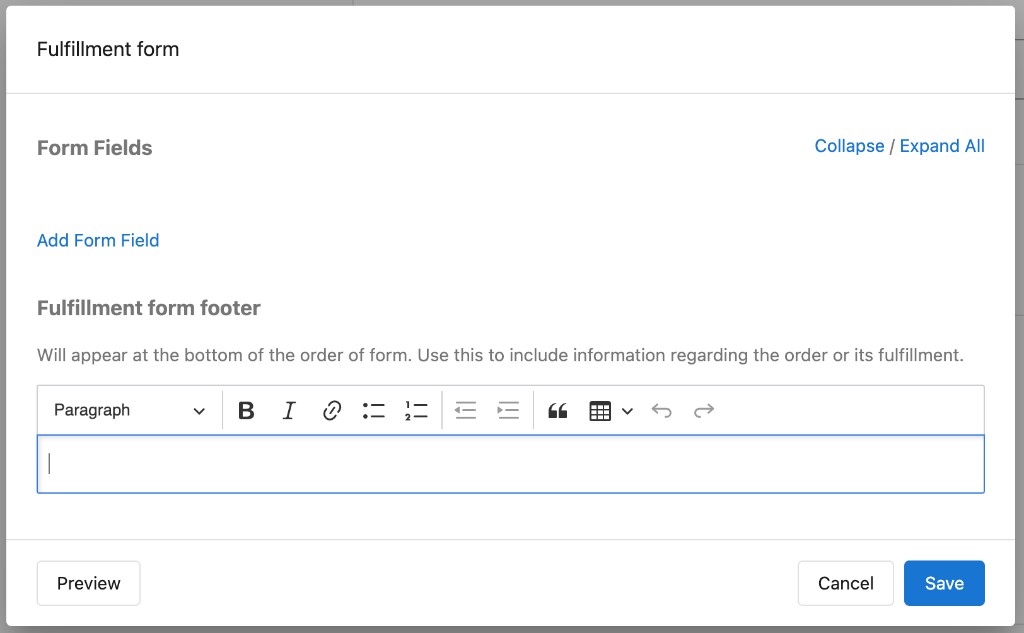
Build a fulfillment form for internal use when provisioning the product:
- Form Fields — Add custom form fields for fulfillment-specific information.
- Fulfillment form footer — A rich text field that appears at the bottom of the fulfillment form. Use this to include information regarding the order or its fulfillment.
Country availability
Set which countries your product is available in. By default, products are available in all countries.
How do I offer a free trial?
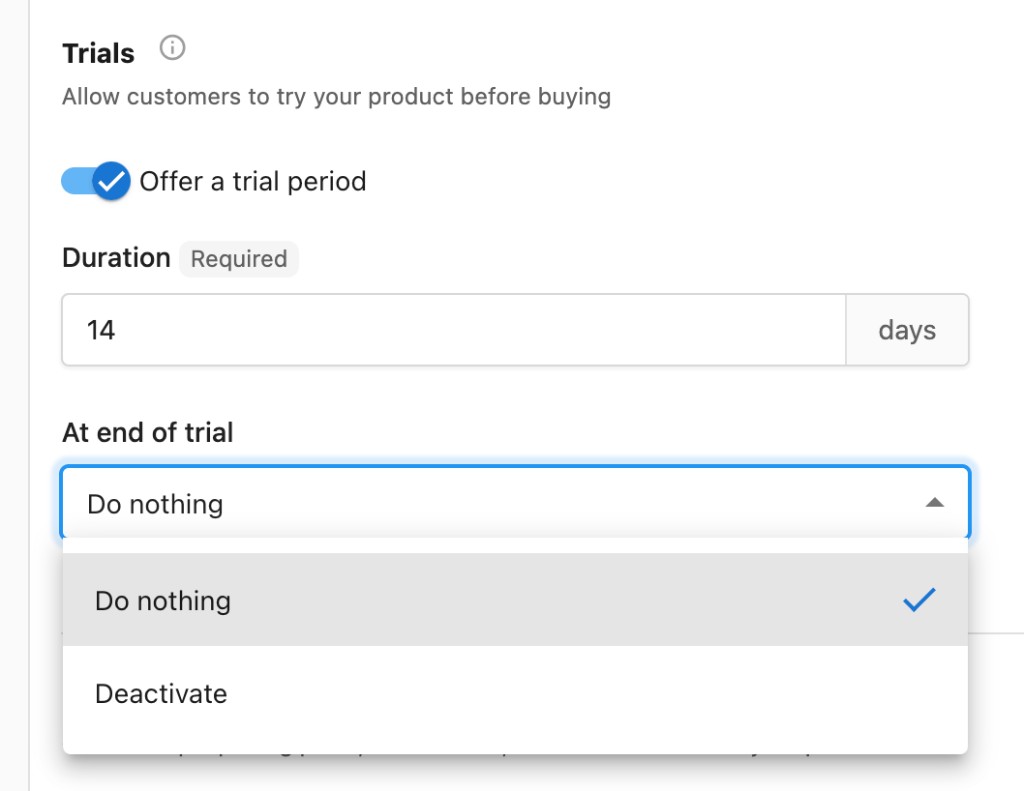
You can offer a trial period to let customers try your product before buying. Toggle Offer a trial period to enable trials and configure the following:
- Duration — Set the number of days for the trial period.
- At end of trial — Choose what happens when the trial expires:
- Do nothing — The product remains active with no automatic action.
- Deactivate — The product is automatically deactivated when the trial ends.
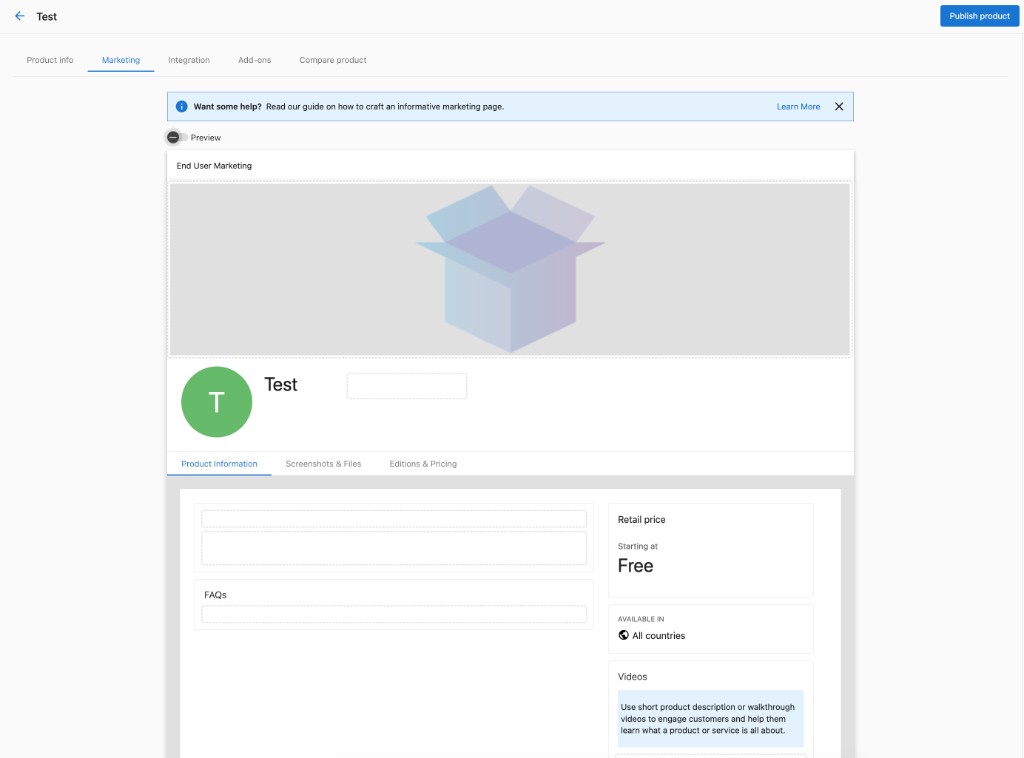
How do I customize my product's marketing?
You can fully customize how your product appears to customers by editing the Marketing tab within a product in Vendor Center. Hover over any element to see what it controls. The following elements are available for customization:
- Banner image — The hero image displayed at the top of your product listing.
- Categories — Assign your product to relevant store categories.
- Description — The main product overview shown to customers.
- Key selling points — Highlight the core benefits and value propositions.
- FAQs — Add common questions and answers about the product.
- Video content — Embed videos to demonstrate or promote the product.
- Contact information — Provide support or sales contact details.
There is also a separate tab for Screenshots and more files, where you can upload additional images and documents.
A Reseller tab is also available, allowing you to customize all of the same elements specifically for how the product appears to resellers.
Use the Preview toggle at the top of the Marketing tab to see how your product listing will look to your clients before publishing.
All of these elements can be tailored to match your branding guidelines, giving you a consistent brand experience across your product listings.
How do I integrate my product with external systems?
The Integration tab contains three sections for connecting your product with external systems and automating workflows.
Integration settings
Configure settings and webhooks related to Vendasta API authentication, purchase and activation workflow automation, and user account modification. Toggle Enable integration to activate.
- API Authentication — Enter your RSA Public Key, used for decoding payloads from Vendor that have been encoded by Vendor Private Key.
- Purchasing, Activation and Cancellation:
- Purchase URL — Sent when the product is activated or deactivated.
- Add-on Purchase URL — Sent when any of the product's add-ons are activated or deactivated. Messages are sent individually for multi-activate add-ons.
- Cancellation URL — Sent when the product or any of its add-ons are canceled. Messages are sent individually for multi-activate add-ons.
- Manually Approve Purchases via API — Configures your product to use the Pending Purchase Workflow (requires Public Key).
- Reseller's users — Allow the reseller's users to access your product.
- Other Webhooks — Expand to configure additional webhook endpoints.
Access and SSO
Choose a basic access URL for your product, or allow users to SSO from the Vendasta platform using OAuth2 and Open ID Connect.
- Access type — Select how users launch your product:
- Public webpage — Redirect users to a public URL.
- Activation-specific URL — Redirect to a URL unique to each activation.
- OAuth2 — Authenticate users via OAuth2.
- SAML — Authenticate users via SAML.
- Product access URL — The URL users are redirected to when launching your product. You can optionally include
<accountId>as a placeholder in the URL.
Task Manager/Fulfillment integration
Standardize your fulfillment process by automating project and task creation in Task Manager/Fulfillment. Toggle Integrate with Task Manager to activate.
- Projects — Automatically create a project in Task Manager/Fulfillment each time this product is purchased. Select a project template and choose who fulfills it:
- Vendor — Create projects in your Task Manager/Fulfillment.
- Reseller — Create projects in the reseller's Task Manager/Fulfillment.
- Event-generated tasks and projects — Automatically create a task or project when an event occurs in a different product:
- Reviews — When a customer review is left for businesses.
- Mentions — When the business is mentioned across the web.
- Listings — When a listing is missing or inaccurate.
- Choose whether these are fulfilled by Vendor or Reseller.
How do I create add-ons?
Add-ons let you create additional features or services that customers can purchase alongside your product. Each add-on is essentially its own product attached to the parent product. Click Create Add-on to get started.
How do I compare or suspend my product?
The Compare product tab shows the activation status of your product and lets you compare your published product against your current draft. If you've made edits, the differences will appear here so you can review changes before publishing.
- Suspend new activations — Prevent new customers from activating the product while keeping it available for existing users.
- Open — Open the product (and all of its add-ons) to the marketplace so it can be activated.
Why don't custom products have Start Selling or Stop Selling buttons?
Custom (private) products you create in Vendor Center do not have Start Selling or Stop Selling buttons. This is by design — your own products are already enabled for selling in your marketplace. To prevent a custom product from being ordered, use Suspend new activations in the Compare product tab of Vendor Center instead.
Best practices
- Start with a clear product name and short description that communicate value quickly.
- Set competitive wholesale and retail pricing — review comparable marketplace offerings for reference.
- Use the Marketing tab to create compelling product listings with banners, selling points, and FAQs.
- Configure order forms to collect only the information you need to fulfill the product.
- Set up notification emails so your team is alerted when products are activated or canceled.
- If offering editions, keep tier names and pricing differences clear for customers.
- Test your product's purchase flow end-to-end before publishing.
Frequently asked questions
How do I automatically activate a product when a new account is created?
Go to Partner Center → Administration → Customize → Account Creation, and add your custom product under Products to activate on account creation. The product activates on every new account without requiring a separate order.
Why isn't Auto Activation working for my product?
Auto Activation only works if the product has no Order Form configured. If an Order Form is attached, the order must be manually processed so the form can be completed. Remove the Order Form first if you want auto activation to apply.
How do I stop a custom product from being ordered?
Use Suspend new activations in the Compare product tab of Vendor Center. This prevents new customers from activating the product while keeping it available for existing users. Custom products don't have Start Selling or Stop Selling buttons.
How do I offer a free trial for my product?
Toggle Offer a trial period, set the Duration in days, and choose what happens At end of trial: Do nothing keeps the product active, and Deactivate deactivates it when the trial ends.
Can my product send customers to a URL after they purchase it?
Yes. In the Access and SSO section of the Integration tab, choose an Access type such as Public webpage or Activation-specific URL, and enter the Product access URL that users are redirected to when they launch your product.