How do I customize the Snapshot Report?
You can customize the Snapshot Report in Partner Center by reordering or removing sections, editing messages, adding custom HTML headers and banner images, and setting the Need Assistance? contact. Template changes apply only to new and refreshed reports.
What is Snapshot Report Customization?
Snapshot Report customization allows you to display business insights to your clients in a white-labeled way that matches your brand and messaging. You can personalize reports by modifying templates, headers, banners, sections, and content to create a consistent brand experience.
Why is Customization important?
- Brand Consistency: Maintain your brand identity throughout the sales process
- Professional Presentation: Create polished, professional-looking reports that build trust
- Targeted Messaging: Customize content and calls-to-action for specific markets or client types
- Competitive Advantage: Stand out from competitors with unique, branded reports
- Improved Conversion: Customized reports with relevant messaging can improve close rates
What's included with Customization options?
Report section management
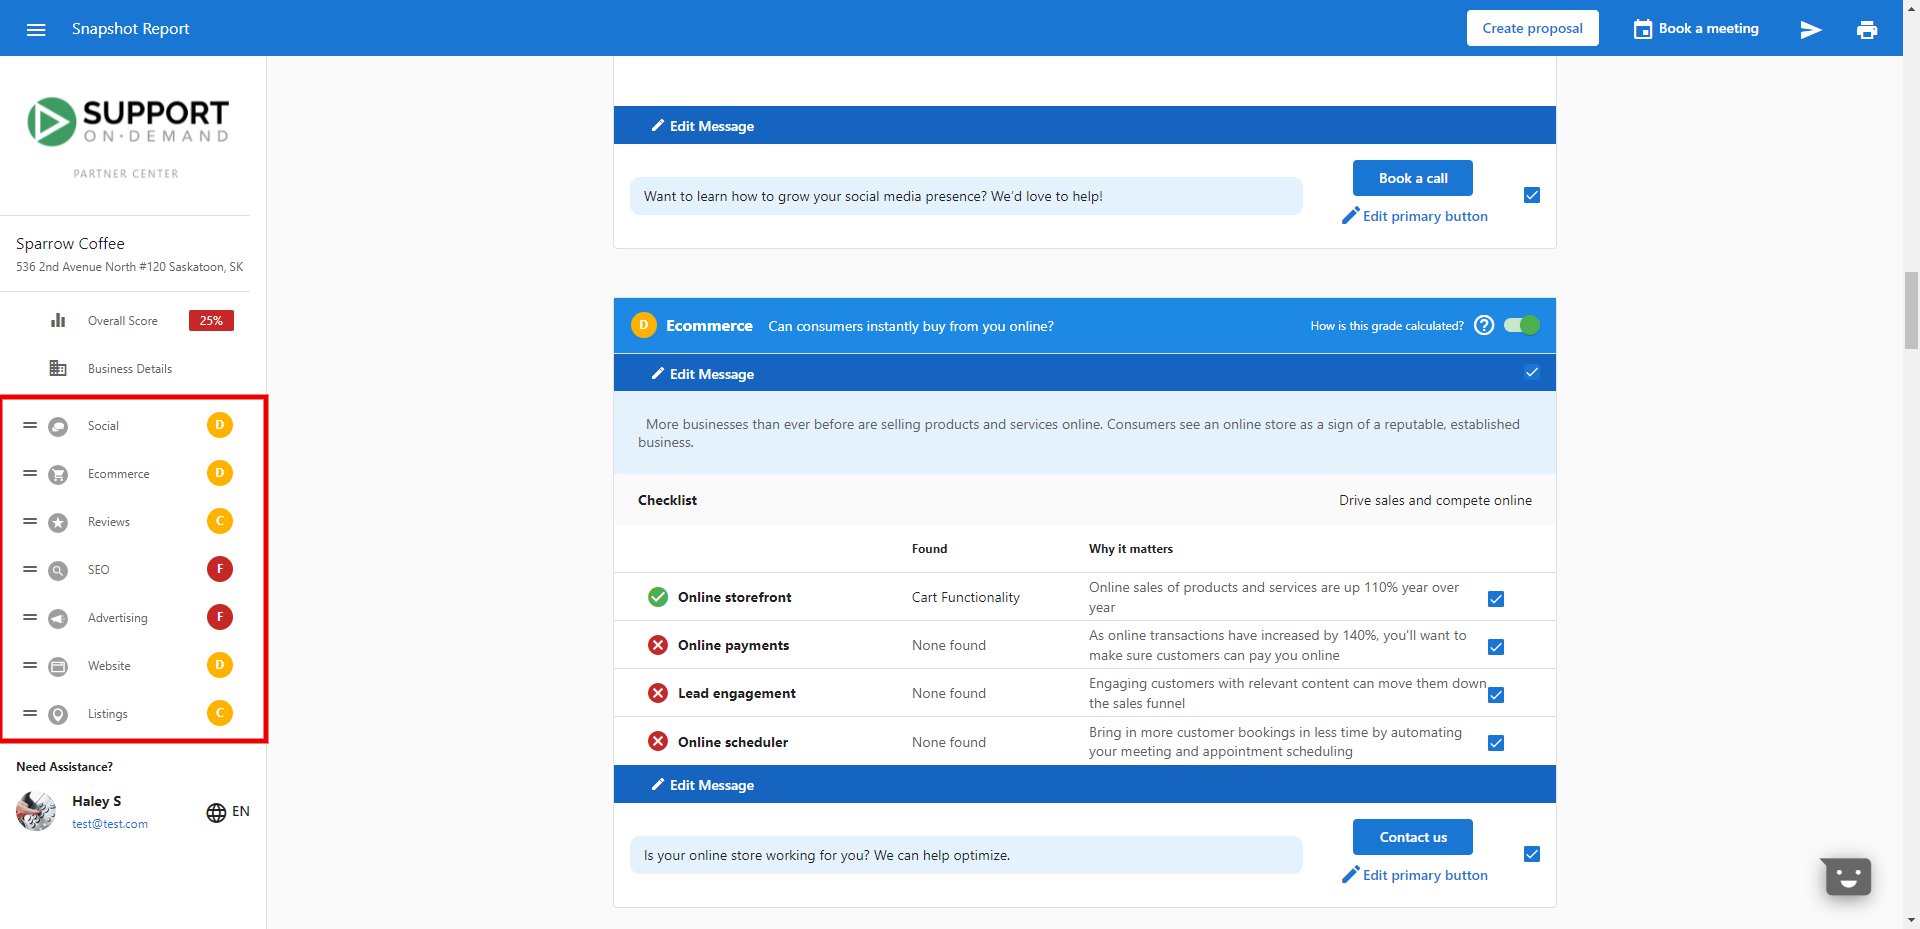
Reordering report sections
Rearrange sections to highlight key information or better suit your client's needs:
- Navigate to your Snapshot Report in the platform
- Select the report you want to customize
- Click on the Configure button
- Use the Rearrange feature to drag and drop sections into your preferred order
Removing report sections
You can remove default Snapshot sections for different scopes:
For a Single Report:
- Open the account's Snapshot Report in Edit Report mode
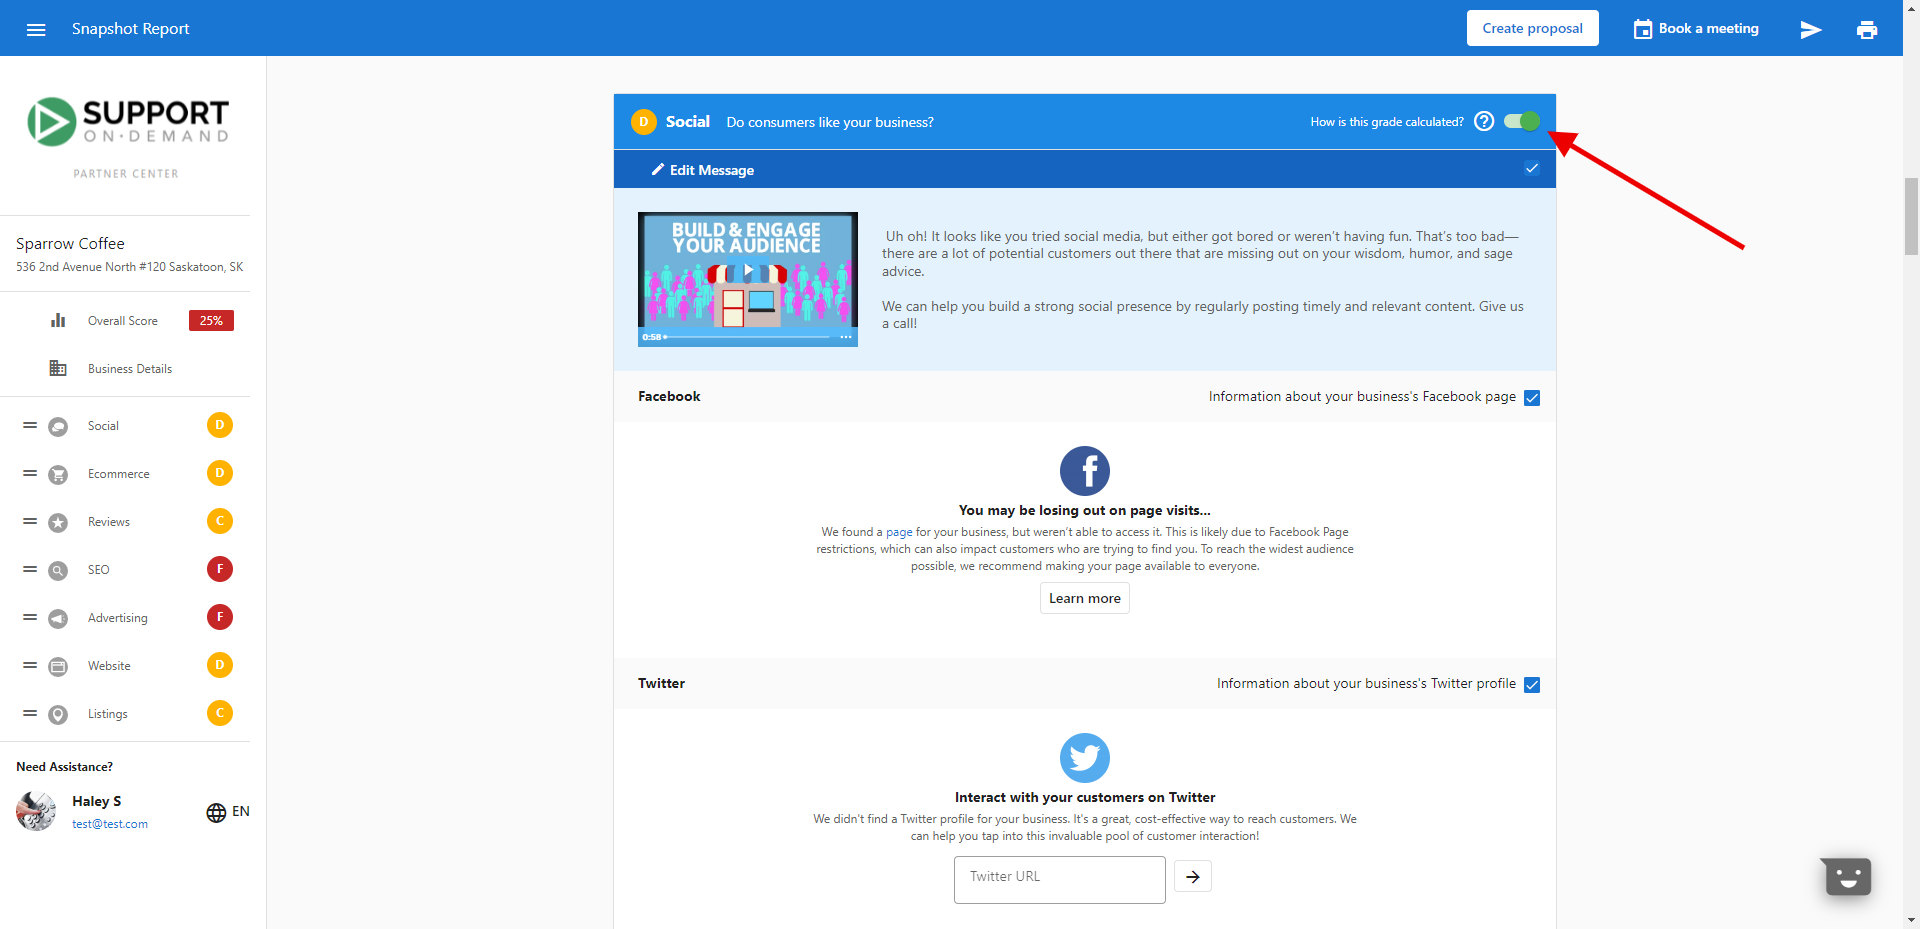
- Beside each section, use the checkbox to control whether that section is visible to the client
- Uncheck any section that does not apply to the business (for example, Ecommerce for a business that does not sell online) before sharing the report
For All Accounts:
- Navigate to
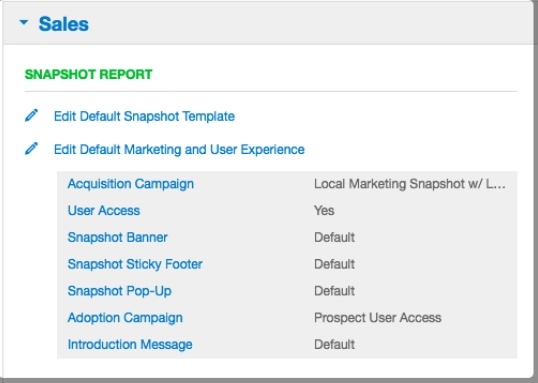
Partner Center→Customize→Partner Defaults→Sales - Select Edit Default Snapshot Template
- Toggle off the sections you wish to remove
For Specific Markets:
- Go to the
Partner Center→Customize→Marketstab - Select the desired market name
- Navigate to
Sales→Edit Default Snapshot Template - Check the boxes of sections you wish to remove
Content customization
Editing messaging
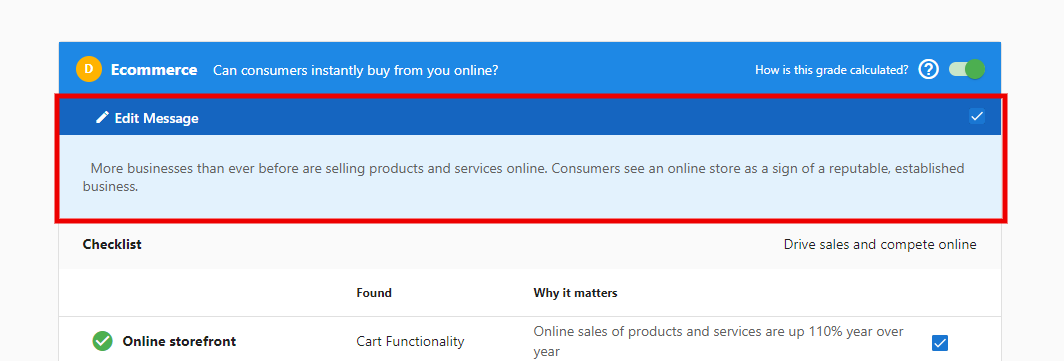
Personalize the message text that appears in reports:
- In the report configuration, find the section you want to edit
- Click on the Edit button for the message field
- Modify the text as needed
- Save your changes
Using default templates
Snapshot Reports come with pre-configured templates to get you started quickly:
- Access the report configuration page
- Select from available templates based on your industry or use case
- Customize further as needed
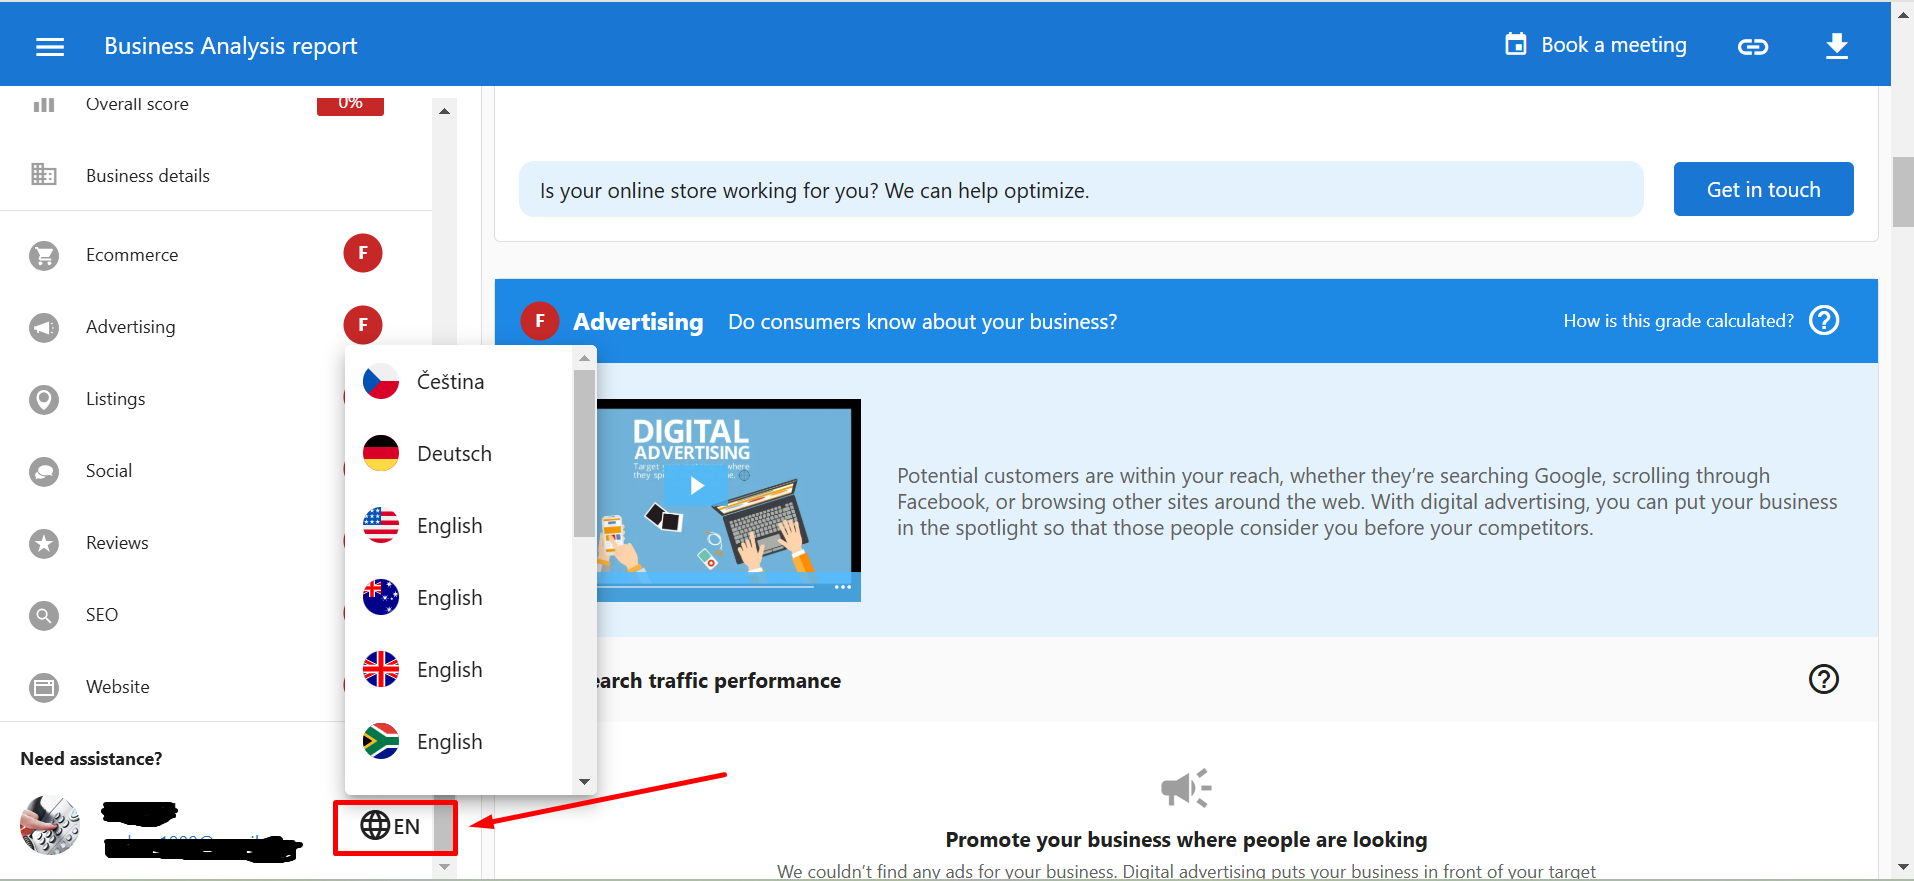
Changing report language
Customize the language used in your reports for international clients:
- In the report configuration, locate the language settings
- Select your preferred language from the dropdown
- The report content will update to reflect your selection
Custom headers and banners
Creating custom headers
The Snapshot Report incorporates both a header and footer that you can customize:
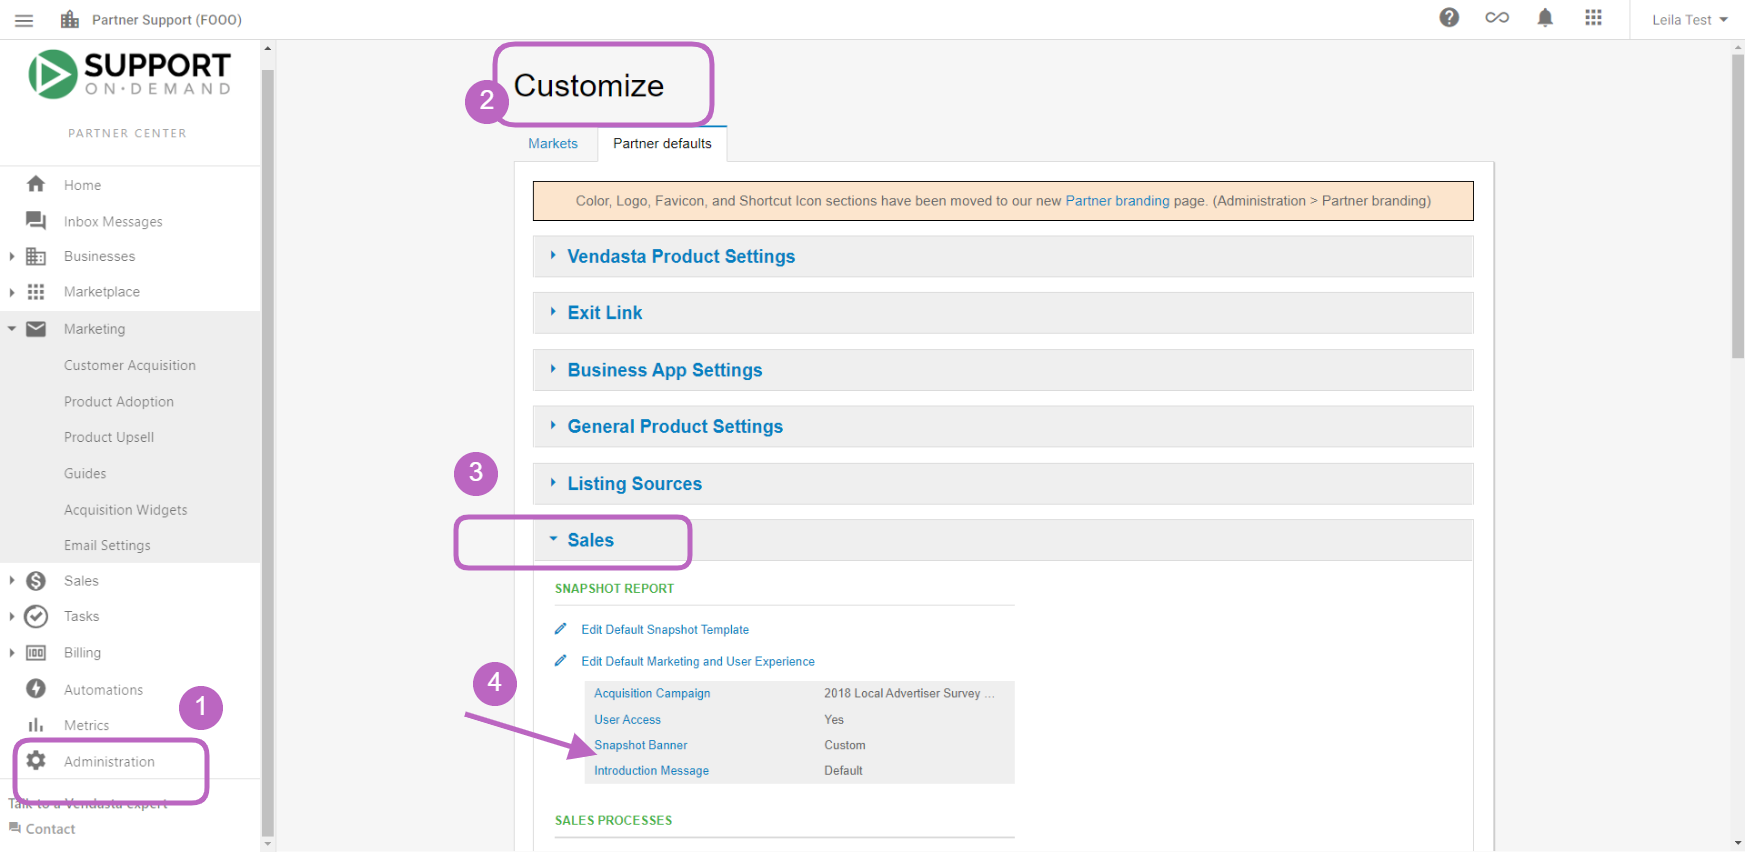
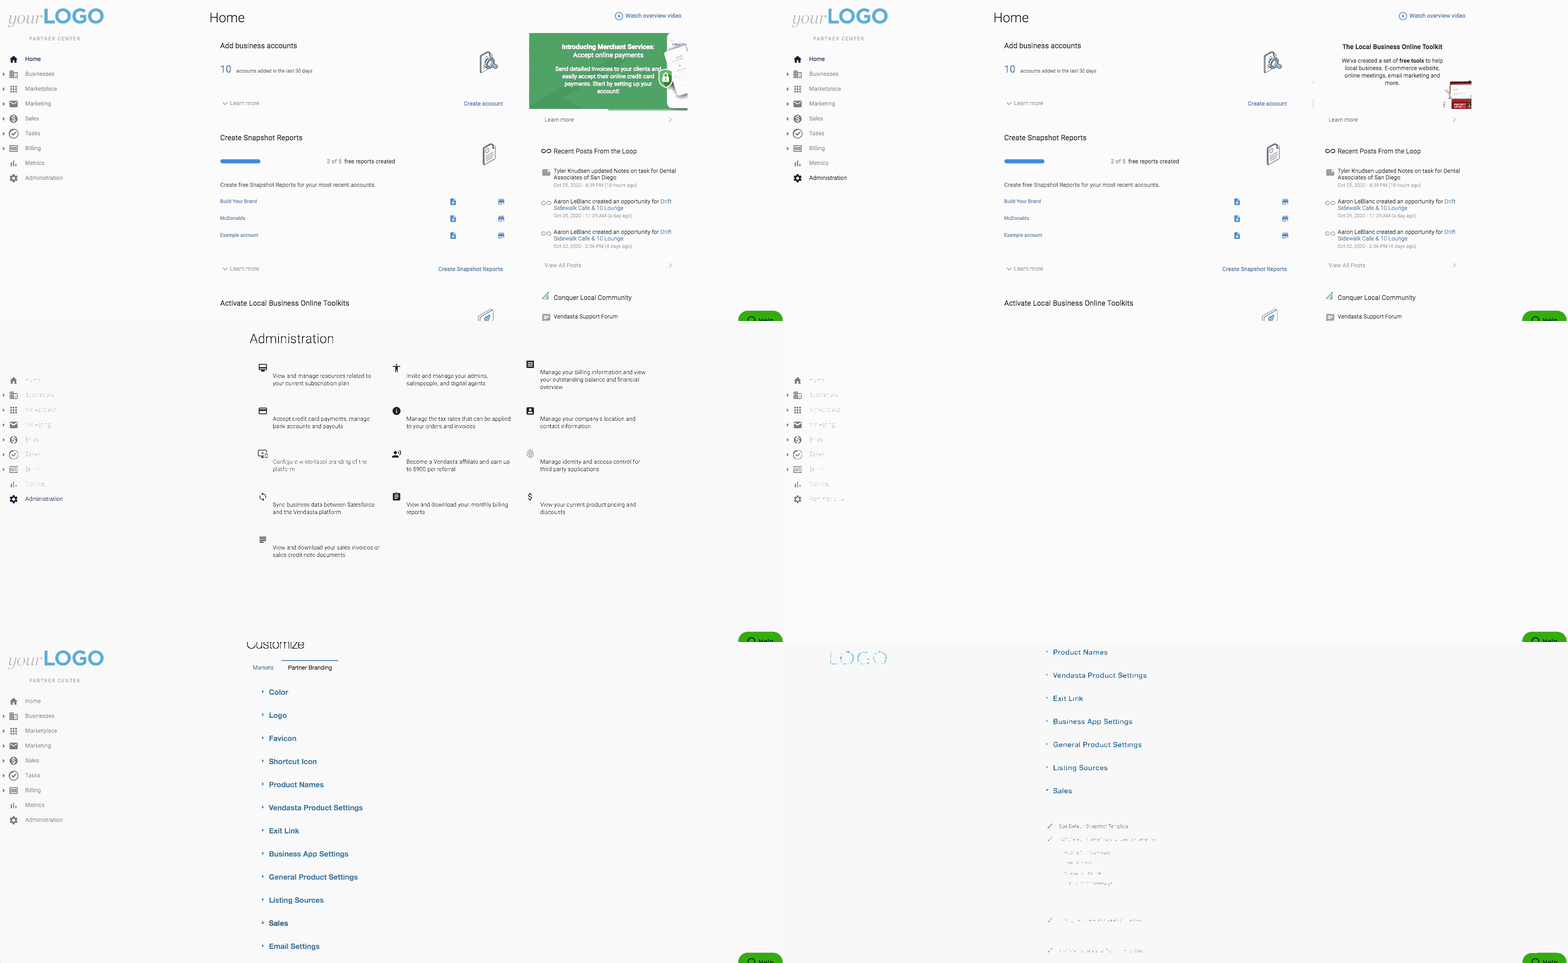
- Go to
Partner Center→Administration→Customize - Navigate to
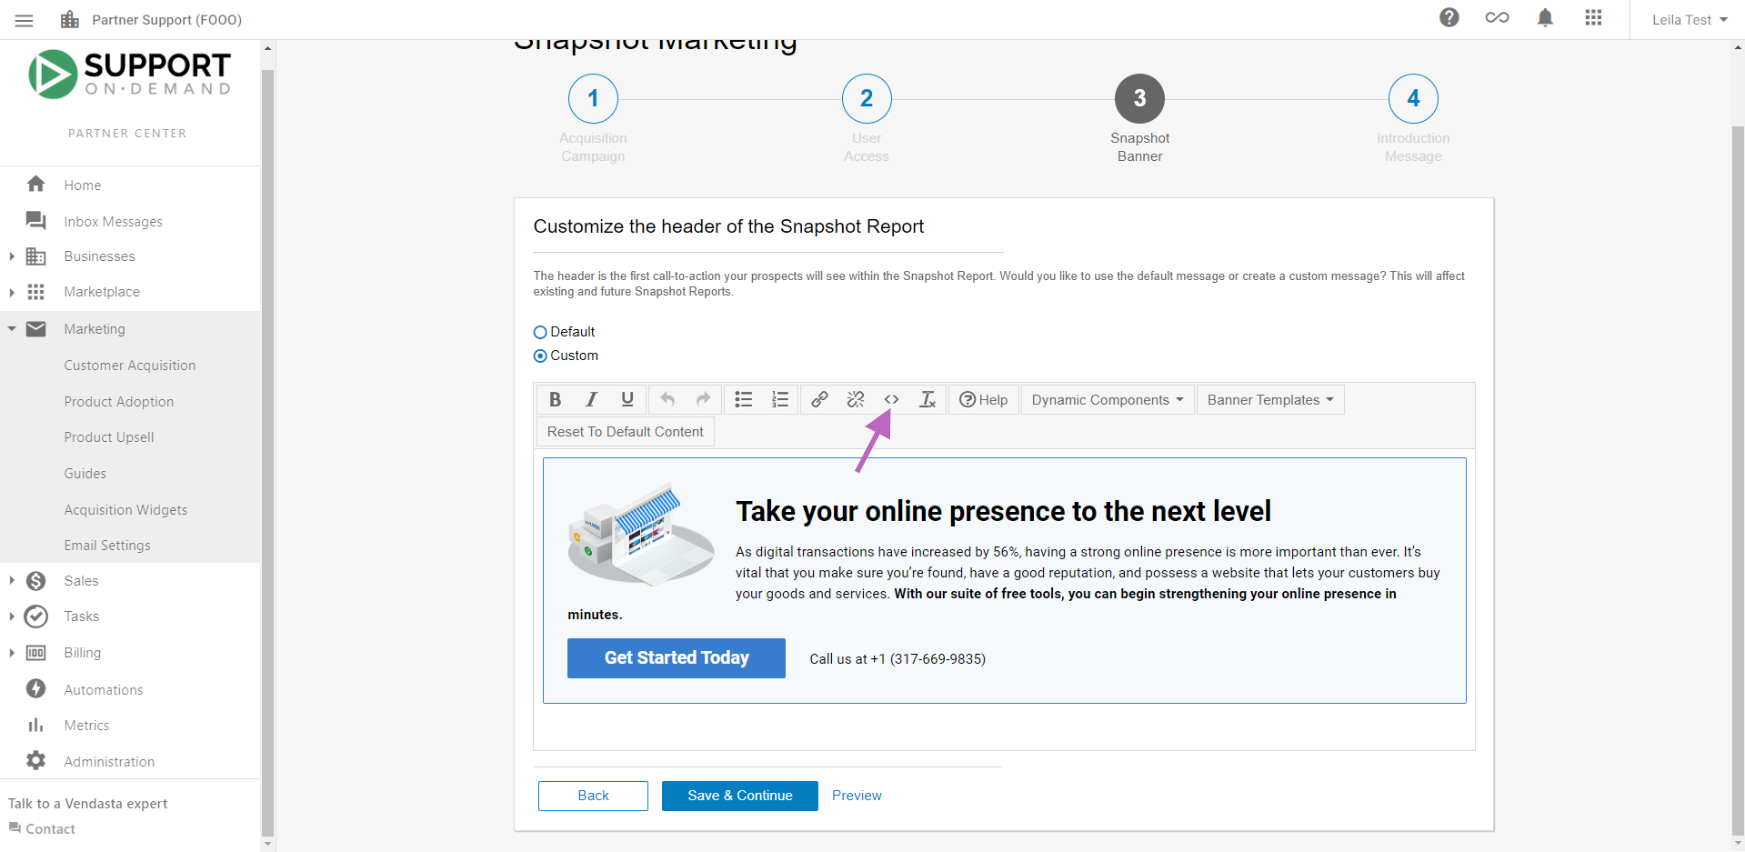
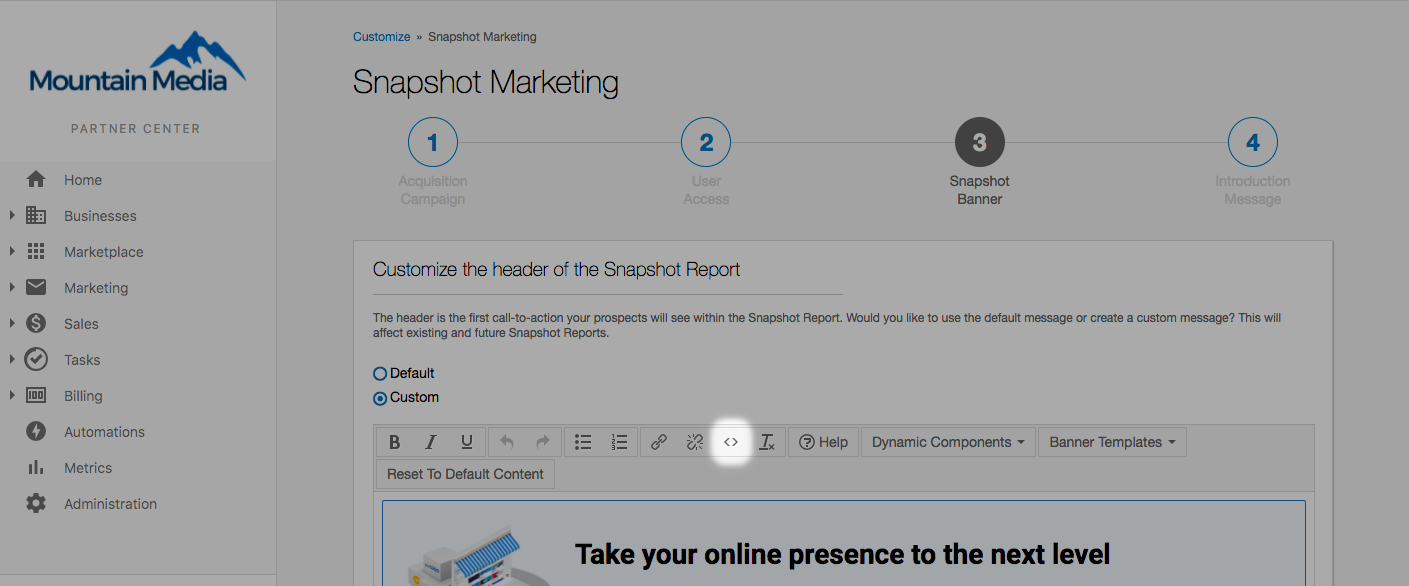
Sales→Snapshot Banner - To begin customizing the header, open the 'source code' option (<>)
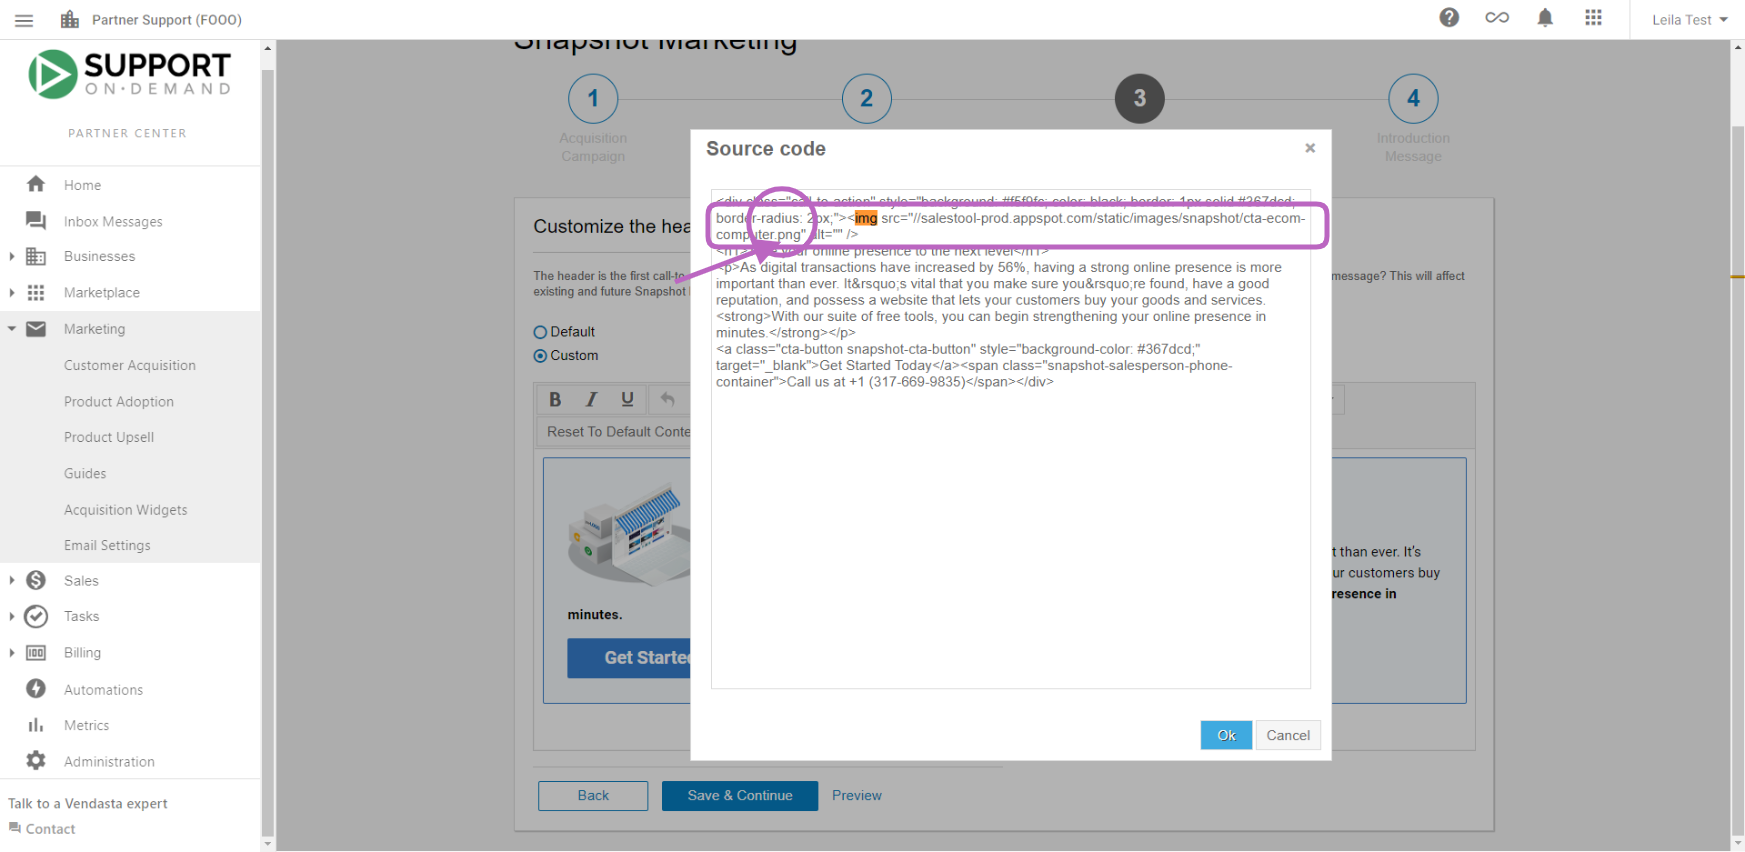
- Insert your custom HTML into the 'source code' and click Ok
- Click Save & Continue
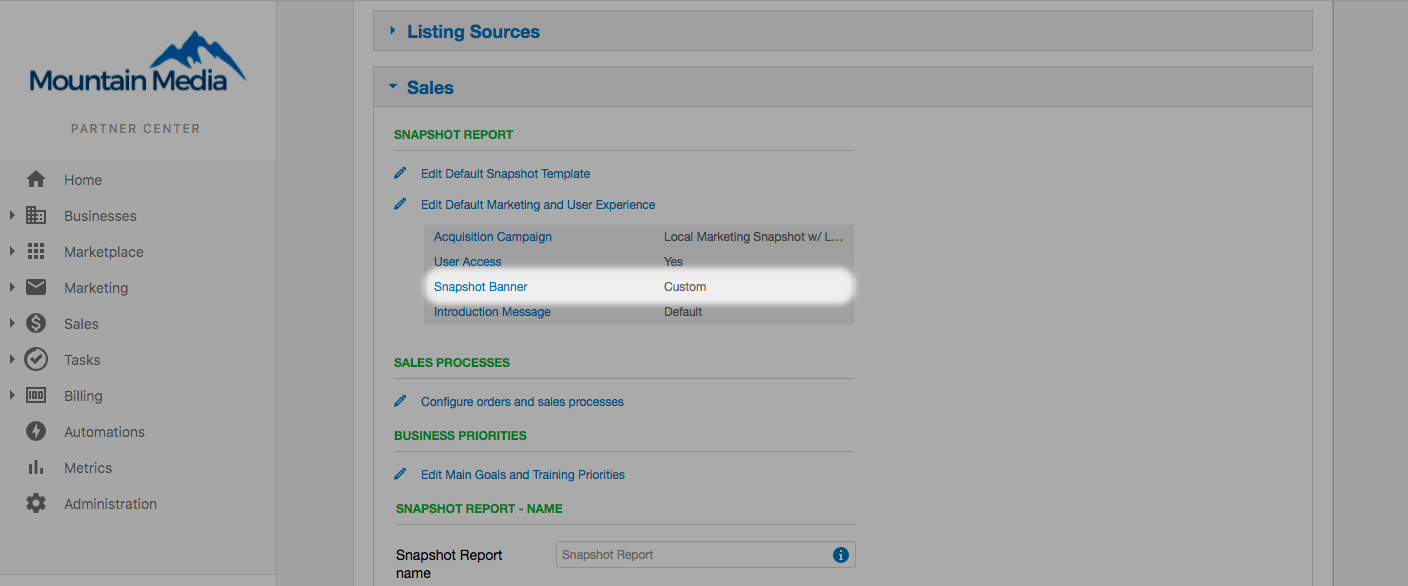
Remember to use the 'Preview' feature before saving changes, use in-line or scoped CSS when adding custom source code, and ensure any images are externally hosted.
Sample HTML for custom headers
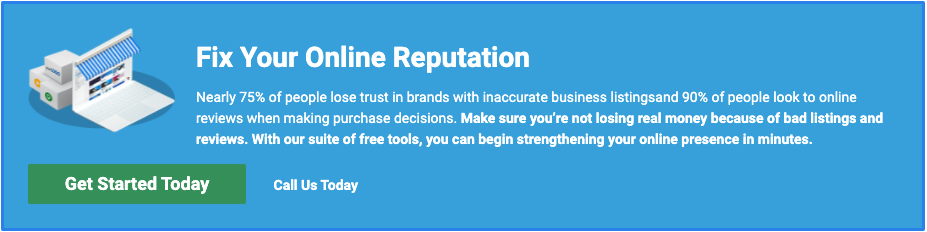
<div class="call-to-action" style="background: #3FAAE0; border: 3px solid #308CED; border-radius: 2px;">
<img src="//salestool-prod.appspot.com/static/images/snapshot/cta-ecom-computer.png" alt="" />
<h1 style="color: white;">Fix Your Online Reputation</h1>
<p style="color: white;">Nearly 75% of people lose trust in brands with inaccurate business listings and 90% of people look to online reviews when making purchase decisions. <strong>Make sure you're not losing real money because of bad listings and reviews. With our suite of free tools, you can begin strengthening your online presence in minutes.</strong></p>
<a class="cta-button snapshot-cta-button" style="background-color: #3d9a63;" target="_blank">Get Started Today</a>
<a class="snapshot-salesperson-phone-container" target="_blank">Call Us Today</a>
</div>
To change the background color, find div class="call-to-action" style="background: #3FAAE0;" and replace #3FAAE0 with your preferred hex color code.
Managing banner images
Updating Banner Images:
- From Partner Center, go to
Products→Snapshot Report - Click the Settings tab
- Under Custom Headers, click the Edit icon next to the header
- Click on the Logo tab
- Click Replace to upload a new image
Optimal Image Specifications:
- Recommended size: 750 x 250 pixels
- Format: JPG, PNG, or GIF
- Quality: High-resolution for professional appearance
- Branding: Should represent your brand consistently
Replacing Banner Images:
- Click Replace under the banner image preview
- Click Choose File
- Select an image from your computer
- Click Upload
Using banner images in email templates
To use your banner image in email templates:
- From Partner Center, go to
Products→Snapshot Report - Click the Settings tab
- Under Custom Headers, click Edit next to the header
- Click on the Logo tab
- Right-click on the banner image
- Select Copy Image Address
Inserting into Email Templates:
- Go to
Partner Center→Products→Email Marketing - Select or create an email template
- Click where you want to insert the image
- Click the image icon in the editor
- Paste the copied URL into the Source field
- Adjust size and alignment as needed
- Click OK to insert the image
Bottom banner and Need Assistance? section
Customizing the bottom banner email address
The bottom banner of the Snapshot Report includes a contact email address. To change it:
- Go to
Partner Center→Administration→Customize→Sales→Snapshot Banner - Open the footer/banner section
- Update the email address displayed in the banner
- Click Save & Continue
Customizing the Need Assistance? section
The Need Assistance? section appears at the bottom of the Snapshot Report with your contact details. By default it shows the assigned salesperson's information. You can configure a default contact that appears when no salesperson is assigned:
- Go to
Administration→Customize→Sales→Edit Default Snapshot Template - Locate the Need Assistance? section
- Update the contact name, phone, and email
- Save changes
If a salesperson is assigned to the prospect's account, their contact information overrides the default Need Assistance? settings automatically.
Package integration
Adding packages to reports
Direct clients to your packages and services directly from the Snapshot Report:
- Go to
Administration→Customize→Sales→Edit Default Snapshot Template - Locate the specific section where you want to enable a package
- Scroll to the bottom of that section and find Edit Message
- Below the call-to-action button, click Edit primary button
- Select Package and choose the specific package from the dropdown menu

You can only add packages and services that have been added to your store from the marketplace.
What can't I customize?
Some parts of the Snapshot Report are fixed and cannot be changed:
- Custom sections: You cannot add entirely new sections to the report. The available sections are predefined. You can style section headers but not create new ones.
- Grade descriptions: The letter grade definitions (A–F) and their explanations are system-controlled and cannot be edited.
Do template changes apply to existing reports?
Changes to the default Snapshot template apply only to new reports and any reports that are refreshed after the change. Existing reports that have not been refreshed will continue to show the old template.
If you want existing prospects to see updated branding or messaging, you need to refresh their Snapshot Reports.
Can partners on the Free tier customize the Snapshot Report?
Partners on the Free tier can still access Snapshot Report customization directly through Partner Center:
- Go to
Partner Center→Administration→Customize - Navigate to
Sales→Edit Default Snapshot Template - Make your changes and save
The same customization options are available regardless of tier; access is through Partner Center directly rather than through a dedicated admin panel.
How do I configure advanced customization?
Voice-over settings
You can customize voice-over options in the report configuration settings:
- Navigate to the customization options within your Snapshot Report settings
- Select different voice-over styles that match your brand
- Choose from available voice-over types based on your presentation preferences
Report naming
Customize report names through the report configuration settings:
- Access report configuration in your Snapshot Report settings
- Modify the report title to match your naming conventions
- Use descriptive names that help organize multiple reports for different prospects
Template configuration
Set up default templates for consistent branding:
- Configure templates based on industry or client type
- Set default messaging for different markets
- Establish consistent branding elements across all reports
Best practices for Customization
Design and branding
- Maintain Consistency: Use consistent colors, fonts, and messaging across all reports
- Professional Quality: Use high-quality images and ensure clean, professional design
- Brand Recognition: Include your logo and brand elements prominently
- Mobile Optimization: Ensure customizations look good on all devices
Content strategy
- Keep it Concise: Focus on the most relevant data for your client
- Highlight Strengths: Arrange sections to showcase positive aspects first
- Provide Context: Add custom messages to explain what the data means
- Include Actionable Insights: Always connect data to possible actions or recommendations
Technical considerations
- Test Before Deploying: Always preview customizations before saving
- External Hosting: Host images externally for better performance
- Responsive Design: Ensure customizations work across different screen sizes
- Browser Compatibility: Test in different browsers to ensure consistency
Frequently asked questions (FAQs)
How do I remove sections of the Snapshot Report?
For a single report: open the report in Edit Report mode and uncheck the box beside any section you do not want the client to see. For all accounts: Navigate to Partner Center → Customize → Partner Defaults → Sales → Edit Default Snapshot Template and toggle off unwanted sections. For specific markets: Go to Partner Center → Customize → Markets → select the market → Sales → Edit Default Snapshot Template and check boxes to remove sections.
Can I change the voice-over type in the Snapshot Report?
Yes, you can customize voice-over options in the report configuration settings. Navigate to the customization options within your Snapshot Report settings to select different voice-over styles that match your brand and presentation preferences.
How do I edit the cover page of the Snapshot Report?
Edit the cover page through the banner and header customization options. Go to Partner Center → Administration → Customize → Sales → Snapshot Banner to modify headers, add custom HTML, upload banner images, and customize the overall appearance of your report's cover page.
Can I rename the Snapshot Report?
Yes, you can customize report names through the report configuration settings. This helps organize multiple reports and makes them easier to identify when managing several prospects or different report versions.
How do I edit banners in the Snapshot Report?
Access banner editing through Partner Center → Products → Snapshot Report → Settings → Custom Headers → Edit → Logo tab. From here you can replace banner images, copy image addresses for use in other materials, and manage all visual branding elements.
What image formats are supported for banner images?
Banner images support JPG, PNG, and GIF formats. The optimal size is 750 x 250 pixels. Use high-quality images that represent your brand consistently. Images that are too large may not display correctly in your Snapshot Reports.
Can I use different templates for different markets?
Yes, you can configure different templates for specific markets through the Partner Center → Customize → Markets section. This allows you to tailor messaging, sections, and branding for different geographic regions or client types.
How do I add custom CSS to my Snapshot Reports?
When adding custom HTML through the source code editor, use in-line or scoped CSS styles. Avoid external stylesheets as they may not load properly. Test your custom CSS thoroughly across different devices and browsers before implementing.
Why does the Need Assistance? section show a salesperson instead of my default contact?
By default, the Need Assistance? section shows the assigned salesperson's contact information. If a salesperson is assigned to the prospect's account, their details override the default contact you set in Administration → Customize → Sales → Edit Default Snapshot Template.
Can I change the colors in my Snapshot Report header?
Yes. In the custom header HTML, find div class="call-to-action" style="background: #3FAAE0;" and replace #3FAAE0 with your preferred hex color code. Use in-line or scoped CSS, and preview your changes before saving.
Can I customize a Snapshot Report before sending it?
Yes. Open the report and click Edit Report before viewing the full report. You can change the language (English, Dutch, French, Portuguese, German), add competitors, and use the checkmarks to hide individual items or whole sections (such as Ecommerce for a business with no store). On a freshly generated report, removing a section changes the overall score. Send it through the built-in email campaign or individually with the paper-airplane icon, which has an AI-drafted message you can steer toward a focus area.
Screenshots or videos
Configuration interface
The customization interface controls report appearance and content.
Template selection
Choose from pre-built templates or create custom configurations for different use cases.
Banner management
Upload and manage banner images for professional report branding.