Connect your domain and email
Outcomes
What your domain unlocks
Connecting your email domain once means every email the platform sends arrives from your business, with your name in the sender line. A Snapshot Report to a prospect, an order waiting for a client's approval, a welcome email to a new Business App user, a marketing campaign: all of it follows the same rule.
Before you connect, platform email sends from a shared grey-label domain. Connecting your own puts your name in the sender line, which is what mail providers reward and what your clients recognize. A Snapshot Report that reaches the inbox starts a conversation. The same report in a spam folder does not. This is also the setup task with the widest reach, because nearly everything you do in the platform produces email at some point. An authenticated domain, a complete business address, and the CAN-SPAM basics on every campaign are the three legs of deliverability, and this step sets up the first two.
One requirement before you start: your sending address has to live on a domain you own, such as hello@yourbusiness.com. Addresses from free providers like Gmail or Yahoo cannot be authenticated, because authentication records can only be added to a domain you control. If you do not own one yet, your own Marketplace sells domains.
Choose who your email comes from
Two decisions come first, and both are about what your recipient sees. The sender name is the name that shows in their inbox: who the email is from. The reply address is where their message goes when they hit reply. After that, the page generates the records that connect your domain, which is the next section.
Three cards stack on this one page: Sender and reply settings, Advanced email settings, and Email domains. Work down them in order, and note that the first two cards each have their own Save.
One scope note the page states plainly: these settings drive Campaigns and other integrated services. Emails sent through Conversations are not affected by them.
Labset the sender, then start the domain
Go to Marketing → Email settings.
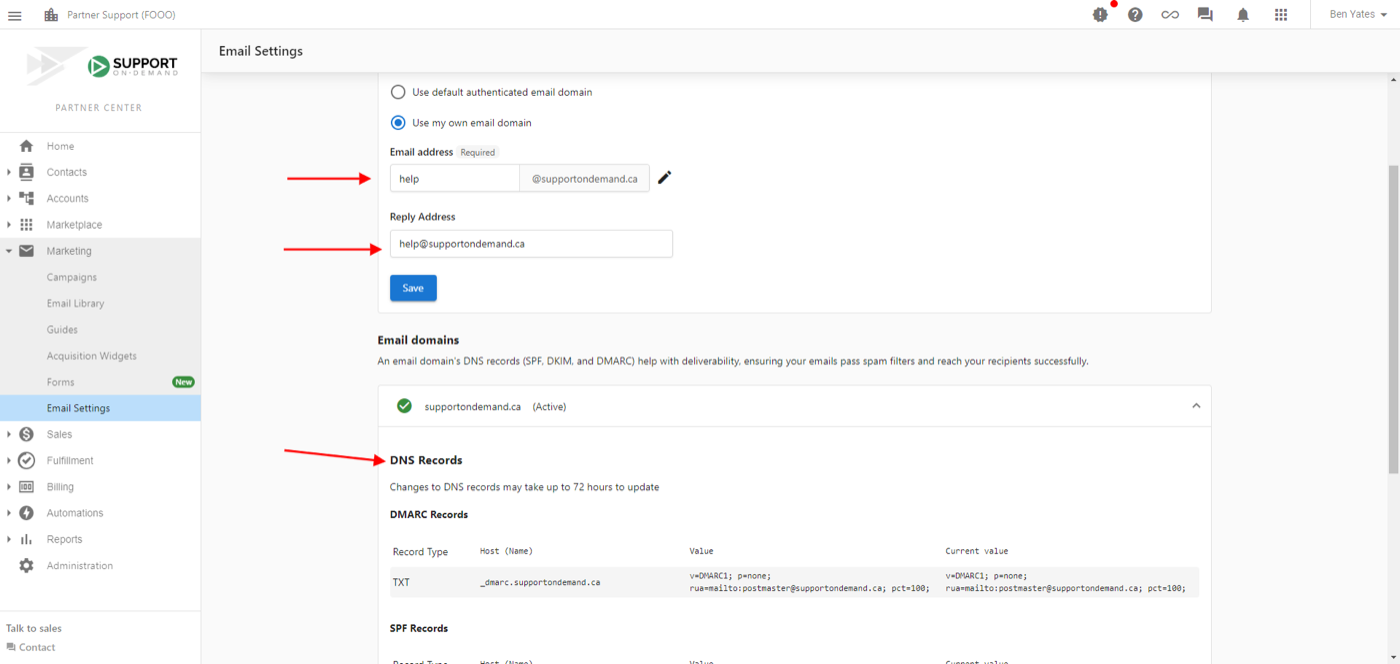
When a salesperson is assigned to an account, the platform uses that salesperson's name and email instead, so prospects always hear from the person they already know.
Add the records at your DNS host
Your DNS host is wherever your domain is managed: GoDaddy, Cloudflare, Namecheap, Google Workspace, or whoever you bought it from. DNS records are the lines that tell the rest of the internet what your domain is connected to. The ones in this section let the platform send email as your domain, so a message it sends carries your name. They do not change your own inbox, and they do not change how you send email day to day.
Start in your own Marketplace rather than going outside for it. Marketplace → Discover Products carries GoDaddy Domains and a general Domains product, and Google Workspace, which is where a lot of businesses buy their branded email in the first place. Buying through the Marketplace means the same products are yours to resell to clients who turn up without a domain either.
The platform generates four records: one DMARC and one SPF as TXT records, and two DKIM records as CNAMEs. Receiving mail servers check them on every incoming message to confirm that email from your domain is legitimate, and until they are in place at your DNS host, nothing changes.
Labcopy the four records across
Go to the service that hosts your DNS: Google Workspace, GoDaddy, Cloudflare, Namecheap, or whoever you bought the domain from.
If your DNS lives with GoDaddy or Namecheap, these guides walk through the exact screens.
Confirm it verified, then switch over
DNS changes do not take effect the moment you save them. The page says so itself: changes to DNS records may take up to 72 hours to update. Most records validate within minutes. Some take closer to 48 or 72 hours, and that is normal. Selecting the domain as your sending address is what actually moves your email across.
Labcheck the marks, then choose your domain
Go back to Marketing → Email settings.
For a walkthrough of each validation, this guide covers updating email settings.
The address on every email you send
One more field completes the compliance picture. Commercial email must include your physical mailing address, and the platform prints it in the footer of what you send. It is usually filled in when your account is created, so this is a check rather than a task.
It lives at Administration → Customize → Partner Defaults, on the Partner defaults tab, inside the Email Settings accordion, under Required contact information for campaigns: address, city, country, state or province, and postal code. The page opens with every section collapsed, so expand the accordion to see it.
Every user who sends email from the platform needs a verified email address. Yours verifies during signup, and as you add teammates, the verification guide covers theirs. The requirements guide lists the full set.
Knowledge Check
Three quick questions on what the domain connection covers, the records themselves, and reading the validation screen.